This easy origami envelope is a simple, no-fuss paper project made using just one square sheet of paper.
It's perfect for notes, money, or gift cards, and works beautifully for birthdays, weddings, Valentine's Day, and Christmas.
If you've ever wanted to learn how to fold an envelope that feels personal and handmade without needing glue or scissors, this is a great place to start.

Jump to:
An easy origami envelope is one of those paper projects that's endlessly useful.
With just a single square sheet of paper, you can fold a neat, functional envelope that feels far more personal than anything store-bought.
Whether you're slipping in a handwritten note, a gift card, or a bit of cash, learning how to fold your own envelope adds a thoughtful touch that people genuinely notice.
What makes this easy origami envelope especially appealing is how accessible it is.
There's no cutting, no glue, and no special tools - just paper and a few well-placed folds.
That makes it ideal if you want something quick and meaningful, or if you're crafting at the last minute.
Once you've folded one, the process feels intuitive, and it's easy to make a small stack in different colours or patterns.
This easy origami envelope works for so many occasions.
It's perfect for birthdays when a card feels too big, weddings when you want a clean, elegant way to give money, or holidays like Valentine's Day and Christmas where presentation matters.
Changing the paper completely changes the mood - soft neutrals feel classic, bold colours feel celebratory, and patterned paper adds personality. Once you know how to fold the basic shape, you can easily adapt it to suit the moment.
Beyond gifting, these envelopes are surprisingly handy for everyday use.
They're great for storing notes, organising small papers, or even keeping receipts together in a bag.
Folding something useful from a plain sheet of paper is quietly satisfying, and it's one of those projects you'll come back to again and again because it just works.

Why You'll Love This Pattern
- It's one of those folds you'll actually use, not just admire once and put away.
- You only need a square sheet of paper - perfect for quick, last-minute crafting.
- The envelope feels thoughtful and intentional in a way store-bought ones don't.
- It adapts easily to different occasions just by changing the paper.
- Once you know how to fold it, you'll find yourself making extras "just in case."
Skill Level
★☆☆☆☆ - Beginner
Materials Needed
- 1 x sheet of square origami paper or lightweight card stock
6 inch x 6 inch (15 cm x 15 cm) square paper is ideal for a small envelope. If you want a larger envelope, you could use 8 inch x 8 inch (20 cm x 20 cm) paper.
Instructions
Step 1: Start with the color you want your envelope to be facing down. Arrange your paper to sit like a diamond shape.
Step 2: Fold the bottom point up to meet the top point.
Step 3: Unfold previous step.
Step 4: Fold the left point to meet the right point.
Step 5: Unfold previous step.
Step 6: Fold the bottom point up to meet the middle.

Step 7: Unfold previous step.
Step 8: Fold the bottom point up again, but this time to meet the nearest horizontal crease (the one you made in step 6).
Step 9: Fold the bottom edge up to meet the middle crease.
Step 10: Fold both the left and right points in to meet the middle.
Step 11: Unfold previous step.
Step 12: Fold both the left and right points in once again, but this time to meet their nearest vertical creases (the ones you made in step 10).

You're almost there!
To unlock the final steps and complete your pattern, create a free account with Grow.me. below.
Make sure you tick the box to subscribe to our newsletter and stay up to date with the latest patterns, tips, and more!
Once you're signed up, you'll get instant access to finish your project and enjoy exclusive content in the future.
Already signed up? Hit the button below and select 'Switch to Log In' to pick up where you left off and finish your project!
Step 13: Fold the left and right edges in along the nearest creases (once again, the ones you made in step 10).
Step 14: Fold the top point down along the line shown, and tuck the point into the bottom pocket.
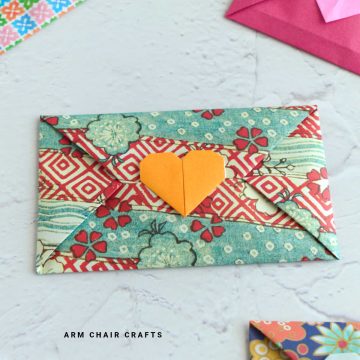
Step 15: Completed envelope.

Tips For Success
- If you're adding heavier items like coins or thick gift cards, slightly thicker paper helps.
- The second envelope always feels easier than the first - don't overthink it.

Color, Paper Ideas, and Variations
- Plain white or kraft paper keeps things simple and elegant for weddings or formal notes.
- Bright colours work well for birthdays and celebrations.
- Patterned scrapbook paper adds personality for holidays like Christmas or Valentine's Day.
- Metallic or pearlescent paper gives the envelope a polished, gift-ready look.
- Fold smaller envelopes for notes and larger ones for money or gift cards.
- Mix and match papers to create a coordinated set for multiple gifts.
- Use seasonal paper to make holiday envelopes without extra decoration.
- Once comfortable with how to fold it, experiment with different square sizes.
Perfect Occasions to Use This Craft
- Birthdays when gifting money or a small card.
- Weddings, anniversaries, and formal events.
- Valentine's Day notes and love letters.
- Christmas gifting or holiday cards.
- Everyday notes, reminders, or small keepsakes.
FAQ
No, the folds are designed to hold the envelope closed on their own.
Any square paper works - standard origami paper is ideal, but scrapbook paper is great too.
Yes, it works well for both, especially when folded neatly with slightly thicker paper (like lightweight cardstock).
Definitely. This easy origami envelope is simple, forgiving, and a great way to learn how to fold basic shapes.
Other Easy Crafts You Might Like To Try:
Stay Connected
Made this pattern? Let us know how it went in the comments below!
Pin this post - Pin now to take your paper crafting skills to the next level.
Share on Instagram or Facebook - Capture the beauty of your finished paper craft project and share it on Instagram or Facebook! Tag us @armchaircrafts so we can see your work!