Looking for a simple, creative way to package small gifts or treats?
These easy mini paper self-closing DIY gift bags are perfect for any occasion.
With just paper, folding, and a few quick steps, you can create charming, functional gift bags that hold candies, jewelry, or little keepsakes.
Ideal for beginners, these self-closing bags are fast to make, customizable with your favorite colors or patterns, and perfect for holidays, parties, or handmade gifts.
Learn how to fold these mini bags and add a special touch to every present.
Jump to:
Mini paper self-closing gift bags are a practical and adorable way to present small gifts.
Using just paper and simple folding, you can create DIY bags that close on their own without tape or glue.
This project is beginner-friendly, teaching you how to fold paper into a neat, self-closing design.
Even if you've never made gift bags before, the process is approachable and satisfying.
You can decorate them with colors, patterns, or stickers, making each bag unique and personalized for the recipient.
Folding these mini gift bags is a fun way to try a little origami without it feeling complicated.
Once you learn how to fold the paper just right, the bag practically closes itself, making a simple yet satisfying craft.
Even beginners will enjoy seeing plain paper turn into a neat, cute little gift bag.
Why You'll Love This Pattern
- Folding these tiny bags is oddly satisfying and surprisingly quick.
- They close all on their own, so you don't need tape or glue.
- You can make a bunch in different colors, perfect for gifts, parties, or just a little creative fun.
- Decorating them is part of the enjoyment-stickers, patterns, or doodles make each one unique.
- Even if you've never done origami before, these are easy enough to try and rewarding to finish.
Skill Level
★☆☆☆☆ - Beginner-friendly
Materials Needed
- 1 x sheet of square origami paper, e.g. 6 inches x 6 inches (15 cm x 15 cm)
Below is a size guide for various gift bag options.
| Paper Size | Final Gift Bag Size | |
| Small DIY Gift Bag | 6 inch x 6 inch (15 cm x 15 cm) | 1.78 inches (4.5 cm) wide x 2 inches (5 cm) tall |
| Medium DIY Gift Bag | 8 inches x 8 inches (20 cm x 20 cm) | 2.4 inches (6 cm) wide x 2.78 inches (7 cm) tall |
| Large DIY Gift Bag | 10 inches x 10 inches (25 cm x 25 cm) | 3 inches (7.5 cm) wide x 3.5 inches (9 cm) |
Instructions
Step 1: Start with the color you want the outside of your bag to be facing down.
Step 2: Fold the bottom right corner up to meet the top left corner.
Step 3: Unfold previous step.
Step 4: Next, fold the bottom left corner up to meet the top right corner.
Step 5: Unfold previous step.
Step 6: Flip your paper over from left to right.
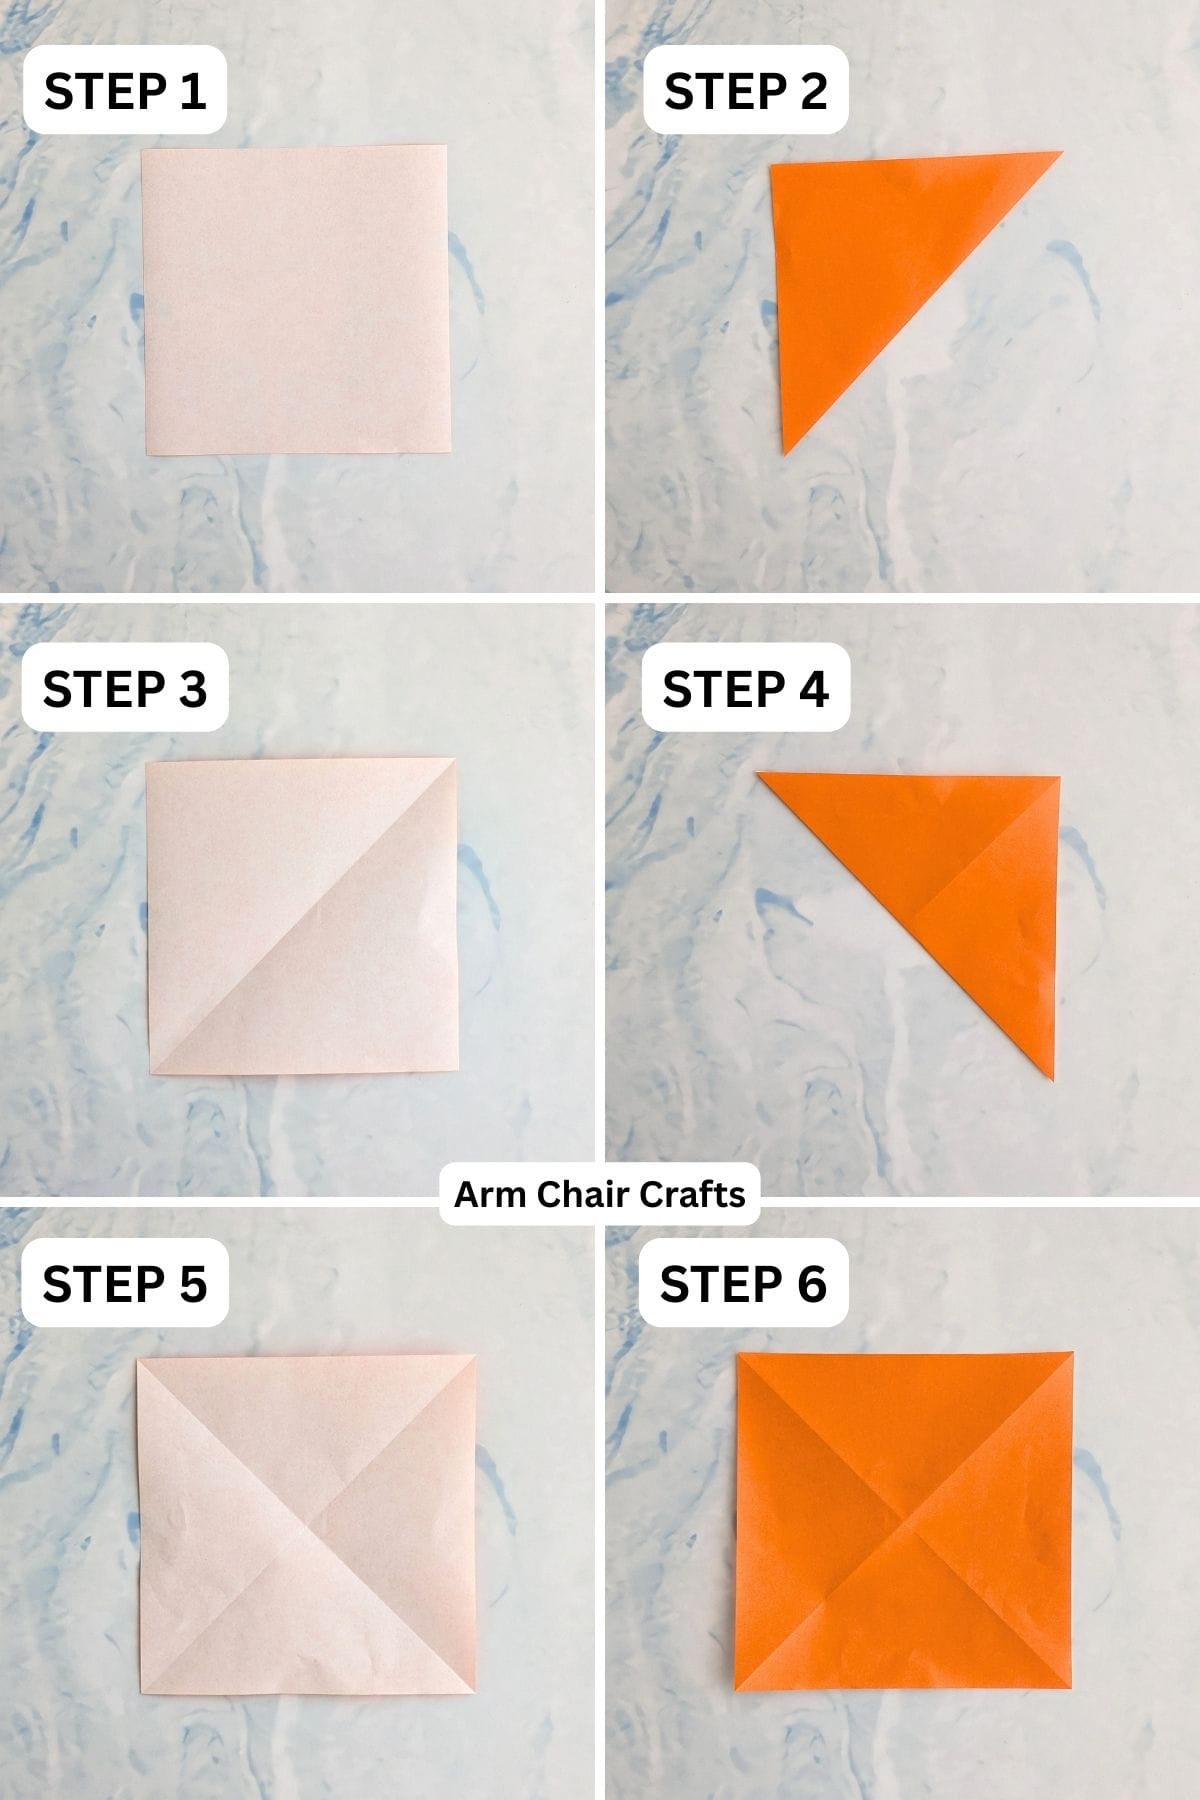
Step 7: Fold the left edge to meet the right edge.
Step 8: Unfold previous step.
Step 9: Fold the bottom edge up to meet the top edge.
Step 10: Unfold previous step.
Step 11: Flip your paper over from left to right.
Step 12: Now, hold your paper on the left and right sides as shown. Then, gently press the center of the paper where all the folds meet.
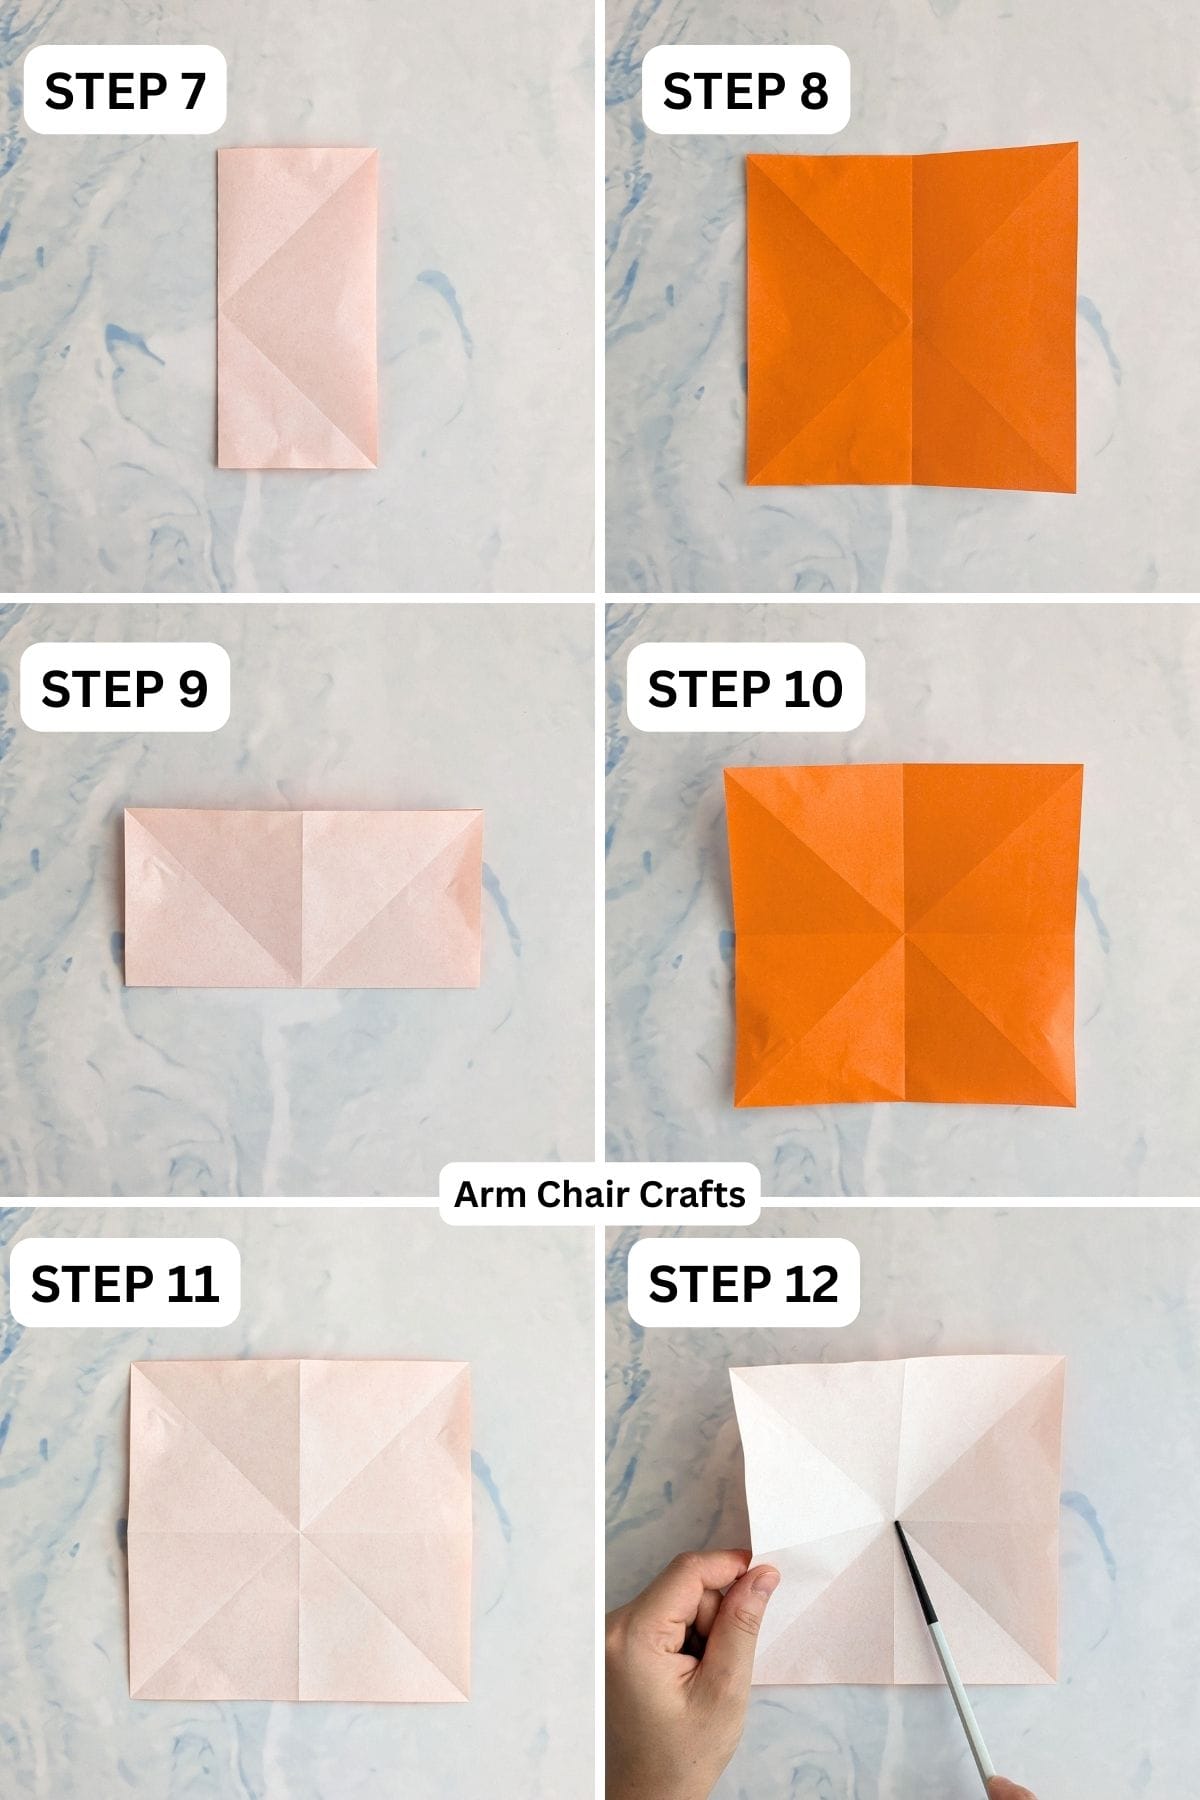
You're almost there!
To unlock the final steps and complete your pattern, create a free account with Grow.me. below.
Make sure you tick the box to subscribe to our newsletter and stay up to date with the latest patterns, tips, and more!
Once you're signed up, you'll get instant access to finish your project and enjoy exclusive content in the future.
Already signed up? Hit the button below and select 'Switch to Log In' to pick up where you left off and finish your project!
Step 13: Still holding the paper on the left and right sides, bring the left and right edges of the paper inward. The paper will start to collapse on itself. Continue to bring the edges of the paper down to meet the bottom edge. The paper will flatten to form a triangle.
Step 14: Rotate your paper so that the point of the triangle is at the bottom, as shown.
Step 15: Fold the bottom point up slightly. This will become how wide the bag is. I recommend folding it up so that the point is just below the center point of the paper.
Step 16: Fold the top left point (top layer only) towards the right, matching the edges along the bottom point you folded up in the previous step.
Step 17: Fold the same flap back towards the left, matching it's edge to it's folded edge on the left as shown.

Step 18: Repeat steps 16 and 17 for the right side (top layer only).
Step 19: Unfold the bottom point you folded up in step 15.
Step 20: Flip your paper over from left to right, refold the bottom point up (along the existing crease line) and repeat steps 16 to 18.
Step 21: Now, you will need to open out your bag. First, once again unfold the bottom point you folded up. Then, begin to carefully open out your bag, flattening the bottom of the bag. Re crease along any edges as needed.
Step 22: Fold all 4 upper points into the bag.
Step 23: Unfold 2 of the upper points on the same side of the bag.
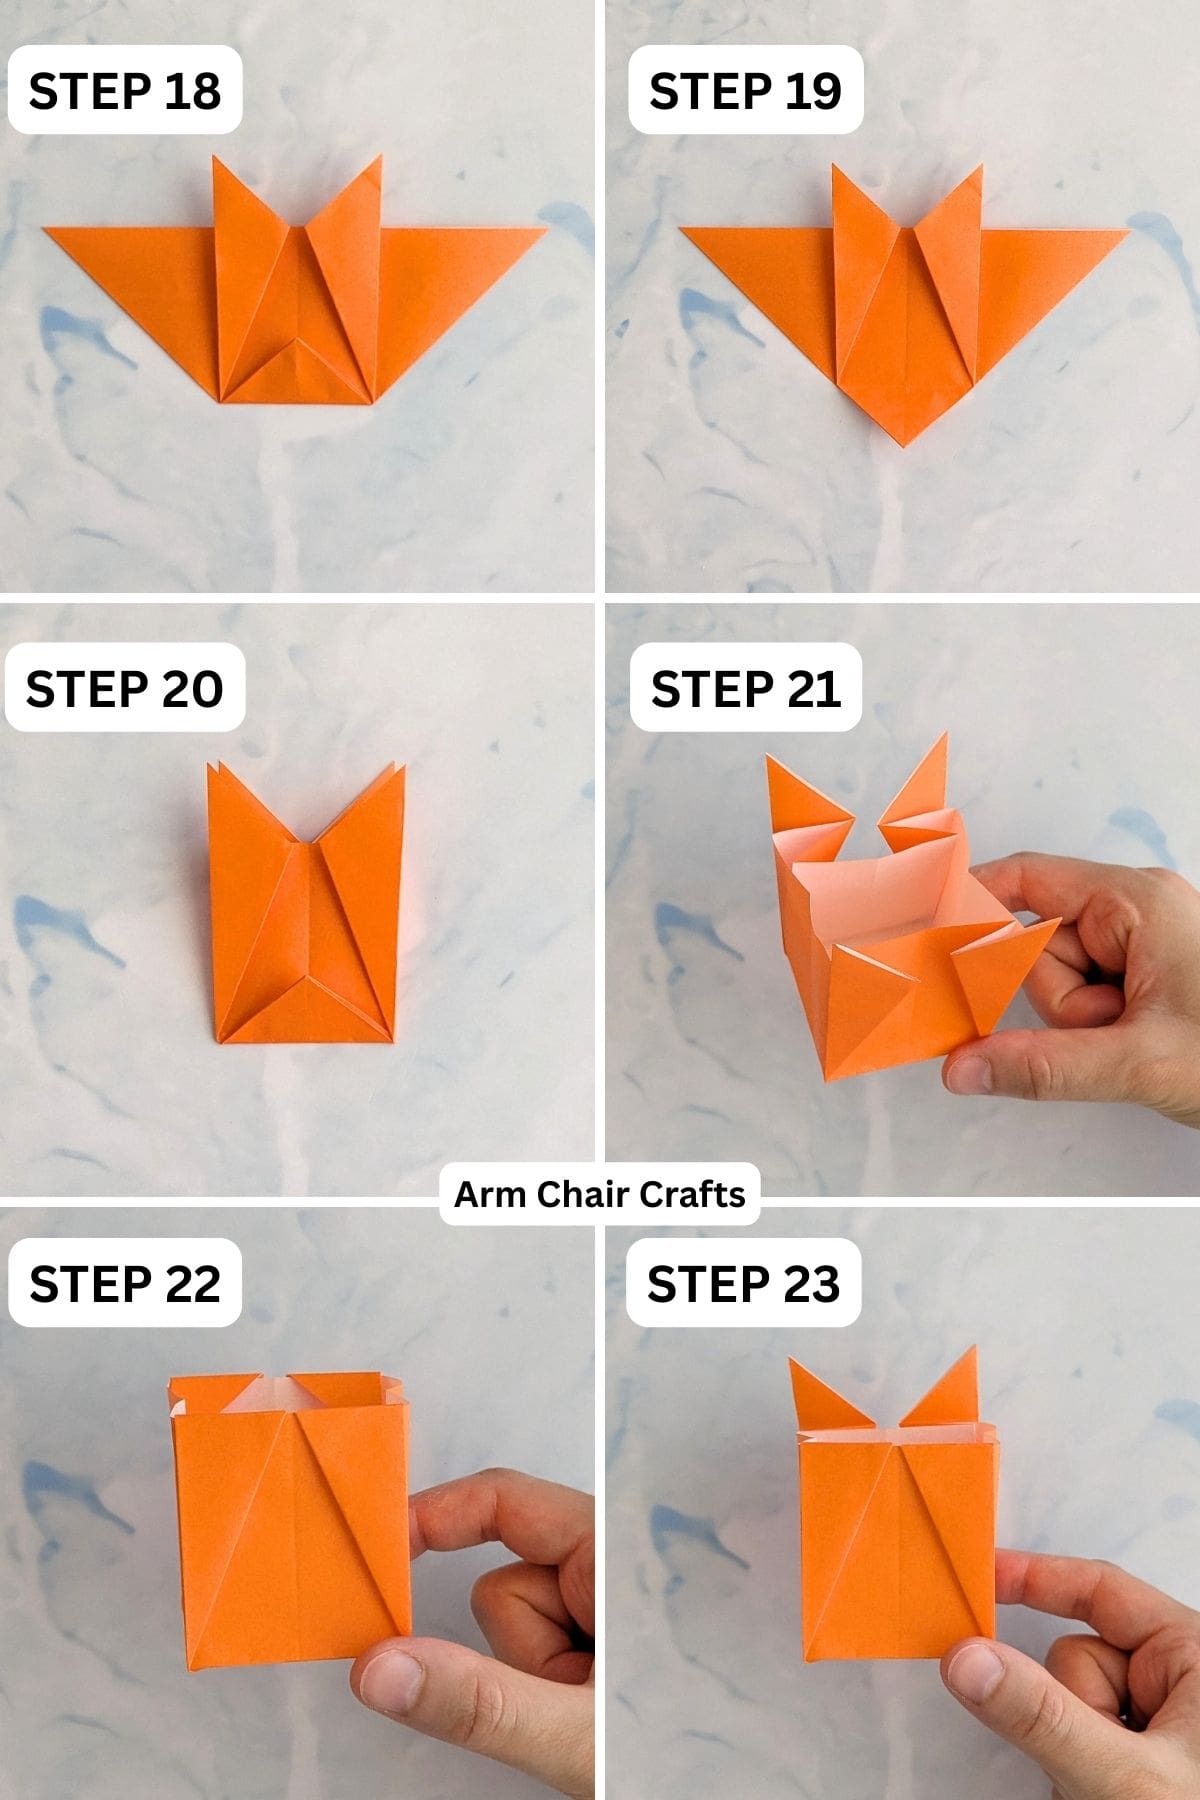
Step 24: Pinch the sides of the bag together to close it. The sides of the bag should collapse inside slightly. Re crease along these edges to give your bag a nicer finish.
Step 25: To lock your bag in place so that it doesn't open, insert the 2 upper points (that you unfolded in step 23) into the opposite side of the bag (where you folded the other 2 upper points into the bag).
This can be a little tricky at first if you've never done it before, so be careful not to squash your bag as you close it. Be gentle.
It can help to first insert one of the upper points and then the other instead of trying to do both at the same time.
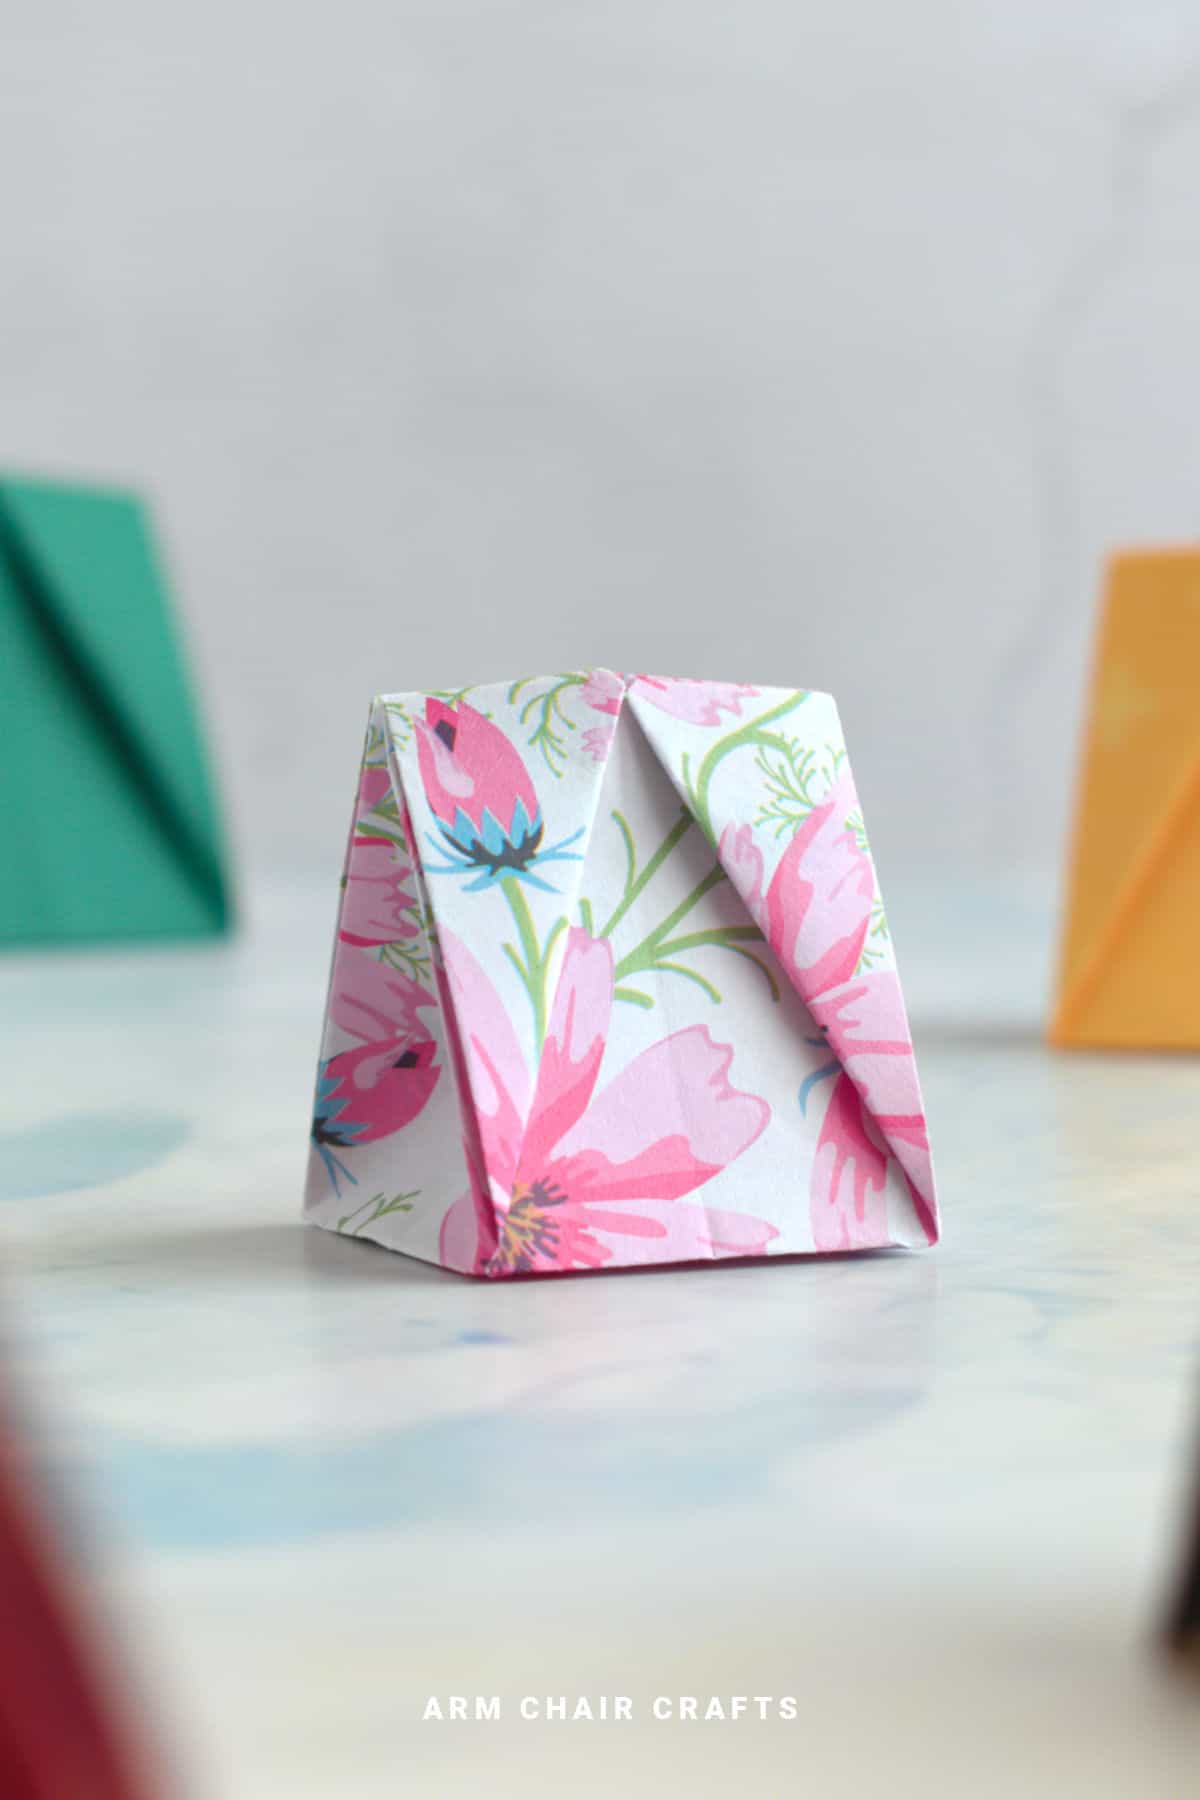
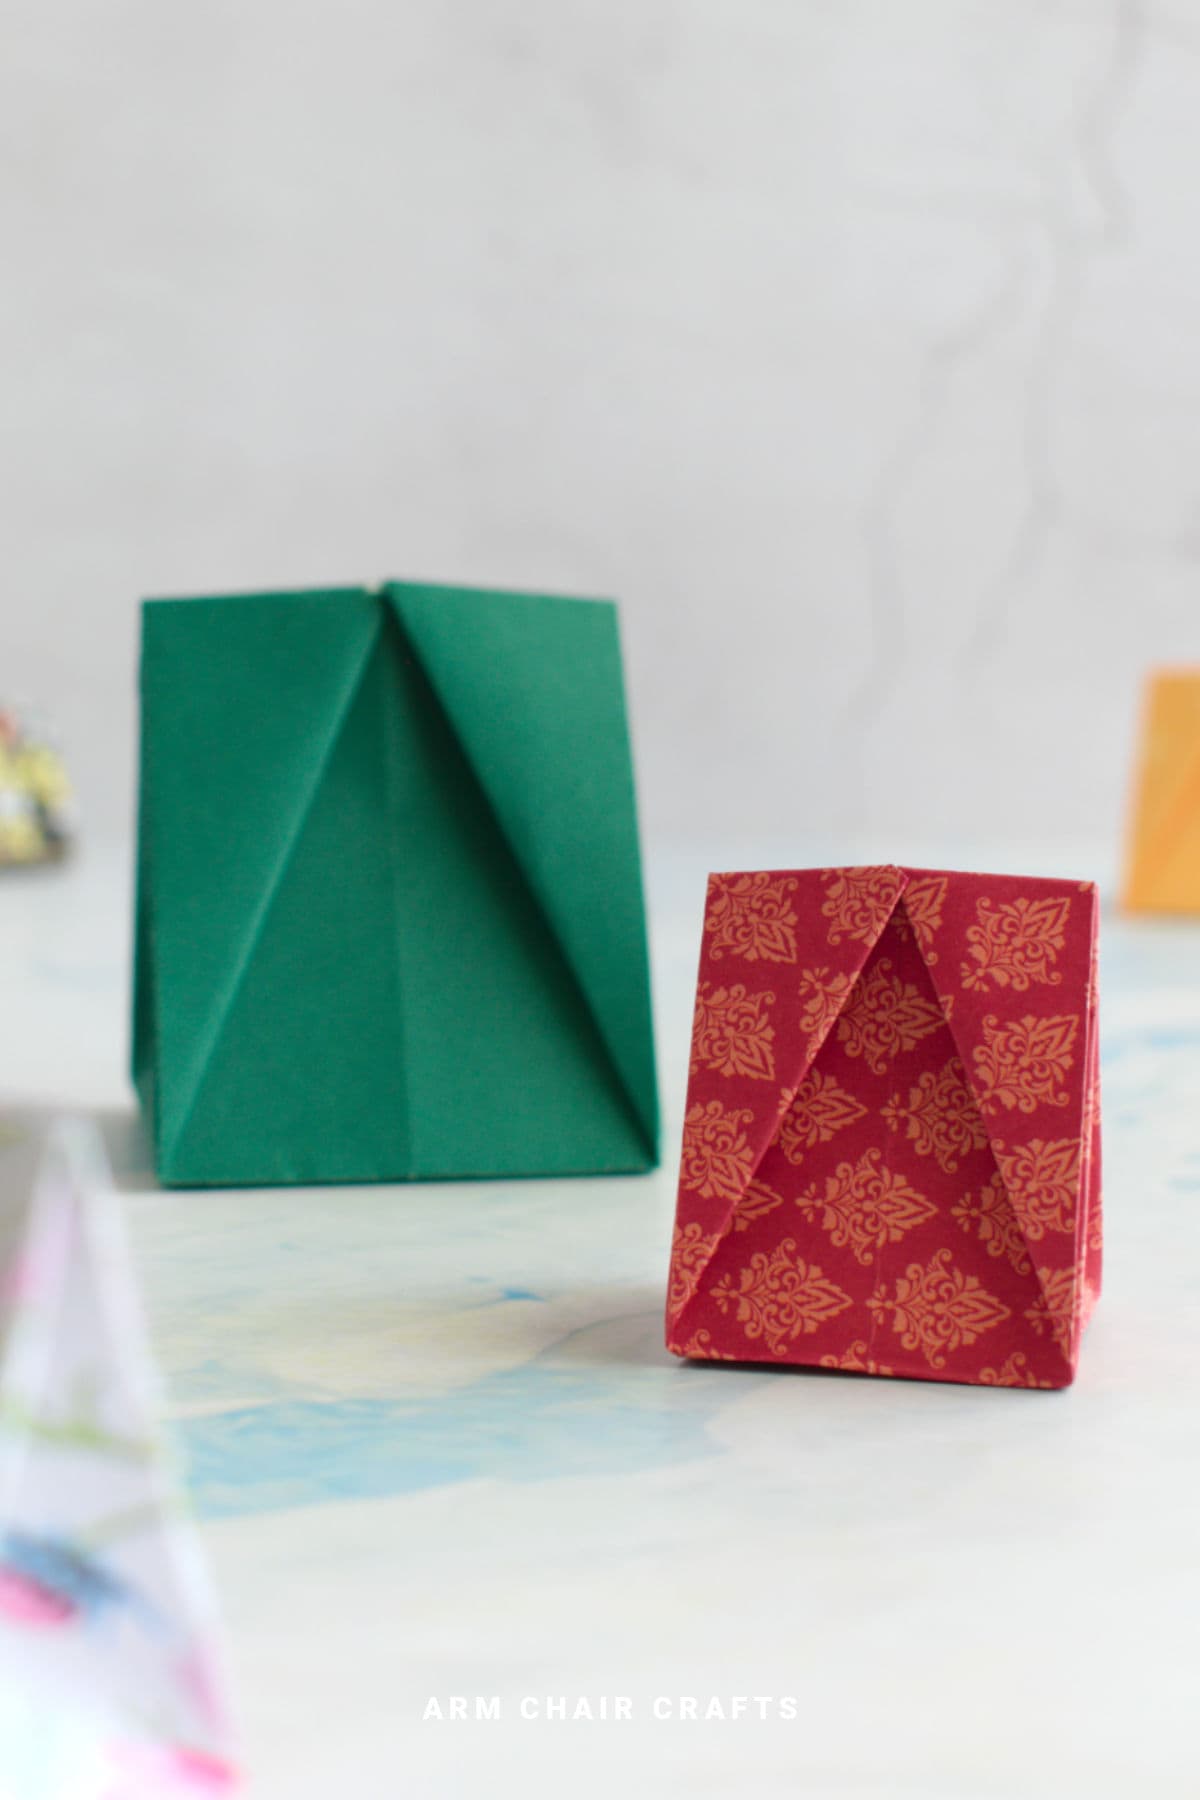
Step 26: Completed self closing DIY gift bag.

Tips For Success
- Use medium-weight paper for sturdier bags that hold small items.
- Pre-crease folds lightly for crisp edges and self-closing functionality.
- Decorate with stickers, markers, or patterned paper for a cute origami effect.
- Make several at once for parties, holidays, or gift sets.
- Experiment with different sizes to hold candies, jewelry, or small treats.
- Yes, we know these look cute already and are self closing, but they look even cuter if you add a mini wooden peg on top!
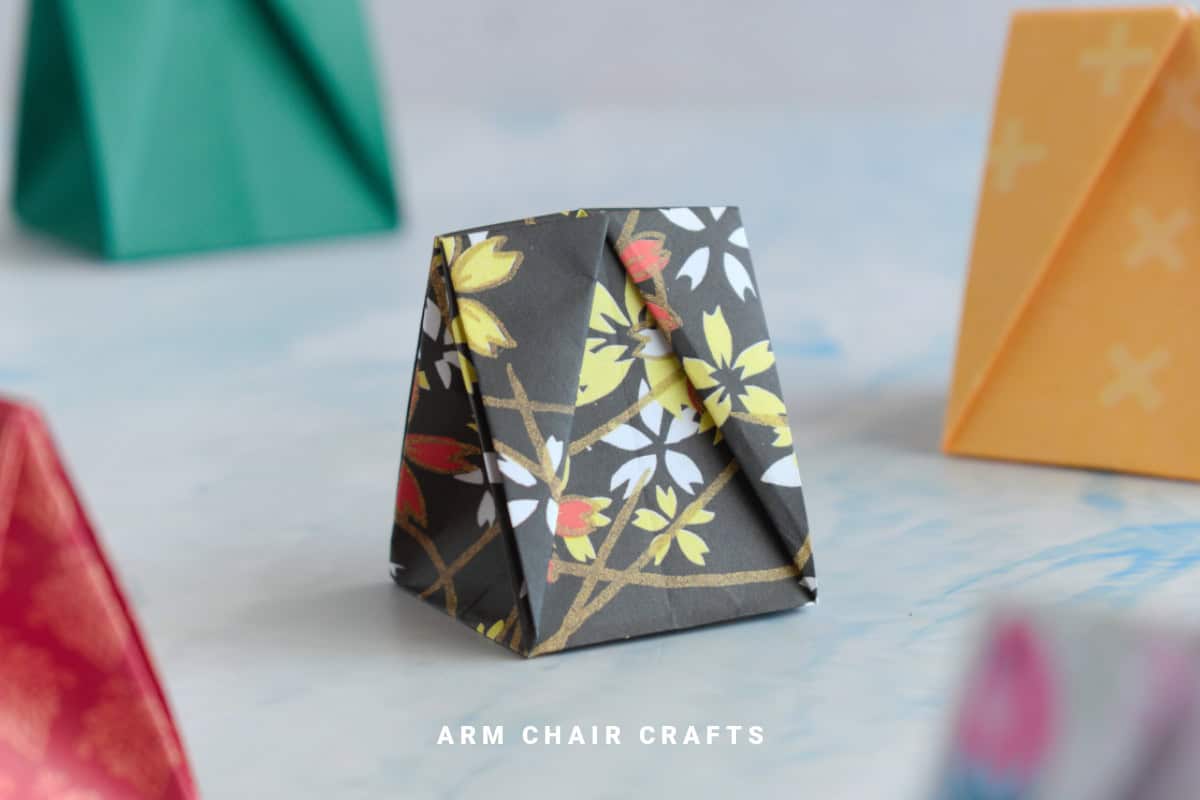
Color, Paper Ideas, and Variations
- Bright primary colors for party favors or school events
- Pastel shades for Mother's Day, baby showers, or Easter
- Metallic or glitter cardstock for a beautiful, festive look
- Patterned scrap paper for a playful, fun design
- Mix and match sizes and patterns for layered gift sets
Perfect Occasions to Use This Craft
- These mini gift bags make charming Valentine's Day favors for friends or classmates.
- They are perfect for Mother's Day, holding small treats or tokens of appreciation.
- Create festive versions for Christmas to present candies, small gifts, or stocking stuffers.
- Use them as birthday favors or party giveaways for children or teens.
- Ideal for classroom or craft group projects, teaching folding and creativity skills.
How To Use This Craft
- Use these self-closing DIY gift bags to hold candies, chocolates, or small trinkets, making gifts extra special.
- They are great for jewelry or tiny keepsake packaging, adding a personal handmade touch.
- Perfect for gifting friends, family, or classmates as thoughtful, creative presents.
- Make multiple bags for parties, holidays, or gift sets, combining different colors and patterns.
- They can serve as decorative accents for desks, tables, or gift displays.
FAQ
Yes! The design is beginner-friendly and uses simple folds to create bags that close without tape or glue.
Medium-weight paper or origami paper works best. Very thin paper may tear, and very heavy cardstock may be difficult to fold (especially if you are making a small gift bag).
Yes! Proper folding ensures the bags stay closed and hold lightweight items like candies, jewelry, or small gifts.
Absolutely. Add colors, patterns, stickers, or small embellishments, but avoid heavy decorations that may interfere with the self-closing mechanism.
Yes. Folding multiple bags at once is easy and perfect for parties, holidays, or classroom activities.
Stay Connected
Made this pattern? Let us know how it went in the comments below!
Pin this post - Pin now to take your paper crafting skills to the next level.
Share on Instagram or Facebook - Capture the beauty of your finished project and share it on Instagram or Facebook! Tag us @armchaircrafts so we can see your work!