There's something special about giving a note tucked into a handmade envelope.
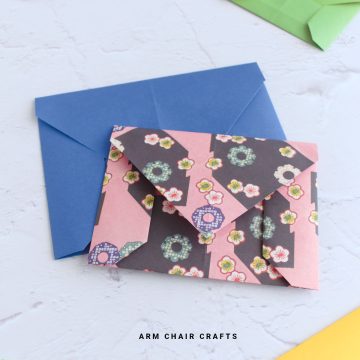
This origami envelope with heart uses two sheets of paper - one for the envelope, one for the heart that slips over the flap - to create a thoughtful, handmade touch.
With no glue or scissors needed, it's perfect for Valentine's Day, weddings, birthdays, or just leaving a sweet message for someone you care about.

Jump to:
Giving a simple note feels different when it comes with a handmade envelope, and the origami envelope with heart is all about that feeling.
Made with two sheets of paper, it combines a neat, functional envelope with a heart that slides over the flap as a charming closure.
The heart isn't just decorative - it's a little gesture that shows someone you cared enough to fold it yourself.
Learning how to fold it is surprisingly calming, and the finished envelope has a quiet sense of ceremony that store-bought ones can't match.
This project is perfect for occasions when you want to show thoughtfulness, from Valentine's Day love notes to wedding well-wishes or birthday surprises.
You can pick colours to suit the mood - soft pastels for tenderness, bold reds for romance, patterned paper for personality.
Because the heart slips on and off, the envelope stays reusable, adding a practical touch to a heartfelt gesture.
Once you've folded a few, you'll notice something magical: the act of folding slowly, carefully, and intentionally becomes part of the gift itself.
Each crease is a tiny, meditative moment, and the end result is a simple yet thoughtful envelope that communicates care in a way words sometimes can't.

Why You'll Love This Pattern
- It turns a simple note into a gift that feels personal.
- Using two sheets of paper lets you play with colours and contrast.
- The heart closure is both functional and thoughtful.
- No glue or scissors needed - just fold, slip, and give.
Skill Level
★☆☆☆☆ - Beginner
Materials Needed
- 2 x sheets of square origami paper or lightweight card stock (one for the envelope and a smaller one for the heart).
6 inch x 6 inch (15 cm x 15 cm) square paper is ideal for a small envelope.
If you want a larger envelope, you could use 8 inch x 8 inch (20 cm x 20 cm) paper.
The ideal paper size for the heart is 3 inches x 3 inches (7.5 cm x 7.5 cm). But, you can experiment with different size paper to suit your envelope.
Instructions
Making The Envelope
Let's start with making your envelope.
Using your largest sheet of square paper.
Step 1: Start with the color you want on the outside of your envelope facing down. The color facing up will be on the inside.
Step 2: Fold the top edge down to meet the bottom edge.
Step 3: Unfold previous step.
Step 4: Fold both the top and bottom edges to meet the middle crease (you made in step 2).
Step 5: Unfold previous step.
Step 6: Next, fold the bottom edge up, but this time to meet its nearest crease.

Step 7: Now, fold the bottom edge up once again, but this time to meet the middle crease (the one you made in step 2).
Step 8: Fold the top edge down so that it meets the 1st crease from the bottom.
Step 9: Unfold previous step.
Step 10: Fold both the bottom left and bottom right corners up on a diagonal to meet the top of the bottom flap as shown.
Step 11: Now, fold both the left and right edges in along the edges of the triangles you made in the previous step.

Step 12: Fold the top left and right corners down on a diagonal to meet the middle (the edges should line up with the 2nd crease from the top).
Step 13: Now, fold the top point down and then tuck it inside the bottom. This completes your envelope. Now, let's make the heart.

You're almost there!
To unlock the final steps and complete your pattern, create a free account with Grow.me. below.
Make sure you tick the box to subscribe to our newsletter and stay up to date with the latest patterns, tips, and more!
Once you're signed up, you'll get instant access to finish your project and enjoy exclusive content in the future.
Already signed up? Hit the button below and select 'Switch to Log In' to pick up where you left off and finish your project!
Making The Heart
Using your smaller square sheet of paper.
Step 1: Start with the color you want your heart to be facing down.
Step 2: Fold the right edge to meet the left edge. Then, unfold.
Step 3: Fold the top edge to down to meet the bottom edge. Unfold. Your paper will now be divided into quarters.
Step 4: Fold the bottom edge up to meet the middle crease.
Step 5: Flip your paper over from left to right. Keeping the fold you just made at the bottom.
Step 6: Fold both the bottom left and bottom right corners up on a diagonal to meet the middle crease.

Step 7: Flip your paper over from left to right, keeping the point at the bottom.
Step 8: Fold the bottom point up to meet the top edge.
Step 9: Flip your paper over from left to right.
Step 10: Open out the 2 small rectangles found in the middle of the bottom edge of the paper. Squash fold the small rectangles down, so they sit flat.

Step 11: Fold the bottom left and right corners inwards diagonally.
Step 12: Fold the bottom points up a little. Keep them as symmetrical as possible. These are the points of your heart.
Step 13: Fold the left edge and right edges in to meet the middle.
Step 14: Flip your paper over. Completed origami heart.
Slip the back of your paper heart onto the seal of your paper envelope.


Color, Paper Ideas, and Variations
- Contrasting colours for envelope and heart make the closure pop.
- Soft pastels create a delicate, romantic look.
- Patterned paper for the heart adds whimsy while keeping the envelope simple.
- Metallic or pearlescent paper makes it feel extra special for celebrations.
- Make a matching set of envelopes with hearts in different colours.
- Experiment with mini envelopes for tiny notes or larger ones for gift cards.
- Try seasonal paper for holidays or events.
- Once you know how to fold it, mix textures and colours for a playful stack of envelopes.
Perfect Occasions to Use This Craft
- Valentine's Day notes or love letters.
- Wedding, anniversary, or engagement messages.
- Birthday greetings or thank-you notes.
- Christmas, holiday cards, or festive messages.
- Everyday small gestures to show someone you care.
FAQ
No, this project is entirely fold-based.
Absolutely. The heart slides off easily, so you can refill it with new notes.
Yes. The folds are simple and forgiving, making it a perfect project for anyone.
Other Easy Crafts You Might Like To Try:
Stay Connected
Made this pattern? Let us know how it went in the comments below!
Pin this post - Pin now to take your paper crafting skills to the next level.
Share on Instagram or Facebook - Capture the beauty of your finished paper craft project and share it on Instagram or Facebook! Tag us @armchaircrafts so we can see your work!