Keep small items neat and organized with this easy origami envelope pouch.
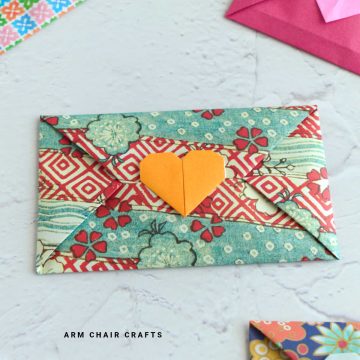
Using just two sheets of paper, you can fold a flat, envelope-like pouch with a removable top that slips on like a lid-no glue or scissors required.
Learning how to fold this simple design is fun, beginner-friendly, and a great way to practice basic origami skills.
Perfect for holding small stationery, gift cards, or little keepsakes, this project is both practical and decorative.
With a few folds, you can create a polished, functional pouch that's ideal for gifting or everyday use.

Jump to:
This easy origami envelope pouch is a clever and practical paper craft that combines simplicity with functionality.
Using two sheets of paper, you can fold a flat, envelope-style pouch with a removable lid that slips on easily, no glue or scissors needed.
Learning how to fold this pouch is approachable for beginners while still giving a satisfying, polished result.
You can customize the papers for colors, patterns, or seasonal themes, making the pouch a thoughtful way to present gifts, store stationery, or create little keepsakes.
The easy origami envelope pouch is simple, versatile, and fun, giving you a finished piece that's both decorative and functional.

Why You'll Love This Pattern
- Creates a practical, flat envelope-style pouch with a removable top.
- Simple design requiring no glue, tape, or scissors.
- Quick and beginner-friendly with easy folds.
- Great for gifting small items or storing stationery.
- Encourages creativity with paper color, pattern, and personalization.
- Lightweight, portable, and easy to make multiple pouches.
Skill Level
★☆☆☆☆ - beginner
Materials Needed
- 2 x sheets of square paper (e.g. origami paper or lightweight cardstock). See below for example sizes
| Paper Size (you need 2 sheets) | Final Envelope Size | |
| Small DIY Envelope | 6 inches x 6 inches (15 cm x 15 cm) | 3 inches x 3 inches (7.5 cm x 7.5 cm) |
| Medium DIY Envelope | 8 inches x 8 inches (20 cm x 20 cm) | 4 inches x 4 inches (10 cm x 10 cm) |
| Large DIY Envelope | 10 inches x 10 inches (25 cm x 25 cm) | 5 inches x 5 inches (13 cm x 13 cm) |
Instructions
Making the Bottom Part
Using your 1st sheet of paper.
Step 1: Start with the color you want on the outside facing down.
Step 2: Fold the left edge to meet the right edge.
Step 3: Unfold previous step.
Step 4: Fold both the left and right edges in to meet the middle crease.
Step 5: Fold the bottom edge up so that it sits about 1 cm below the top edge.
Step 6: Fold the top edge down so that once it's creased, it is in line with the bottom edge you folded up in the previous step.

Step 7: Tuck the flap you folded down in the previous step into the bottom flap. Set aside. You will now make the top part.

You're almost there!
To unlock the final steps and complete your pattern, create a free account with Grow.me. below.
Make sure you tick the box to subscribe to our newsletter and stay up to date with the latest patterns, tips, and more!
Once you're signed up, you'll get instant access to finish your project and enjoy exclusive content in the future.
Already signed up? Hit the button below and select 'Switch to Log In' to pick up where you left off and finish your project!
Making the Top Part
Using your other sheet of paper.
Step 1: Start with the color you want on the outside facing down.
Step 2: Fold the bottom edge up to meet the top edge.
Step 3: Unfold previous step.
Step 4: Fold the bottom edge up to meet the crease you made step 2.
Step 5: Fold the left edge to meet the right edge, but only crease in the middle to leave a mark.
Step 6: Unfold previous step.

Step 7: Fold both the left and right edges in to meet the middle (using the small crease you made in step 5 as a guide), but leaving a small gap from the middle.
Step 8: Fold the bottom edge up along the line shown (tip: it's folded edge should be in line with the bottom flap you folded up in step 4).
Step 9: Fold both the top left and top right corners down on a diagonal to meet the line shown.
Step 10: Fold the top point down to meet the bottom edge.
Step 11: Tuck the flap you just folded down in the previous step into the bottom pocket. Completed top.

Step 12: Slip the top over the bottom piece you made to complete the envelope.

Tips For Success
- Use slightly thicker paper for a sturdier pouch.
- Ensure edges are aligned neatly for a clean finish.
- Crease folds sharply for a polished look.
- Add subtle decorations like stickers or colored tape for personalization.

Color, Paper Ideas, and Variations
- Contrasting or complementary colors for a two-toned effect
- Patterned or seasonal papers for festive occasions
- Metallic or foil paper for elegant gift pouches
- Use recycled paper or magazine pages for a creative twist
- Combine textures, like smooth and textured paper, for a unique look
Perfect Occasions to Use This Craft
- Present small gifts, gift cards, or money elegantly
- Use for party favors or thank-you notes
- Fun activity for crafting with kids
- Create a matching set for holidays like Christmas, Valentine's Day, or birthdays
- Practical desk organizer for small stationery items
How To Use This Craft
- Hold gift cards, small notes, or tiny keepsakes.
- Create personalized pouches for party favors.
- Use for DIY advent calendars or small holiday surprises.
- Make multiple pouches for coordinating gift sets.
- Display as part of a handmade paper craft collection.
FAQ
You can use colored paper, stickers, washi tape, or even hand-drawn designs for personalization.
Yes, standard origami paper, lightweight cardstock, craft paper, or even recycled paper works best.
No, the design works entirely with folds-no glue, tape, or scissors needed.
Stay Connected
Made this pattern? Let us know how it went in the comments below!
Pin this post - Pin now to take your paper crafting skills to the next level.
Share on Instagram or Facebook - Capture the beauty of your finished paper craft project and share it on Instagram or Facebook! Tag us @armchaircrafts so we can see your work!