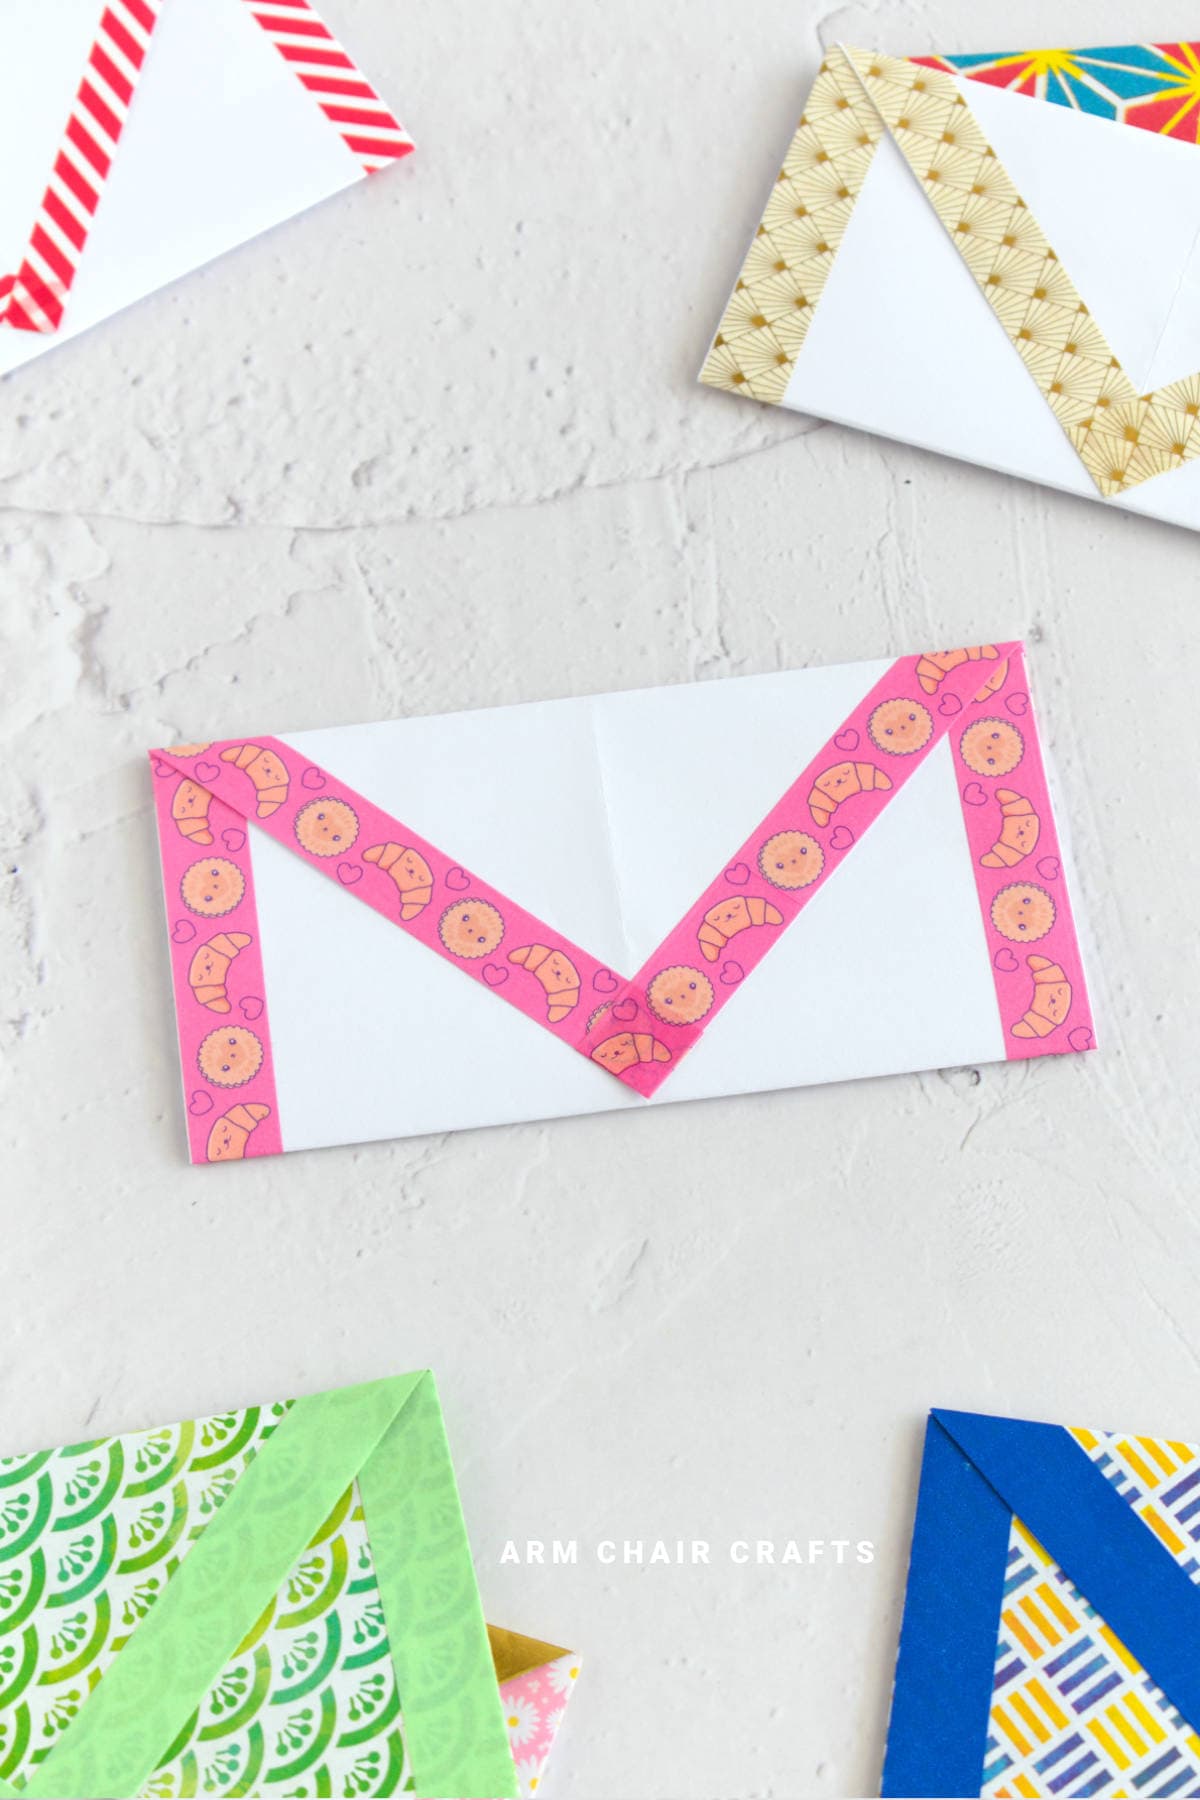
If you want a simple, handmade way to package a note, card, or small flat item, learning how to make a paper envelope is a great skill to have.
Using just a square sheet of paper, you can fold an envelope that feels personal, tidy, and surprisingly versatile.
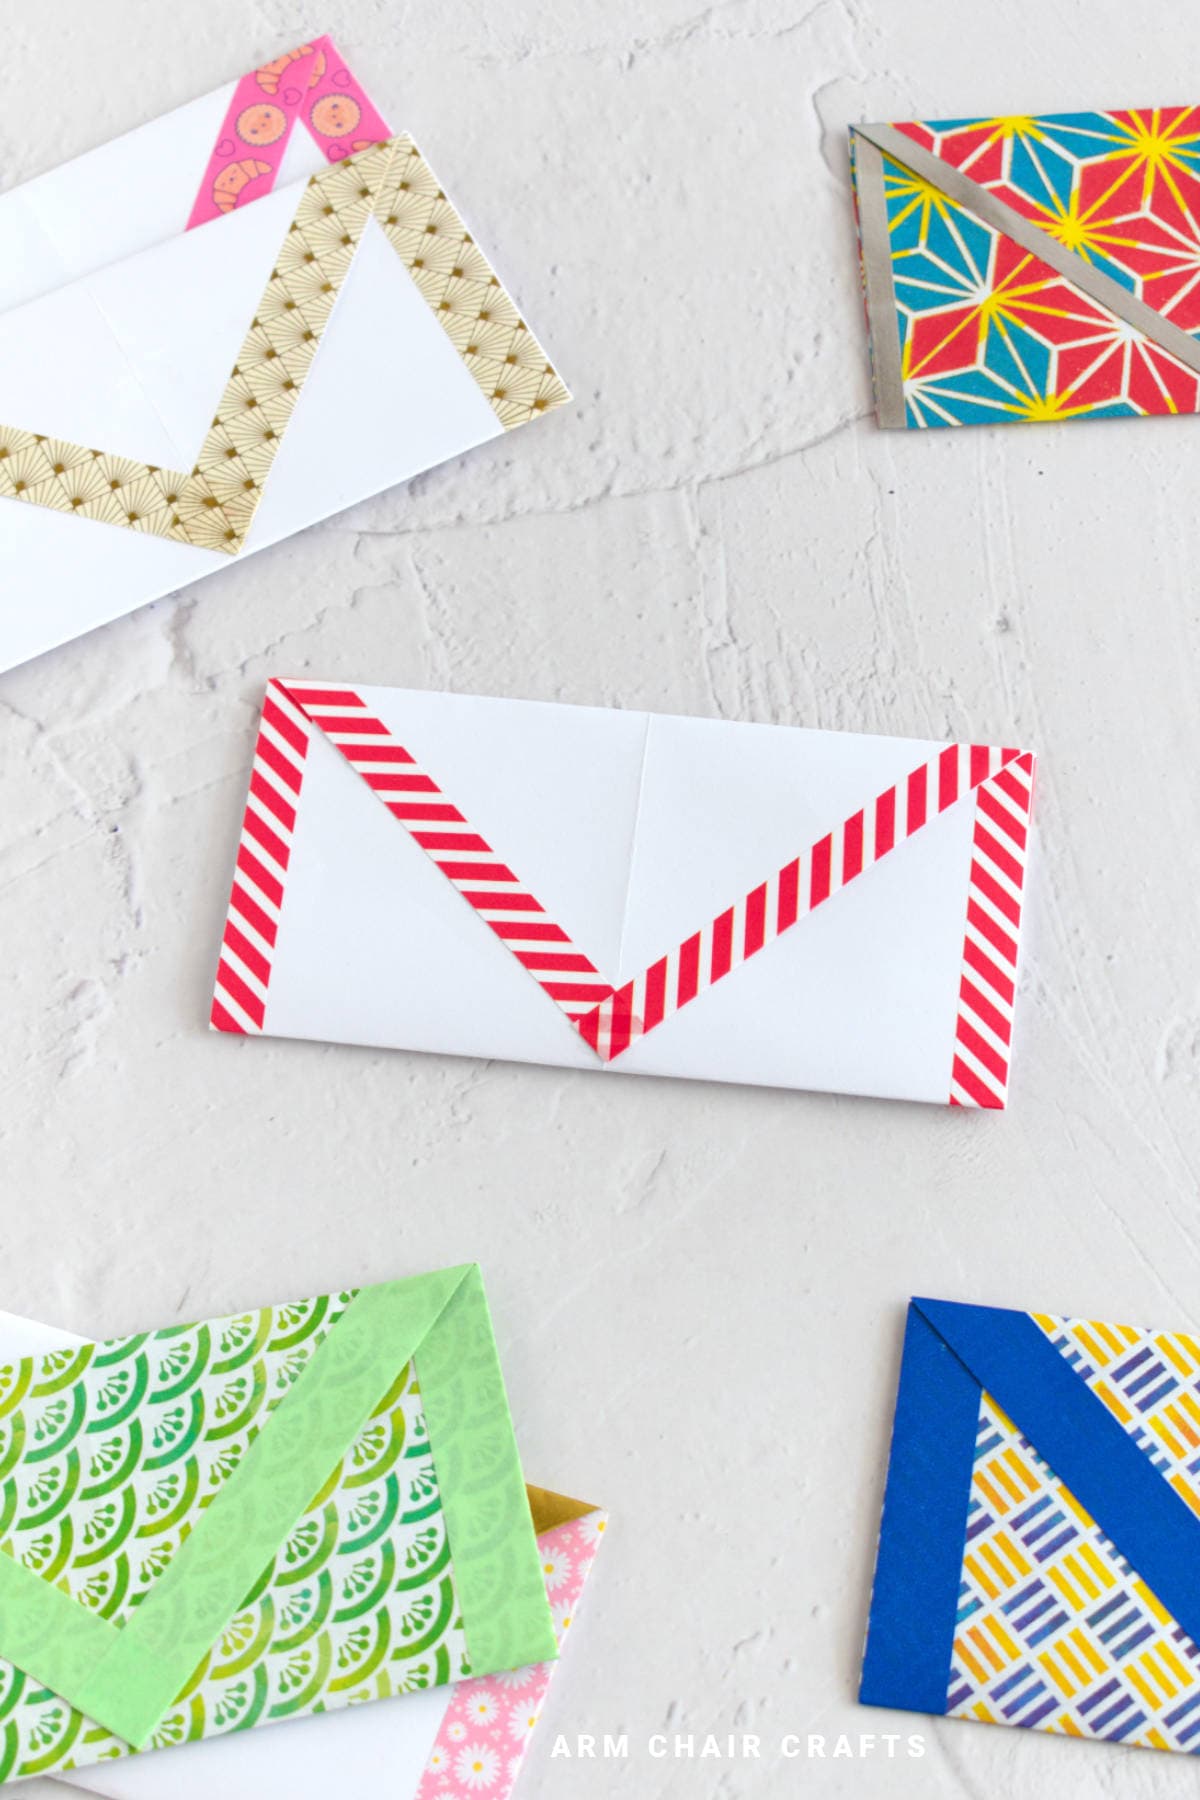
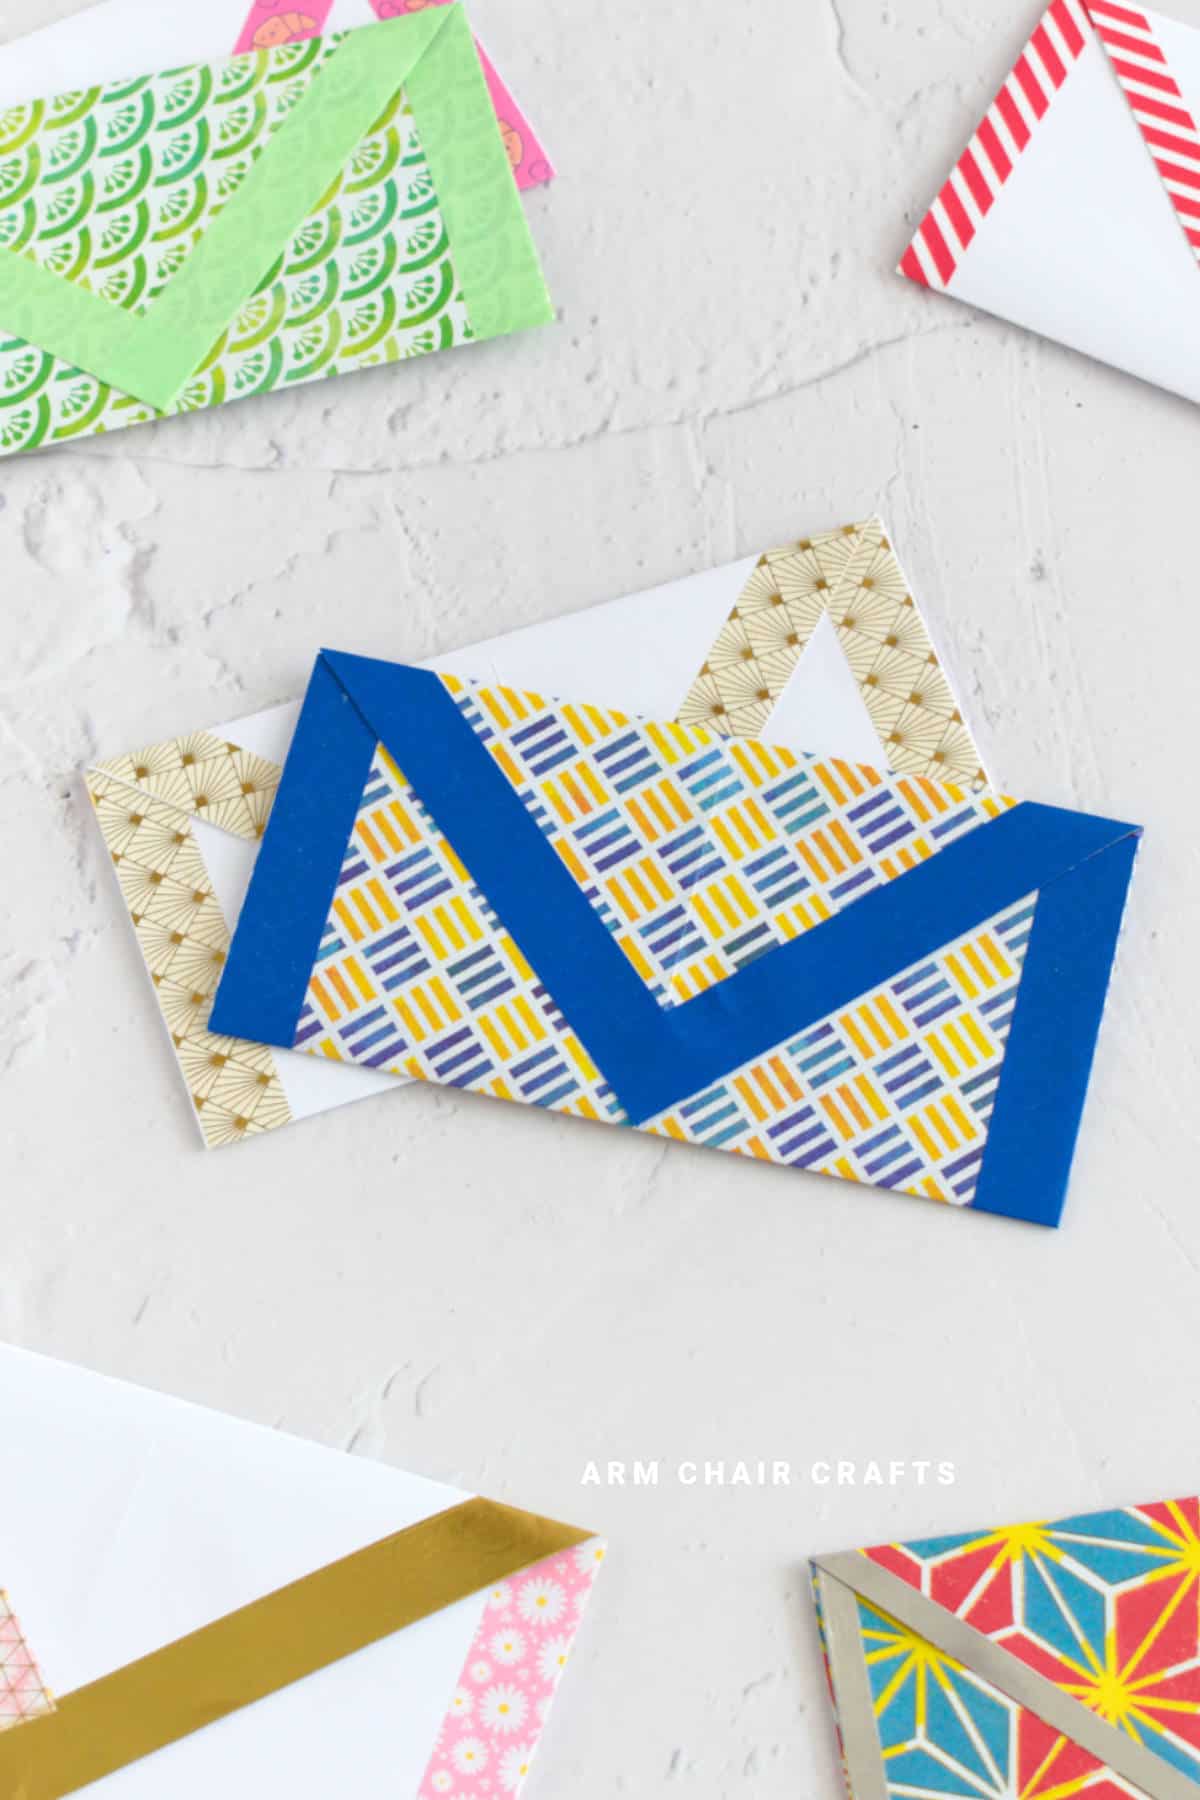
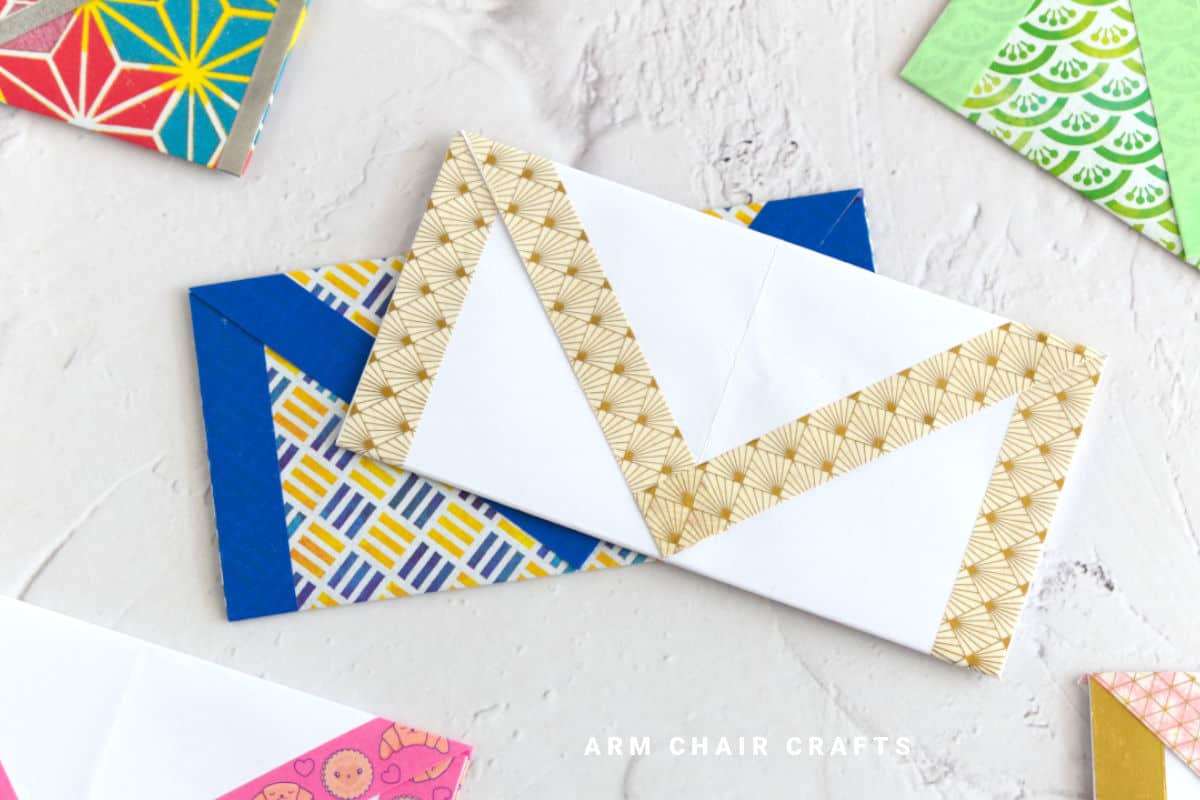
Adding washi tape decoration makes it even more fun, turning a practical paper craft into something decorative and gift-worthy.
This beginner-friendly project is quick to make, easy to customize, and perfect for letters, gift cards, or small surprises.
Jump to:
A handmade paper envelope instantly makes even the simplest note feel more thoughtful.
Instead of reaching for a store-bought envelope, you can use a square sheet of paper and a few careful folds to create something that feels personal and intentional.
This project is ideal for beginners and anyone who enjoys simple origami-style crafts.
As you learn how to fold the paper into a neat envelope shape, you'll see how a basic design can be both functional and decorative.
Washi tape adds an extra layer of creativity, letting you secure the envelope while also decorating it in a way that suits the occasion or recipient.
Why You'll Love This Pattern
- It turns a single square of paper into something genuinely useful.
- The folding process is simple, calm, and satisfying.
- Washi tape adds decoration without making the project complicated.
- Each envelope can be customized for different people or occasions.
- It's a practical craft you'll reach for again and again.
- Even beginners can achieve a neat, polished result.
Skill Level
★☆☆☆☆ - Beginner
Materials Needed
- 1 x square sheet of paper (e.g. origami paper or lightweight cardstock
A paper envelope made with 8 inches x 8 inches (20 cm x 20 cm) paper makes an envelope that is 6 inches x 3 inches (15 cm x 7.5 cm)
Instructions
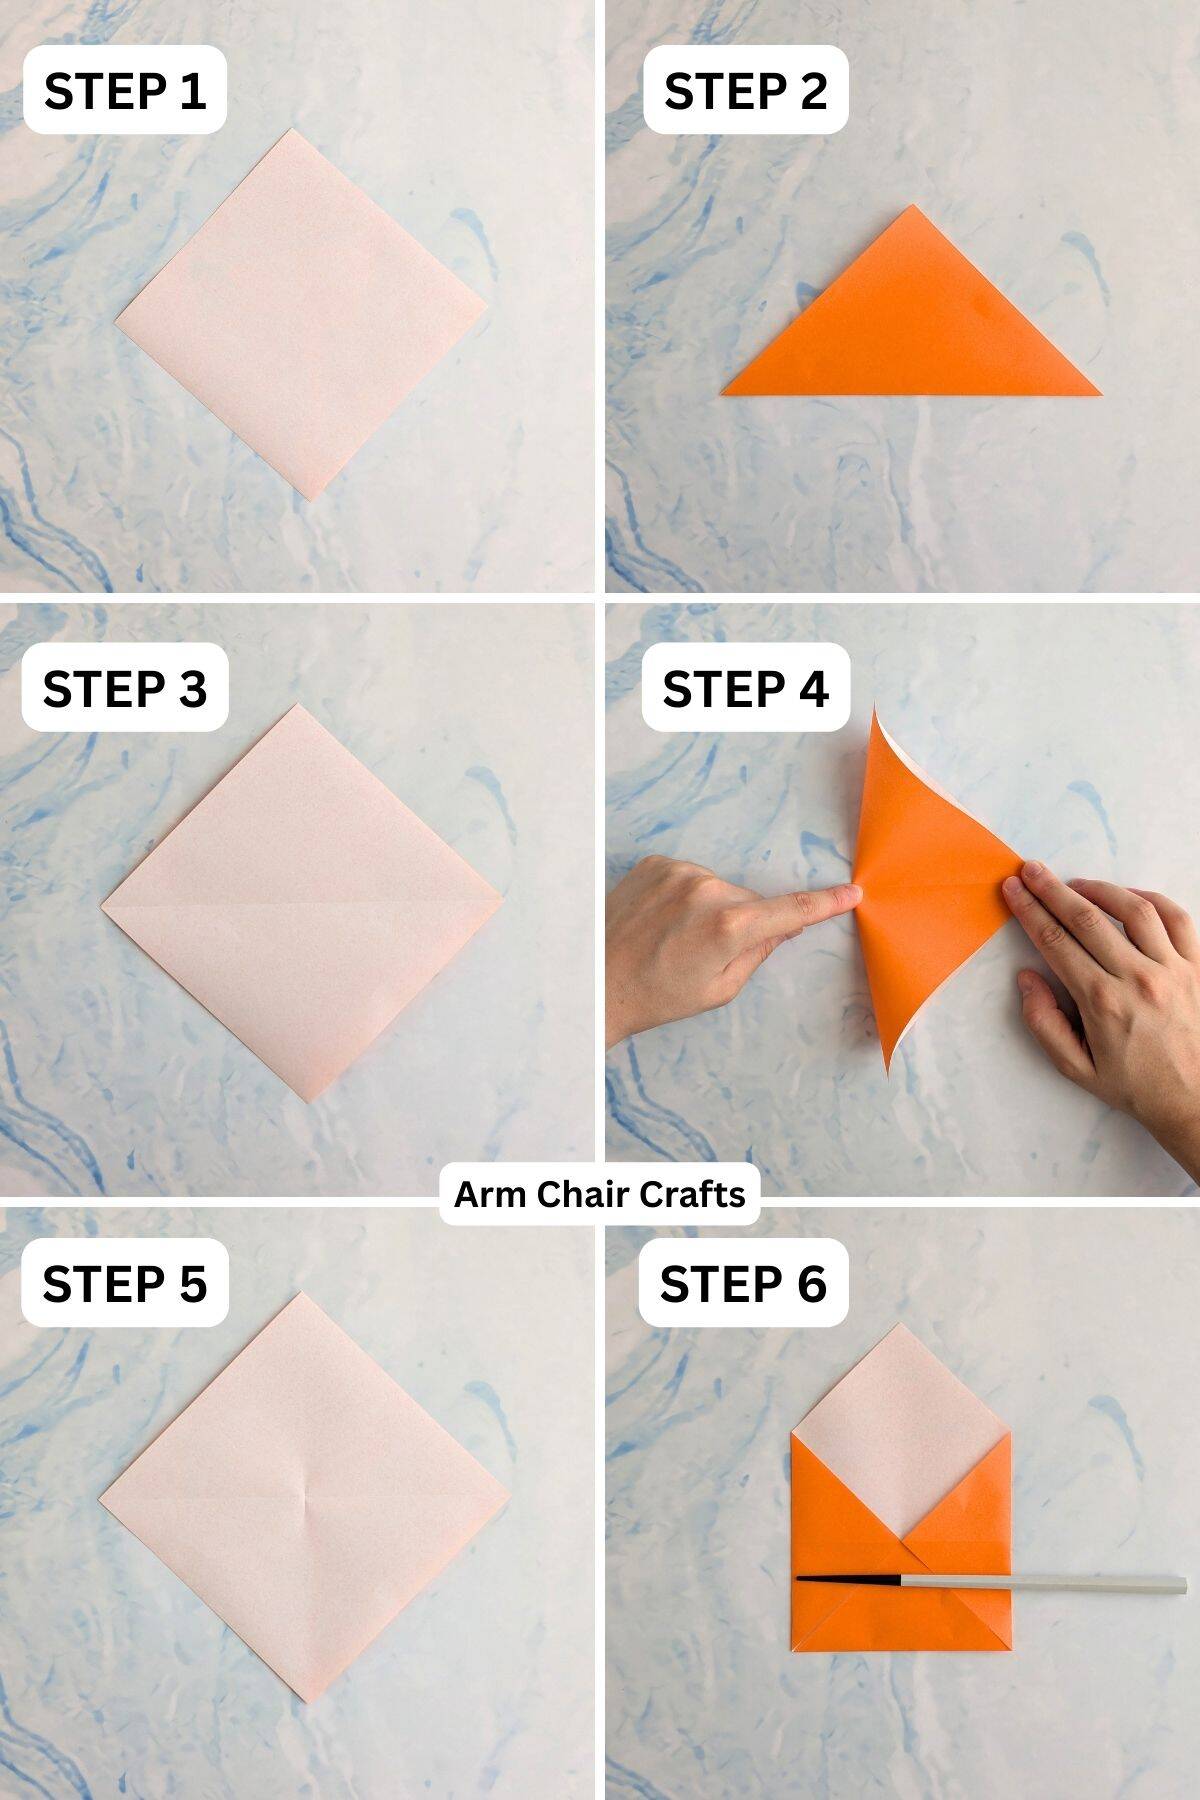
Step 1: Start with the color you want on the outside of your envelope to be facing down. Arrange your paper to sit like a diamond shape.
Step 2: Fold the bottom point up to meet the top.
Step 3: Unfold previous step.
Step 4: Fold the left point to meet the right point, but only crease in the middle.
Step 5: Unfold previous step.
Step 6: Fold the left point, right point, and bottom point, in to meet the middle (which is marked by the small crease you made in step 4 and step 2.
You're almost there!
To unlock the final steps and complete your pattern, create a free account with Grow.me. below.
Make sure you tick the box to subscribe to our newsletter and stay up to date with the latest patterns, tips, and more!
Once you're signed up, you'll get instant access to finish your project and enjoy exclusive content in the future.
Already signed up? Hit the button below and select 'Switch to Log In' to pick up where you left off and finish your project!
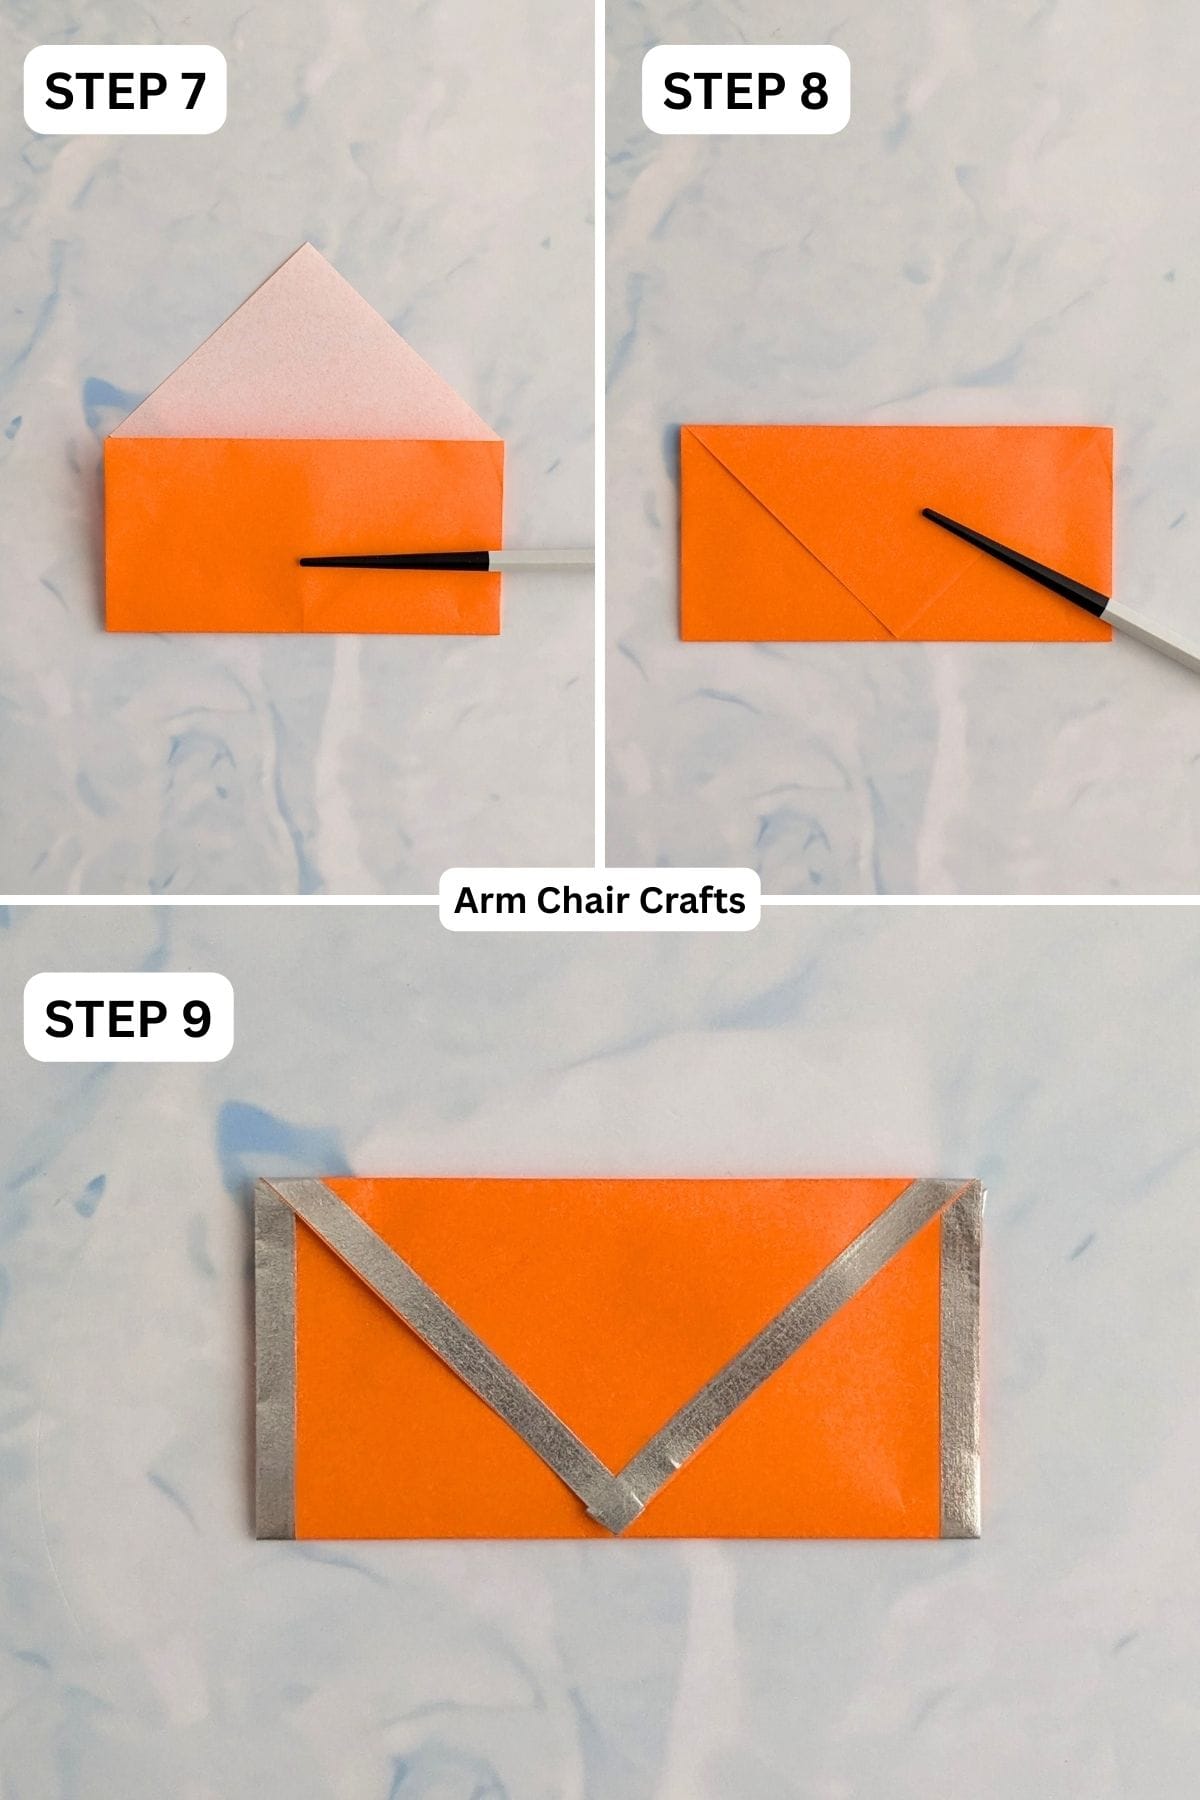
Step 7: Fold the bottom edge up to meet the top corners as shown (use the existing middle horizontal crease).
Step 8: Fold the top point down to meet the bottom edge.
Step 9: Decorate your envelope with washi tape. Completed envelope. To close your envelope, you could use some washi tape to tape it shut or for a neater look, use some double sided tape.
Tips For Success
- Use medium-weight paper so the envelope holds its shape well.
- Make firm creases to keep the envelope looking neat and secure.
- Patterned paper works beautifully, but plain paper can be decorated easily.
- Apply washi tape after folding so it doesn't interfere with creases.
Color, Paper Ideas, and Variations
- Neutral or kraft paper for a simple, handmade look
- Bright colors for birthdays or cheerful notes
- Pastels for baby showers or Mother's Day
- Festive paper for Christmas or holiday gifting
- Layered washi tape designs for a beautiful, decorative finish
Perfect Occasions to Use This Craft
- This paper envelope is perfect for birthdays, holding cards or small notes.
- It works beautifully for Christmas, pairing handmade envelopes with gifts or letters.
- Use it for thank-you notes or personal messages.
- It's a thoughtful option for weddings or special events.
- Ideal for Mother's Day, Valentine's Day, or everyday gifting.
How To Use This Craft
- Use the envelope to send handwritten notes or letters with a personal touch.
- Slip gift cards or flat items inside for a cleaner presentation.
- Pair it with handmade cards or crafts for cohesive gifting.
- Create a set of matching envelopes for events or stationery collections.
- Decorate and display them as part of gift wrapping or table settings.
FAQ
Absolutely. Washi tape, drawings, stamps, or labels can all be added once folding is complete.
Stay Connected
Made this pattern? Let us know how it went in the comments below!
Pin this post - Pin now to take your paper crafting skills to the next level.
Share on Instagram or Facebook - Capture the beauty of your finished project and share it on Instagram or Facebook! Tag us @armchaircrafts so we can see your work!