Bring a touch of handmade charm to your home with this standing crochet angel pattern - Eve.
This elegant amigurumi angel is perfect for holiday décor, gifts, or as a collectible craft piece.
Using basic crochet techniques, you'll create a standing angel that's soft, decorative, and full of character.
Learning how to crochet Eve is fun, approachable, and beginner-friendly, giving you a beautiful handmade item that's perfect for Christmas trees, Easter, mantels, or special keepsakes.
It's a relaxing, creative project that yields a charming finished piece you'll love to display or gift.
Exclusive PDF Patterns in the Recline and Unwind Club
Access ad-free, downloadable PDFs, the exclusive Arm Chair Craft's shop, and our growing community by joining the Recline and Unwind Club!
Jump to:
- Why You'll Love This Pattern
- Project Snapshot
- Materials Needed
- Yarn and Hook Information
- Stitches and Abbreviations - US Terms
- Special Stitches
- Gauge
- Emily's Notes
- Finished Size
- ⭐ Want more crochet projects like this? ⭐
- Instructions
- Crochet Tips, Yarn Choices, and Color Inspiration
- Perfect Occasions to Use This Craft
- How To Use This Craft
- FAQ
- More Crafts You Might Like To Try
- More Easy Patterns For You To Try
- Stay Connected
A standing crochet angel is a decorative amigurumi-style figure designed to sit upright rather than hang, often made with structured shaping and added reinforcement. It's commonly used for seasonal displays, mantel decor, or handmade keepsakes.
With basic stitches and simple assembly, you can create a soft, standing angel that adds charm to your home or serves as a thoughtful handmade gift.
Learning how to crochet Eve allows you to practice fundamental amigurumi techniques, including shaping, making the limbs, and finishing small details.
This standing crochet angel pattern is beginner friendly, yet it produces a polished, professional-looking result that can become a cherished decoration for years to come.
Whether you place Eve on a mantel, use her as a gift topper, or include her in a collection of handmade ornaments, this project combines creativity, skill-building, and festive appeal.
If you are after other easy to crochet angel patterns, you might like this 2D crochet angel ornament or this mini standing crochet angel.
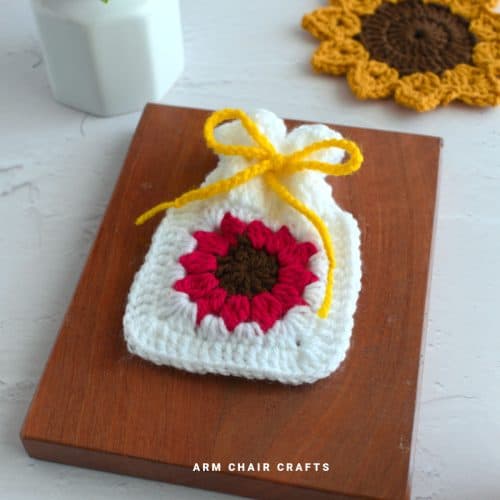
Or, if you're browsing for more quick crochet gifts you can make in a weekend, these crochet heart coasters are another simple, thoughtful project to try.
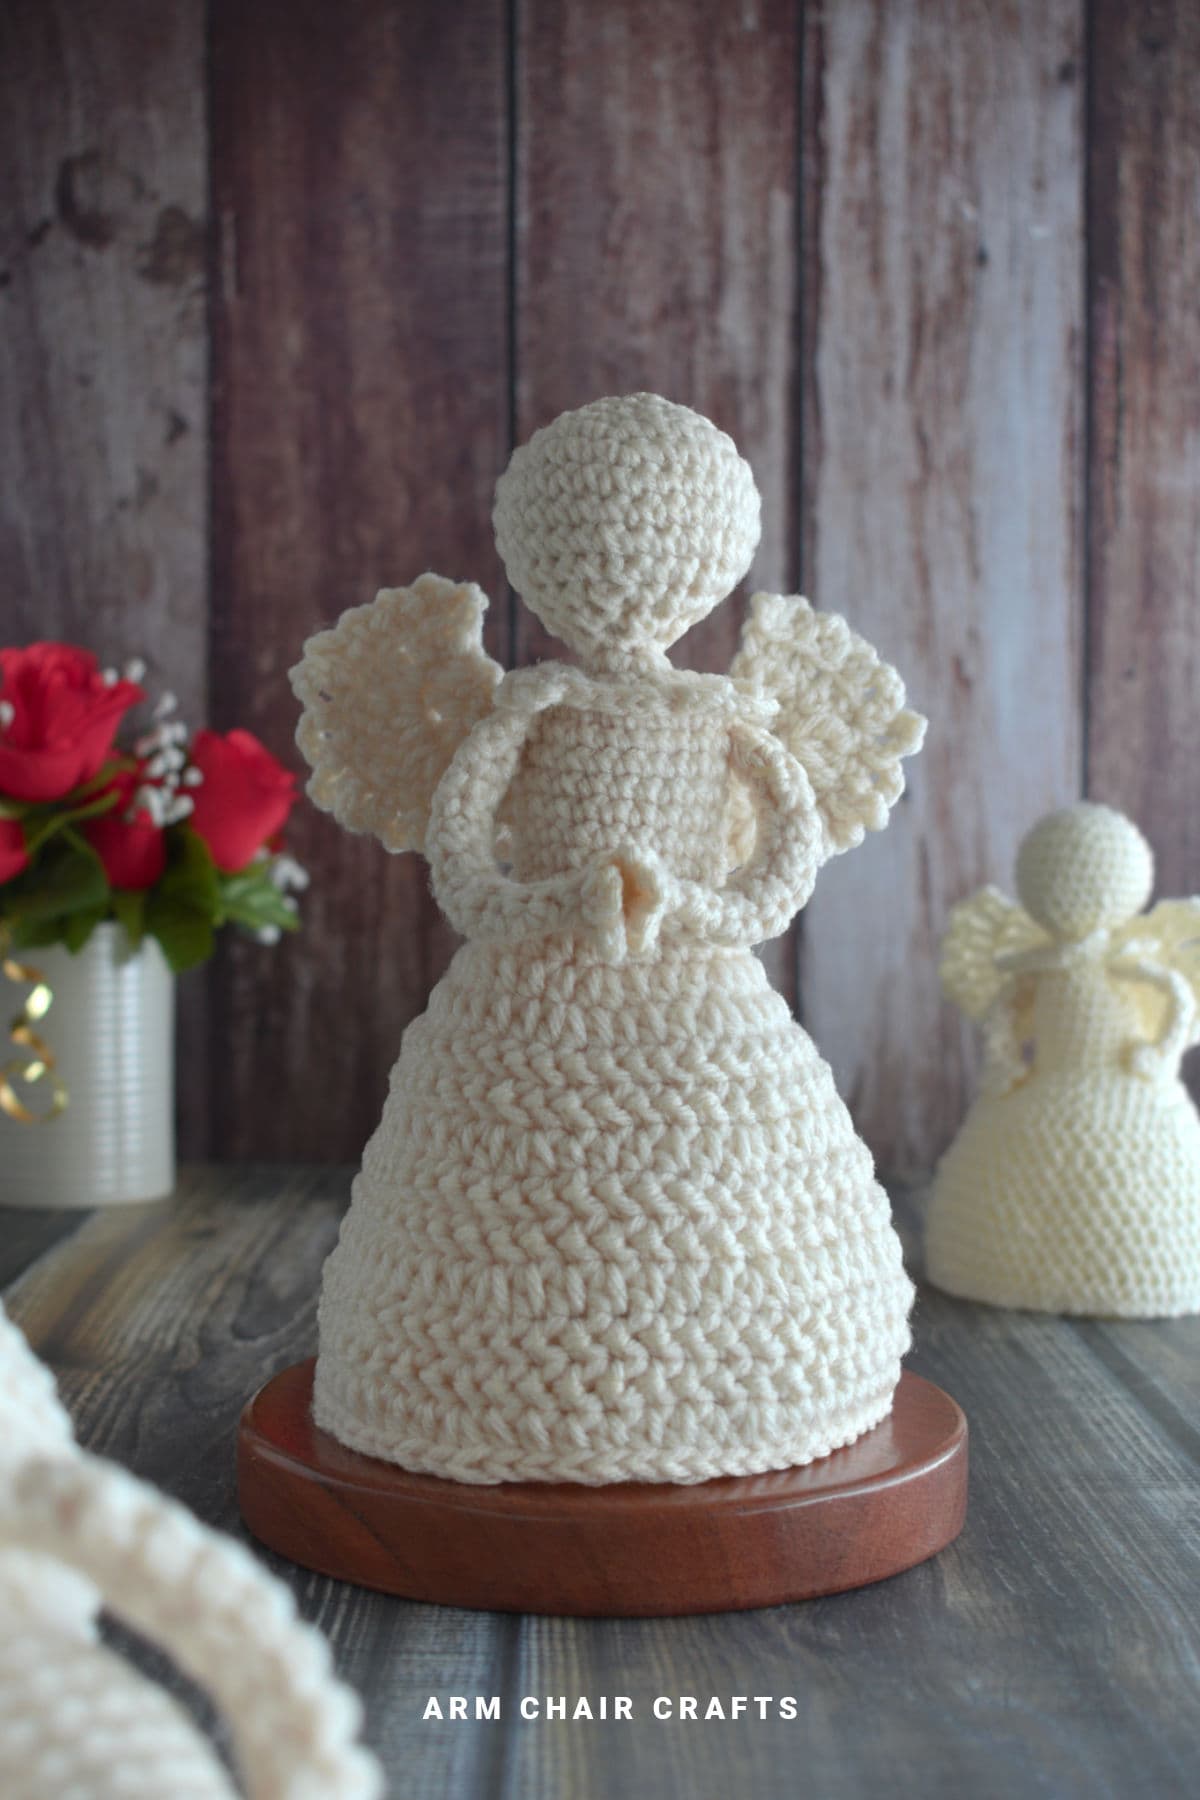
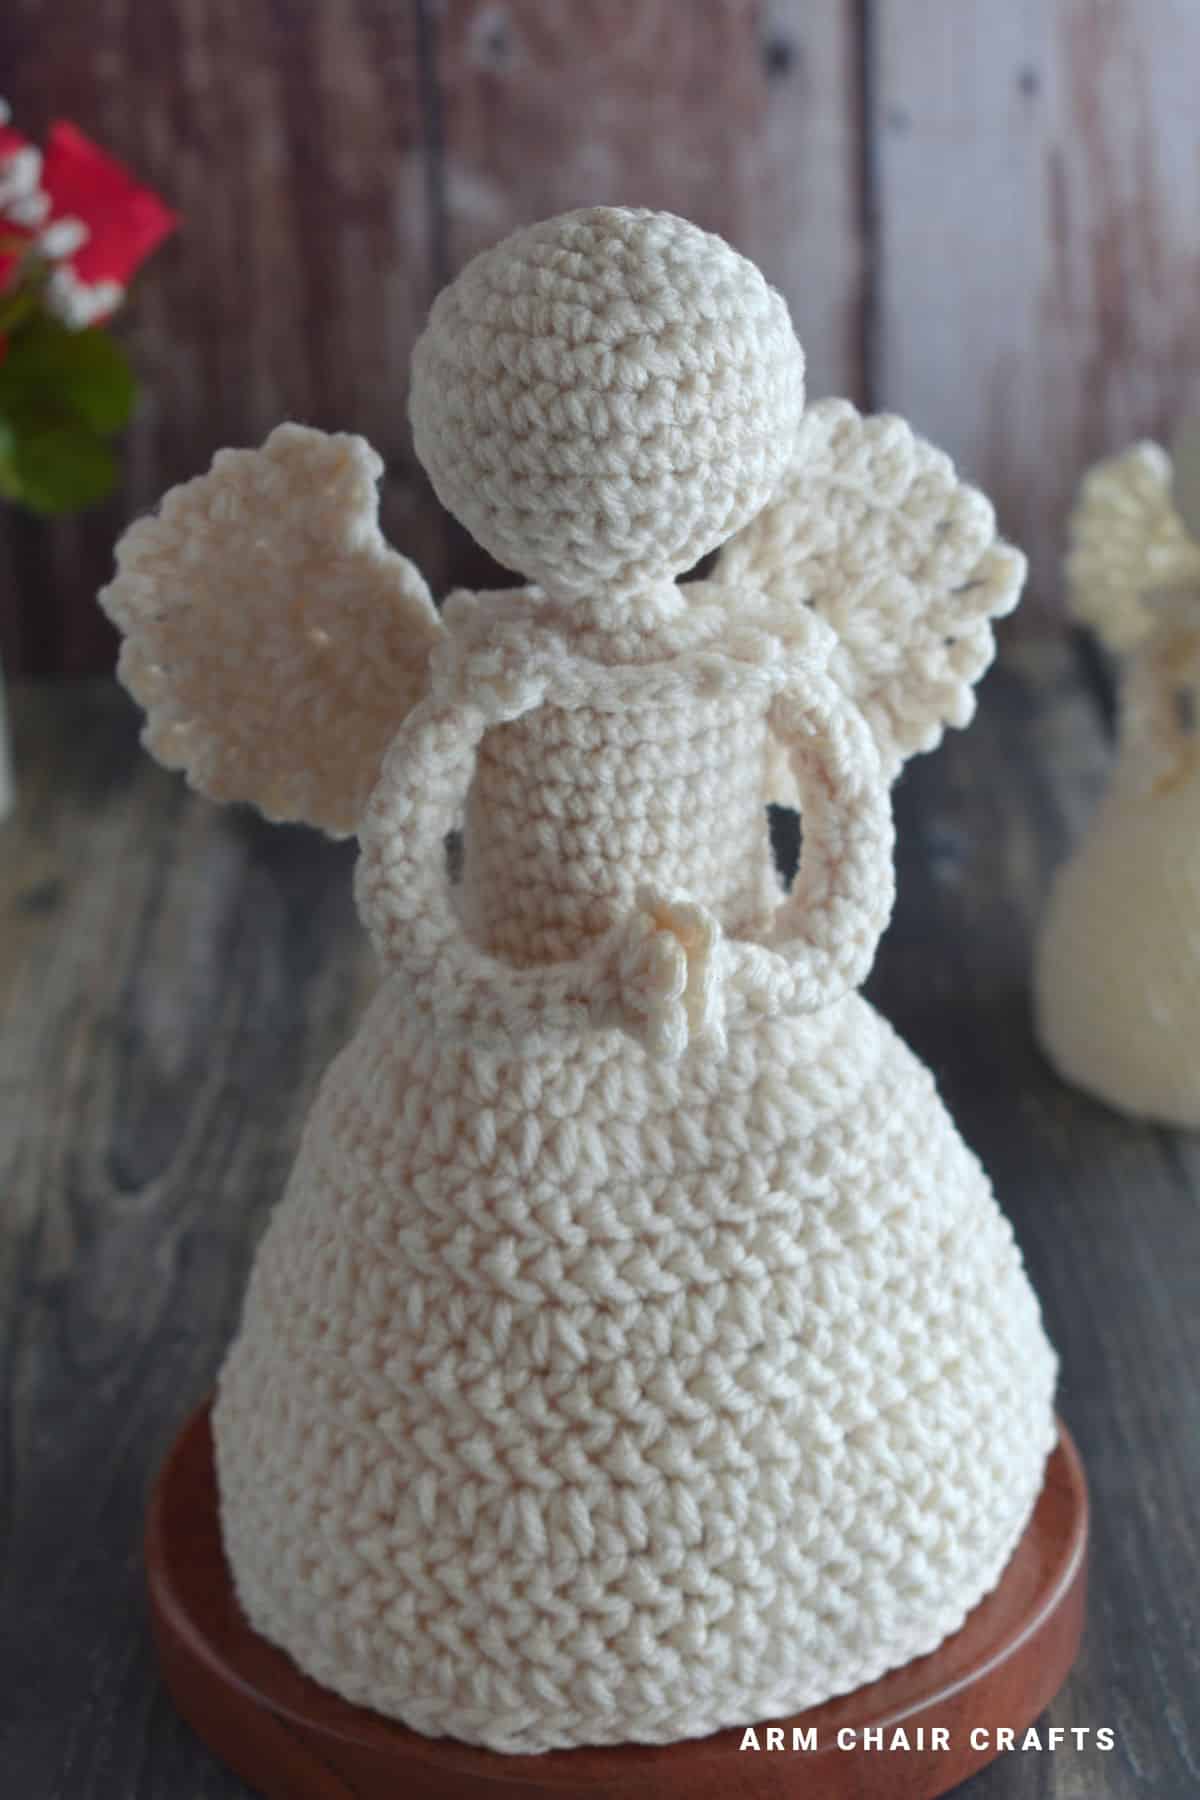
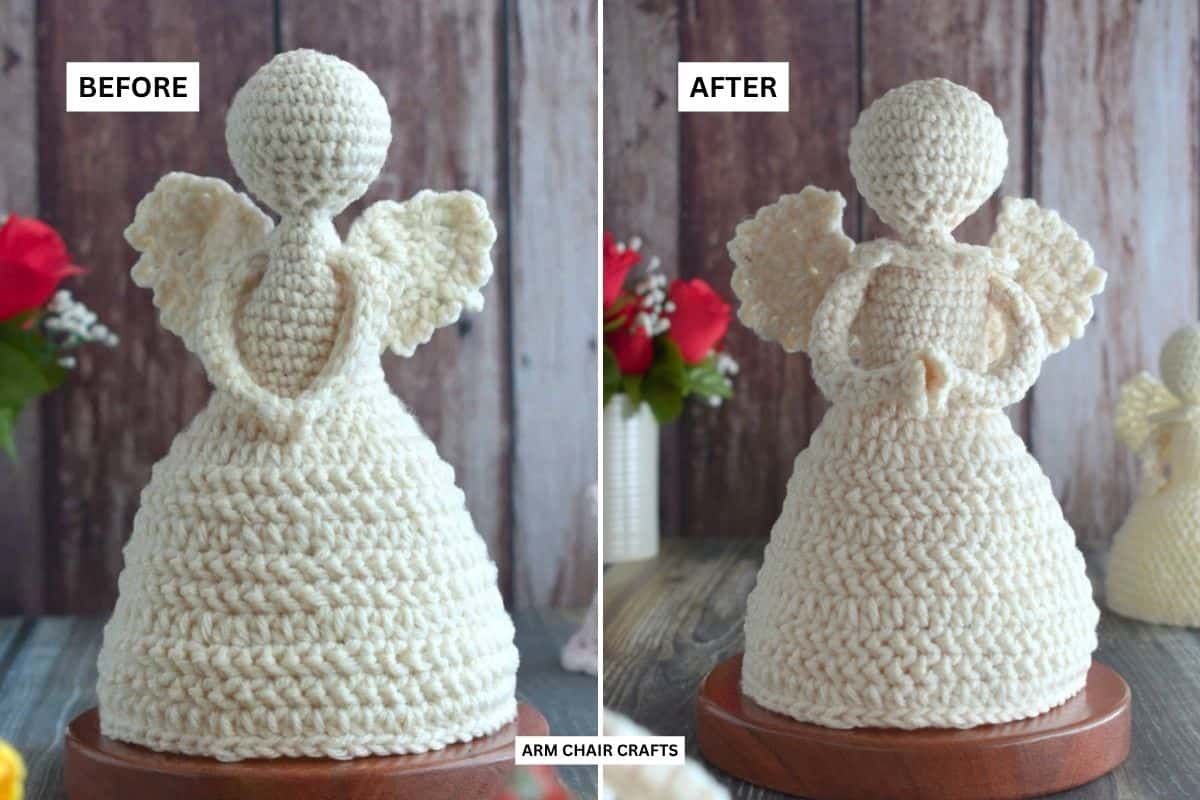
Update (March 2026): I've refreshed this crochet angel pattern with a few refinements!
I added a delicate collar and shaped hands to the arms to give her a more elegant finish. I also adjusted the wings so they are easier to make.
I've included a before and after photo below so you can see the difference!
Why You'll Love This Pattern
- Produces a charming, soft, standing crochet angel perfect for gifts or décor.
- Teaches essential amigurumi skills, including shaping and assembly.
- Compact and manageable size makes it approachable for beginners.
- Fun to customize with different yarn colors or small details.
- Makes a meaningful handmade gift for holidays or special occasions.
- Gives a sense of accomplishment with a polished, finished piece.
- This is a low sew crochet pattern!
Project Snapshot
Skill Level: Beginner to Intermediate
Time Needed: Great weekend crochet project. It took me under a day to make one angel.
Construction: Worked in parts and assembled with shaping
Best For: Holiday decor, keepsakes, display pieces
Materials Needed
Yarn
- #4 medium acrylic yarn (also known as worsted, Afgan, Aran, or 10 ply) with 11 WPI*
- You will need about 2 ounces / 96 yards (56 grams / 88 meters) of yarn.
Hook
- 4 mm (G / 6) hook
- 3.5 mm (E/4) hook (for the wings)
Other
- Stitch Marker
- Stuffing (fiberfill)
- Scissors
- Yarn Needle
- Pearl Head Pins
*Wraps per inch (WPI) - this is a measure of yarn thickness. To measure WPI, count how many times the yarn wraps around a ruler in one inch. There are more wraps for thinner yarn and fewer wraps for thicker yarn.
Yarn and Hook Information
You can use any kind of yarn you'd like for this crochet angel. Although, yarns with more structure such as acrylic help the angel stand.
If you use another yarn size or type, make sure to use an appropriate hook size. Also, be aware that if you do, your angel may turn out to be a different size.
Stitches and Abbreviations - US Terms
- Ch - Chain
- St/s - Stitch/es
- Sc - Single Crochet
- Sc2tog - Single Crochet 2 Together (see special stitches below)
- BL - Back loop
- FL - Front loop
- Sl st - Slip stitch
- Hdc - Half Double Crochet
- Hhdc - Herringbone Half Double Crochet (see special stitches below)
- FO - Fasten off
- Tr - Treble Crochet (see special stitches below)
- Sk - Skip
- [ ] at the end of each row indicates how many stitches are needed in that row.
Special Stitches
Sc2tog (Single Crochet 2 Together)
Sc2tog (Single Crochet Two Together) is a decrease stitch used in crochet to reduce the number of stitches.
How to Do sc2tog:
- Insert your hook into the first stitch.
- Yarn over and pull up a loop (2 loops on hook).
- Insert hook into the next stitch.
- Yarn over and pull up another loop (3 loops on hook).
- Yarn over again and pull through all 3 loops. Completed sc2tog.
Herringbone Half Double Crochet (Hhdc)
- Yarn over and insert the hook into the stitch.
- Yarn over and pull up a loop; you now have three loops on your hook.
- Pull the first loop on your hook through the second loop on your hook.
- Yarn over and pull through the remaining 2 loops on your hook.
Treble Crochet
- Yarn over twice, insert hook into stitch and pull up a loop (4 loops on hook).
- Next, yarn over and pull through two loops (3 loops on hook).
- Then, yarn over and pull through two loops (2 loops on hook).
- Yarn over and pull through remaining loops (1 loop on hook).
Gauge
Gauge is not too important for this crochet angel.
Emily's Notes
Standing figures like this feel a bit more intentional while you're making them, you're thinking about balance and structure as you go.
Once it stands on its own, it feels like a real accomplishment.
Finished Size

The finished size of Eve is about 5.5 inches (14 cm) wide and 8.5 inches (22 cm) tall.
⭐ Want more crochet projects like this? ⭐
Join the Recline and Unwind Club to access ad-free crochet patterns, helpful tips, and more - your next favorite project could be waiting there!
Copyright Notice
This pattern and its contents are protected by copyright law. It may not be copied, altered, redistributed, resold, translated, or used to produce photo or video tutorials in any format, either in whole or in part.
You are permitted to sell finished items made using this pattern. However, the written pattern itself may not be sold, shared, or distributed in any form. When marketing or displaying your finished items, please photograph your own work and refrain from using any of my original images.
Sharing Guidelines For Roundups - Bloggers you are welcome to include this pattern in roundup posts as a link, as long as you use one photo and link directly (with a do follow link) back to the original post. For full details, please refer to my Terms of Use page.
Instructions
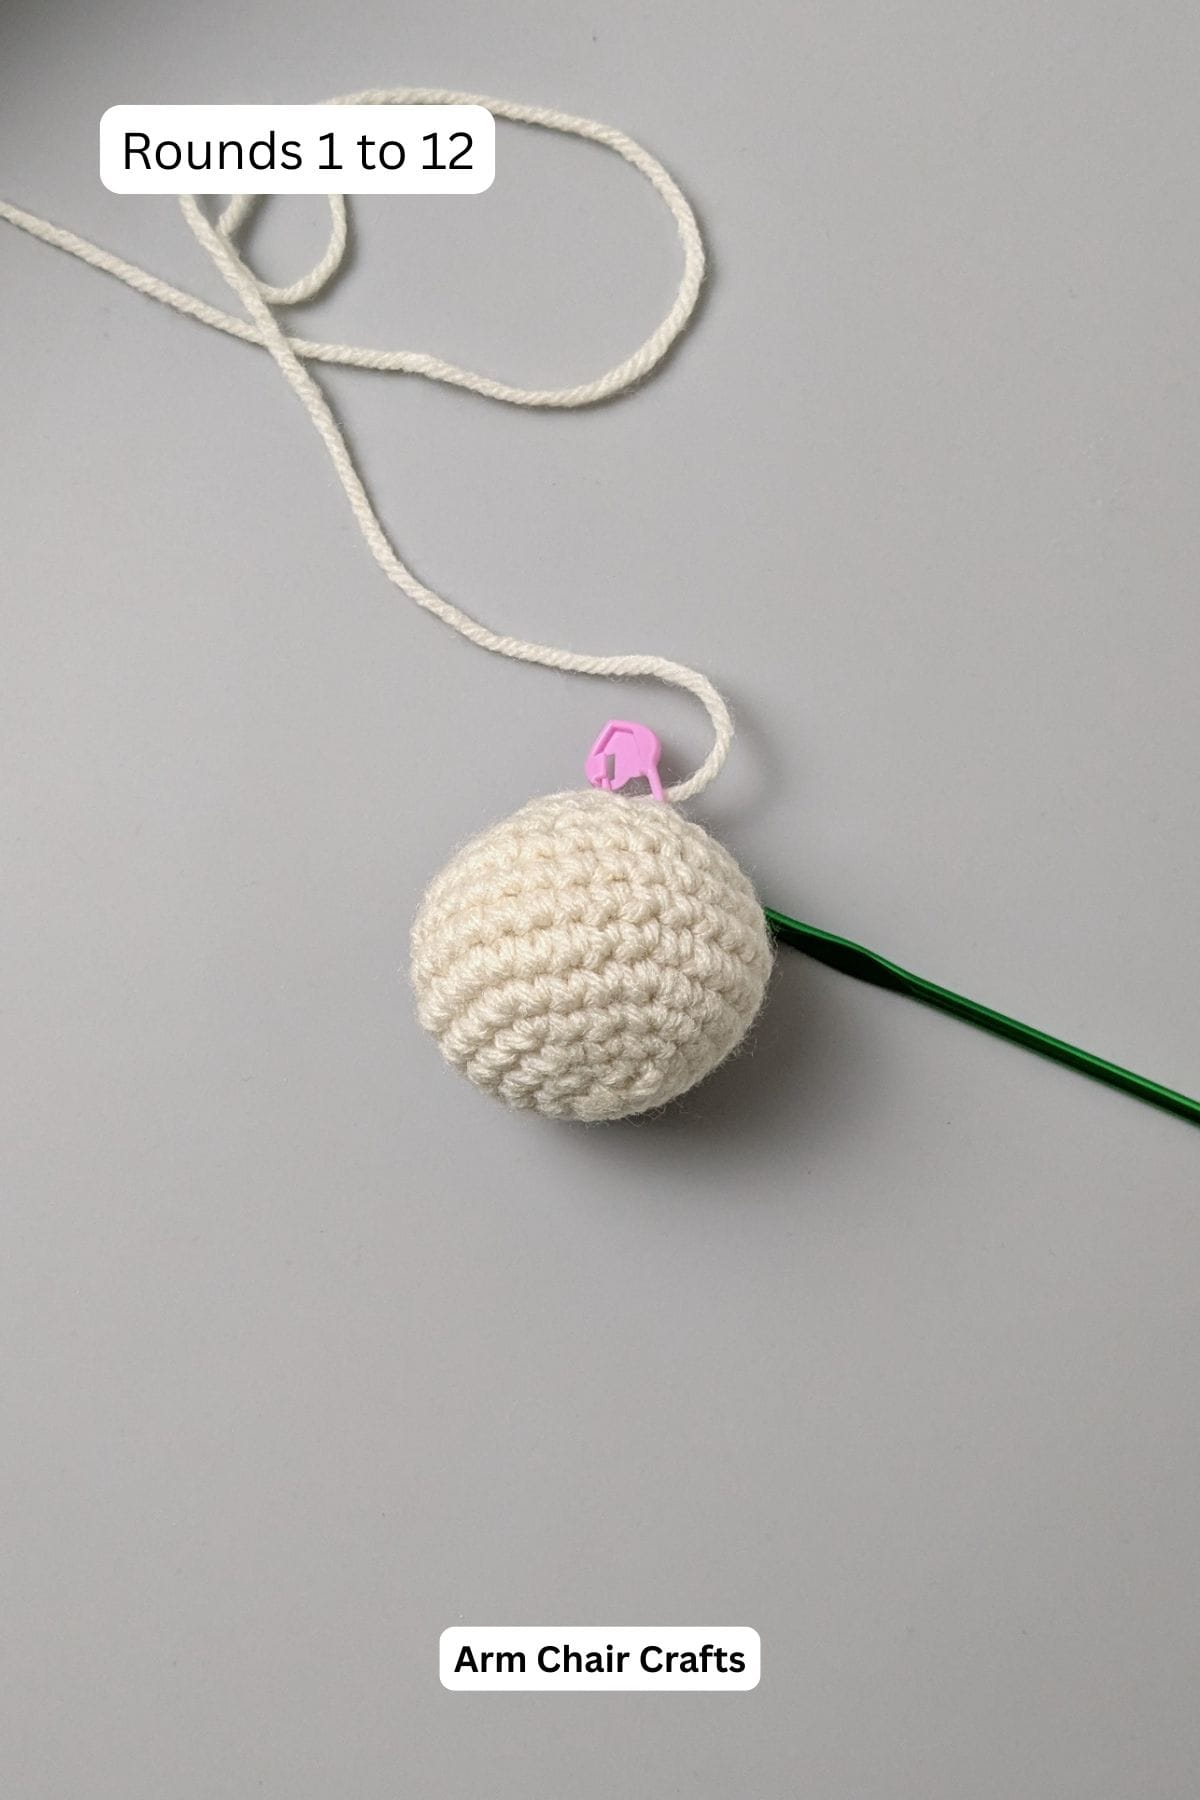
Making the Head
You will be working in continuous rounds first.
Round 1: Using your 4 mm (G/6) hook, make 6sc into magic ring, pull ring tight to close. [6 sc].
Round 2: 2 sc in each of next 6 sts. [12 sc].
Round 3: *1 sc in next st, 2 sc in next st,* repeat from * 6 times. [18 sc].
Round 4: *1 sc in each of next 2 sts, 2 sc in next st,*, repeat from * 6 times. [24 sc].
Round 5: *1 sc in each of next 3 sts, 2 sc in next st,* repeat from * 6 times. [30 sc].
Rounds 6 - 8: 1 sc in each of next 30 sts. [30 sc in each round].
Round 9: *1 sc in each of next 3 sts, sc2tog,* repeat from * 6 times. [24 sc].
Round 10: *1 sc in each of next 2 sts, sc2tog,* repeat from * 6 times. [18 sc].
Round 11: *1 sc in each of next st, sc2tog,* repeat from * 6 times. [12 sc].
Firmly fill the head with fiberfill.
Round 12: *sc2tog,* repeat from * 6 times [6 sc].
Making the body
Round 13: 1 sc in each st around. [6 sc].
Round 14: 2 sc in each st around. [12 sc].
Round 15: 1 sc in next st (mark BL of 1st st and keep st marker in place until you finish Round 18), 2 sc in next st, *1 sc in next st, 2 sc in next st,* rpt from * 5 times [18 sc].
Decorative collar
Round 16: Sl st into FL of next st, work sts in FL for this Round, ch3 (count as dc), 2dc in same st as ch-3, 1hdc in next st, 1sc in next 5-sts, 1hdc in next, 3dc in next st (FL of next marked st), 1hdc in next st, 1sc in next 5-sts, 1hdc in next, sl st into top of ch-2 to join. [20sts]
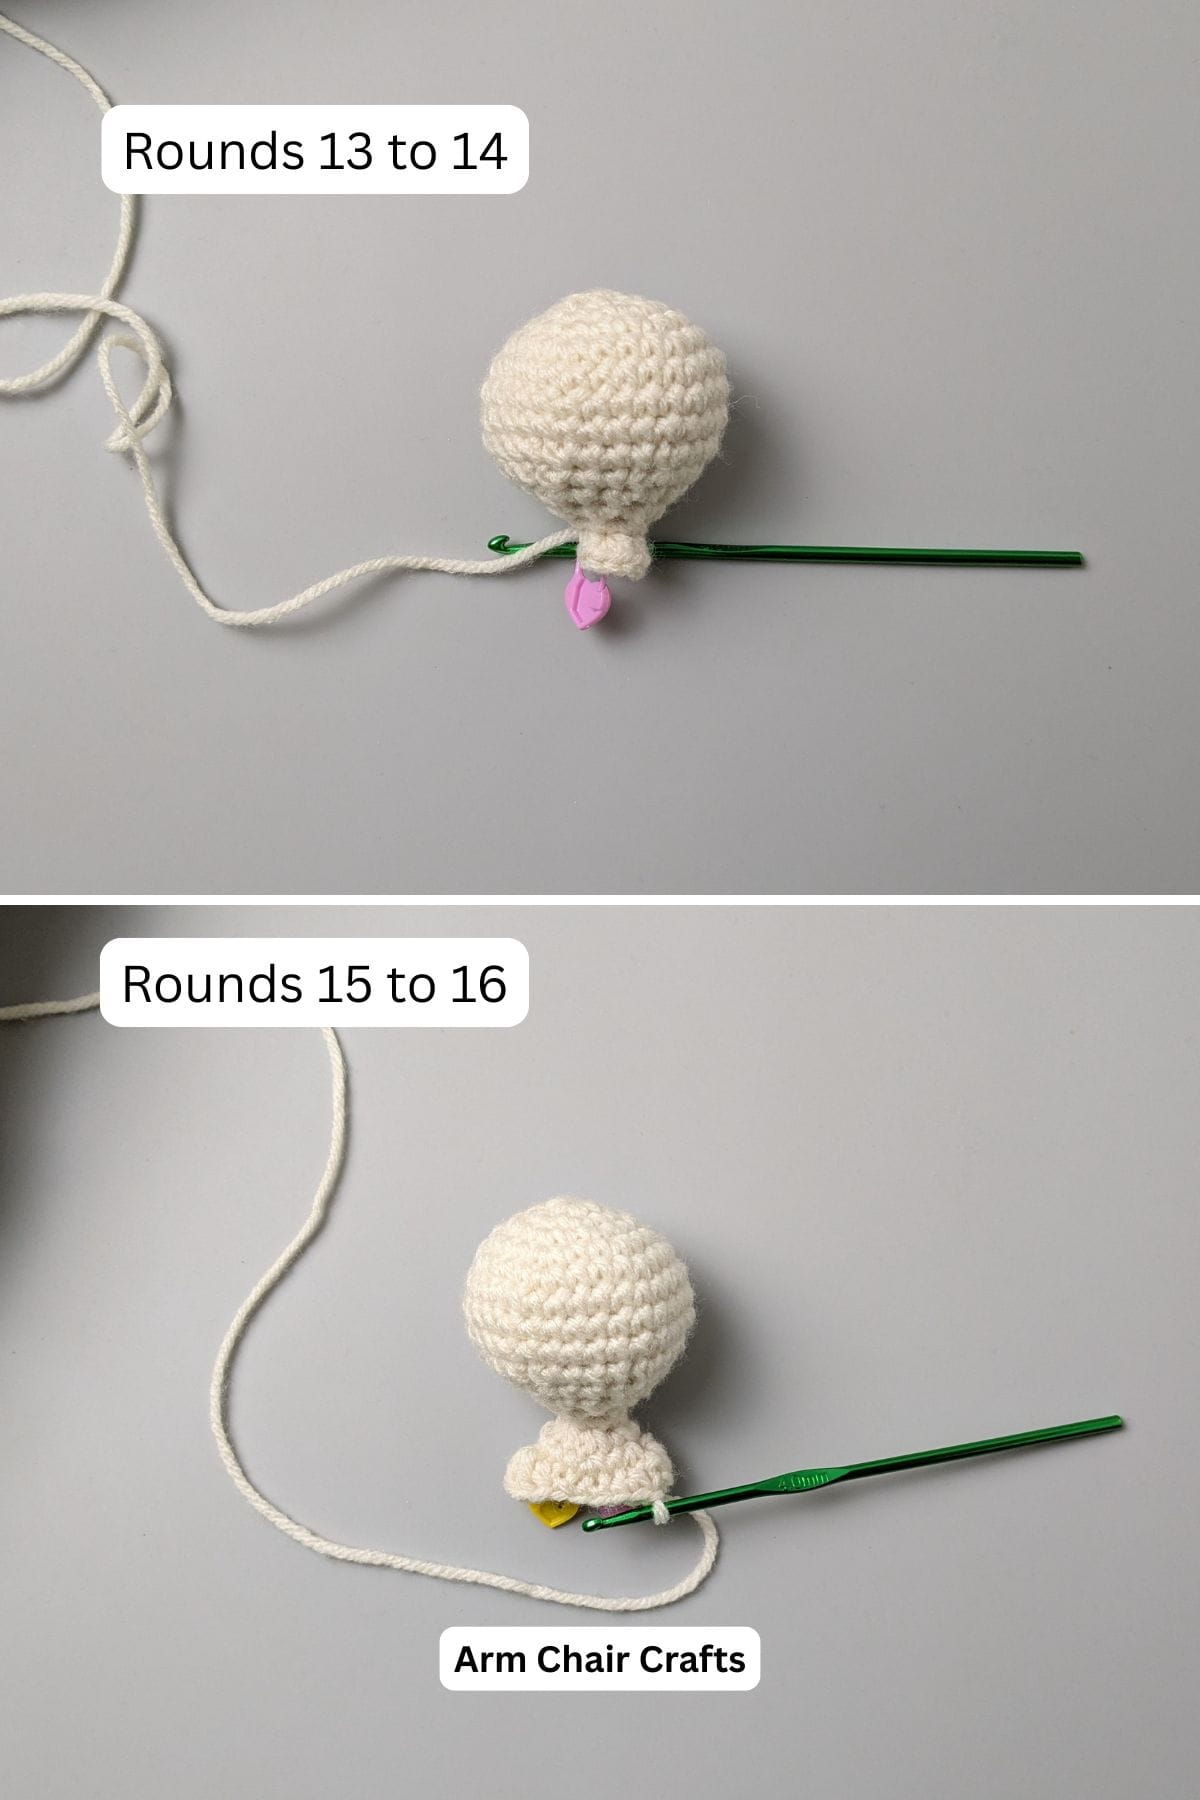
Round 17: *ch3, sl st into next st, rpt from * 3 times, sl st into next 5-sts, ** ch3, sl st into next st, rpt from ** 4 times, sl st into next 5-sts, ch3, sl st into next st, ch3, sl st into base of 1st ch-3 to join, cut yarn, fasten off, weave in ends.
Shoulder
Round 18: Fold the collar down so that you can work into the BL of the sts in Round 15, sl st yarn into 1st marked stitch, 1 sc in same sp as sl st, 1 sc in each st around. [18 sc].
Round 19: 2 sc in next st, 1 sc in each of the next 8 sts, 2 sc in next st, 1 sc in each of the next 8 sts. [20 sc].
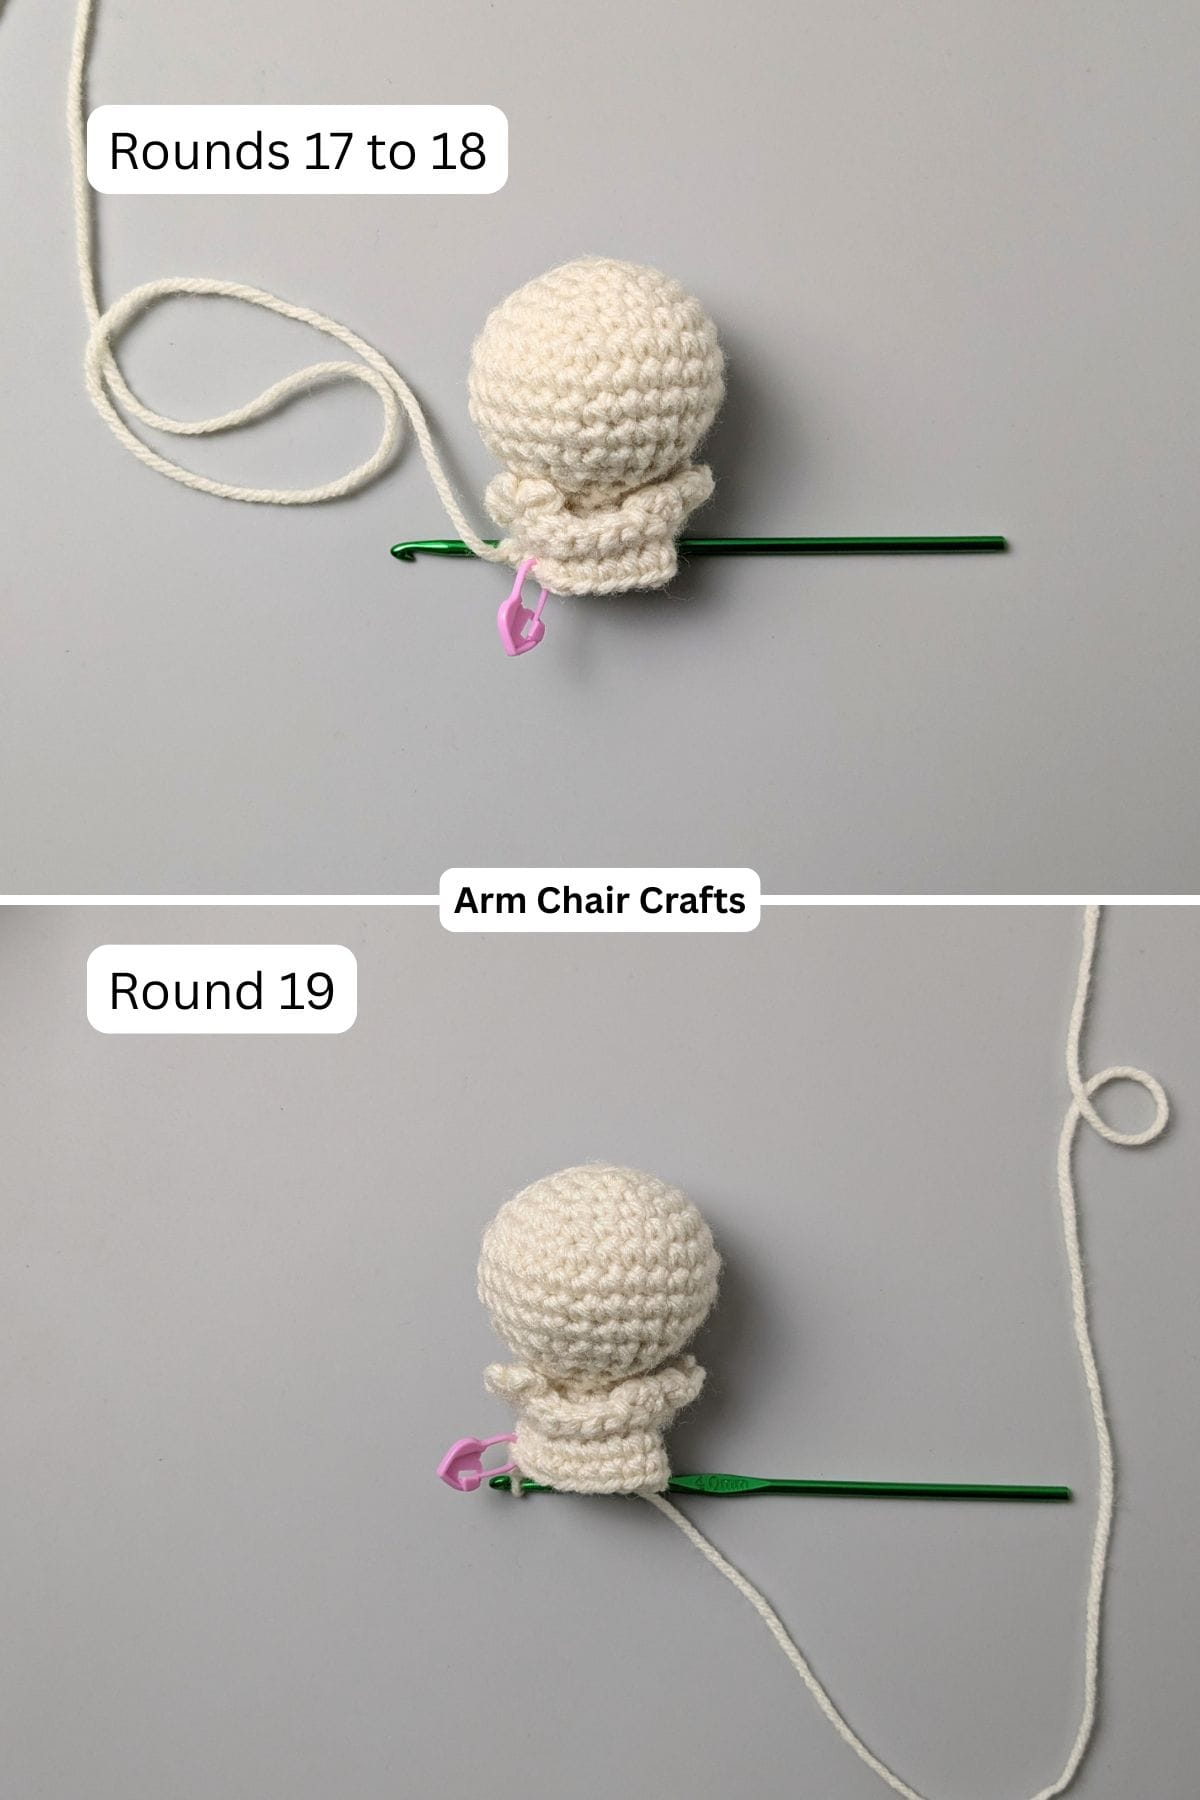
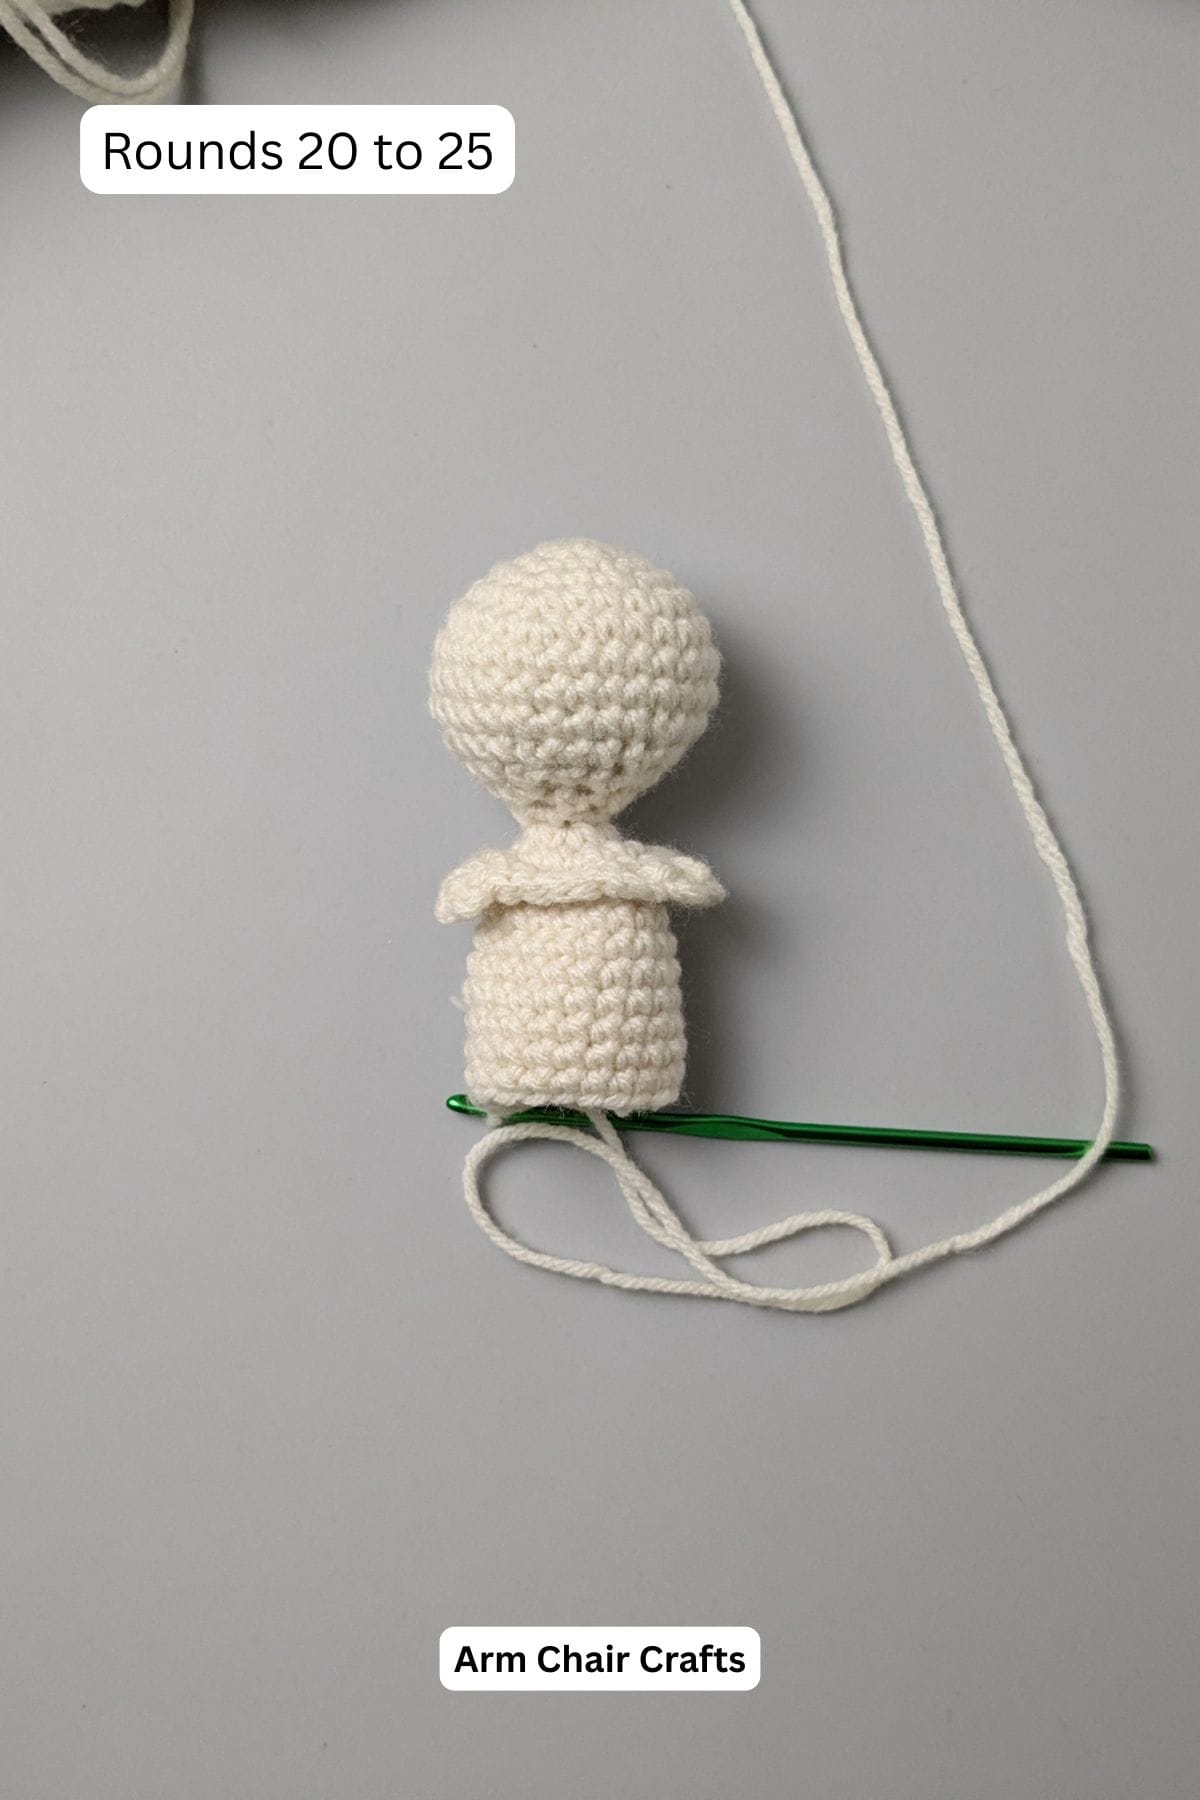
Now you will start the skirt of the angel. You will still be working in joined rounds.
Round 20: Ch1, 1 sc in each st around, sl st into 1st sc to join. [20 sc].
Round 21 - 25: Ch1, 1 sc in each st around, sl st into 1st sc to join. [20 sc in each round].
You're almost there!
To unlock the final steps and complete your pattern, create a free account with Grow.me. below.
Make sure you tick the box to subscribe to our newsletter and stay up to date with the latest patterns, tips, and more!
Once you're signed up, you'll get instant access to finish your project and enjoy exclusive content in the future.
Already signed up? Hit the button below and select 'Switch to Log In' to pick up where you left off and finish your project!
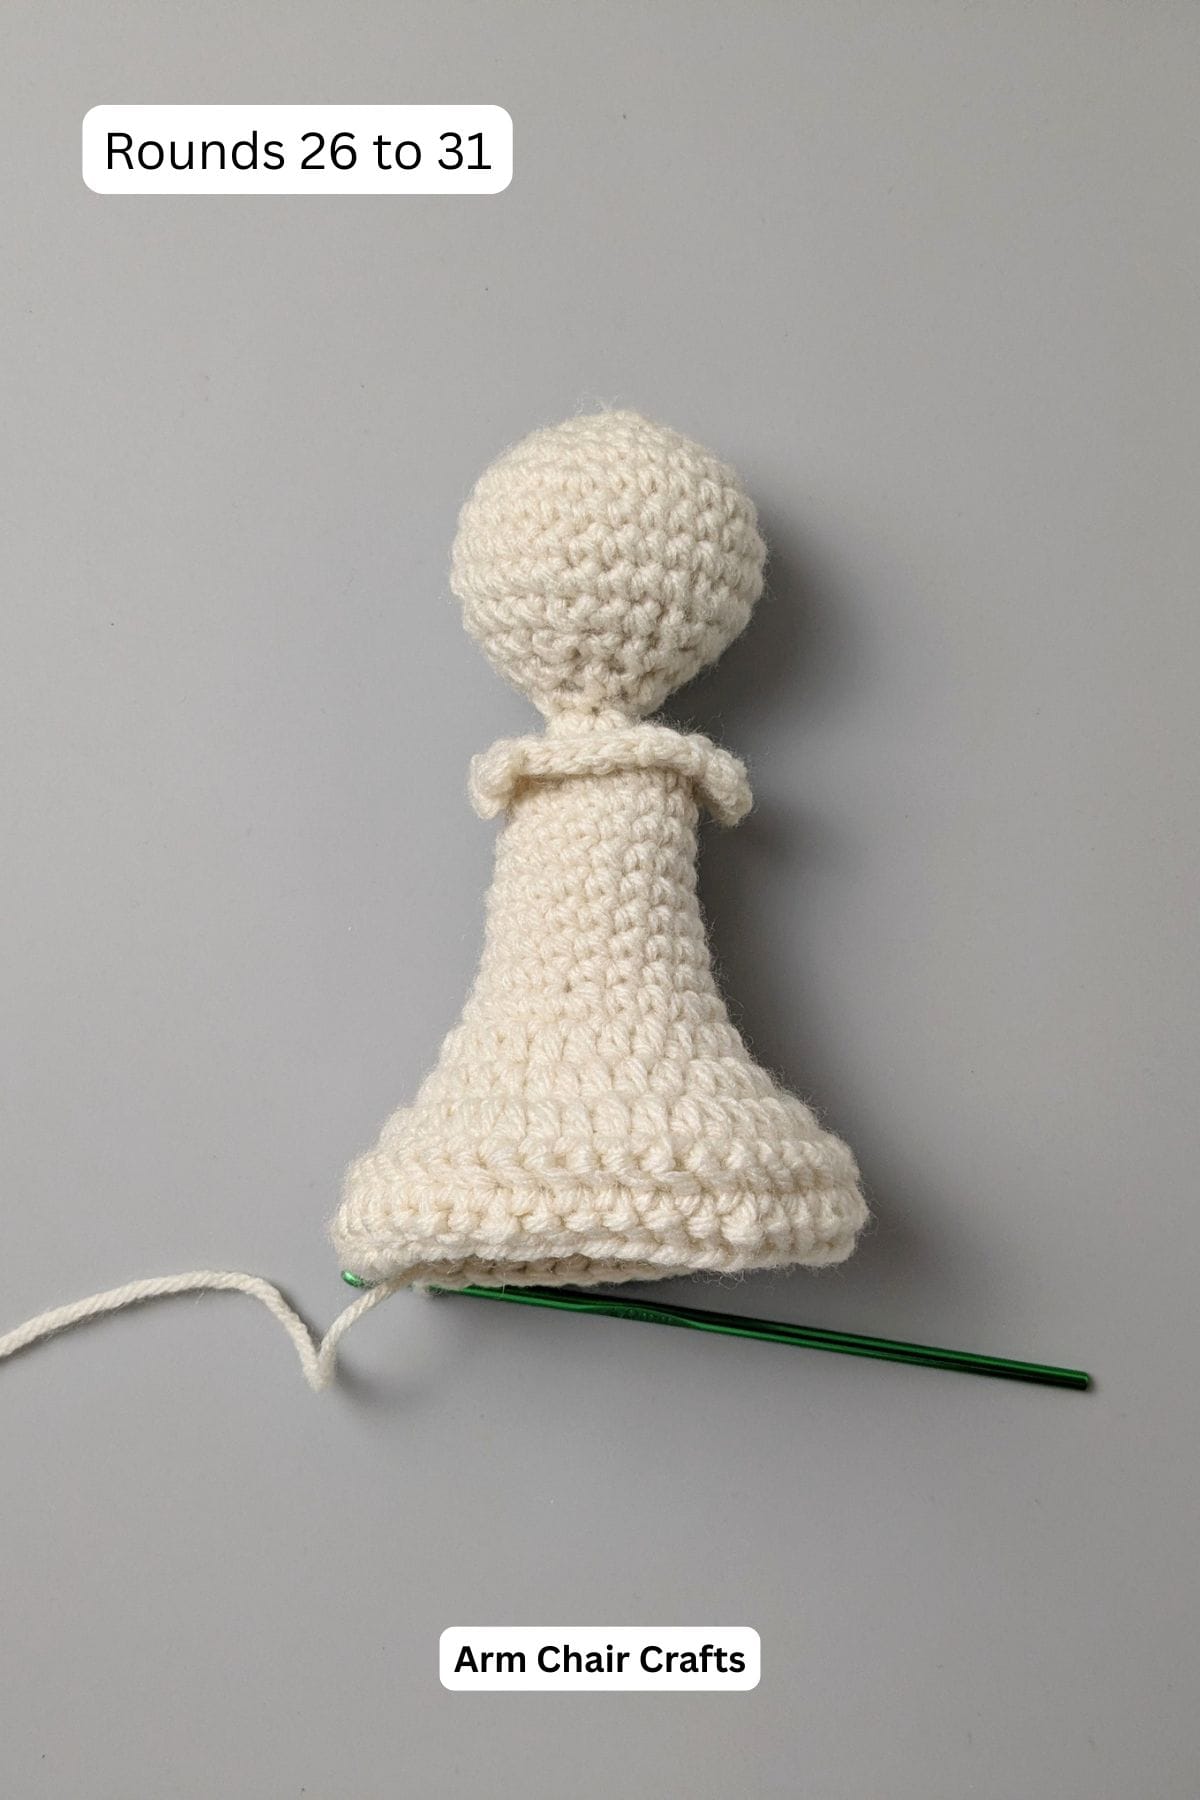
Round 26: Ch1, *2 sc in next st, 1 sc in each of the next 2 sts,* repeat from * around, sl st into 1st sc to join. [28 sc].
Round 27: Ch1, 1 hdc in each st around, sl st into 1st hdc to join. [28 hdc].
Round 28: Ch1, *2 hdc in next st, 1 hdc in each of the next 3 sts,* repeat from * around, sl st into 1st hdc to join. [35 hdc].
Round 29: Ch1, *2 hdc in next st, 1 hdc in each of the next 4 sts,* repeat from * around, sl st into 1st hdc to join. [42 hdc].
Rounds 30-31 Ch1, 1 hhdc in each st around, sl st into 1st hdc to join. [42 hhdc in each round].
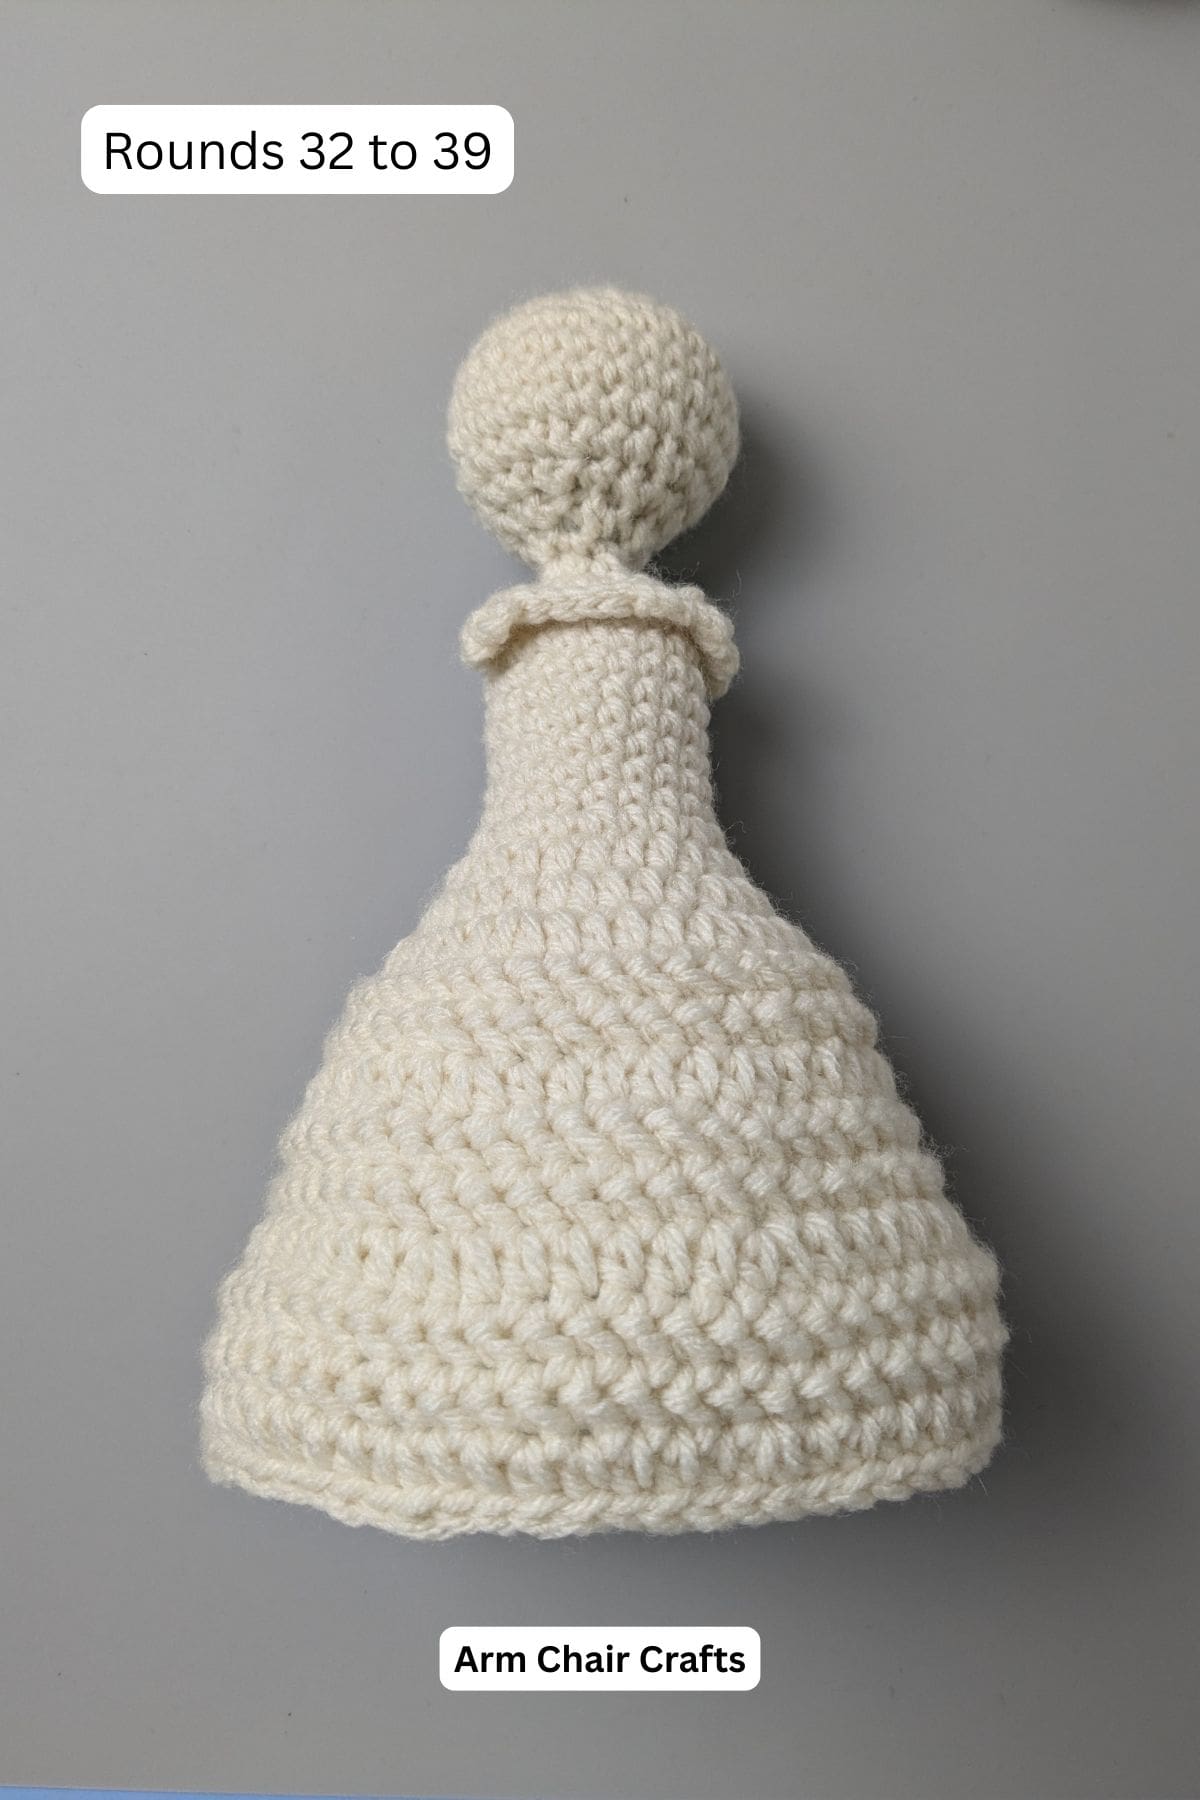
Round 32: Ch1, *2 hdc in next st, 1 hdc in each of the next 5 sts,* repeat from * around, sl st into 1st hdc to join. [49 hdc].
Rounds 33-34: Ch1, 1 hhdc in each st around, sl st into 1st hhdc to join. [49 hhdc].
Round 35: Ch1, *2 hdc in next st, 1 hdc in each of the next 6 sts,* repeat from * around, sl st into 1st hdc to join. [56 hdc].
Rounds 36-37: Ch1, 1 hhdc in each st around, sl st into 1st hhdc to join. [56 hhdc].
Round 38: Ch1, *2 hdc in next st, 1 hdc in each of the next 7 sts,* repeat from * around, sl st into 1st hdc to join. [63 hdc].
Round 39: Ch1, 1 sl st in each st around, sl st into 1st ch to join. FO and weave in any ends. [63 sts].
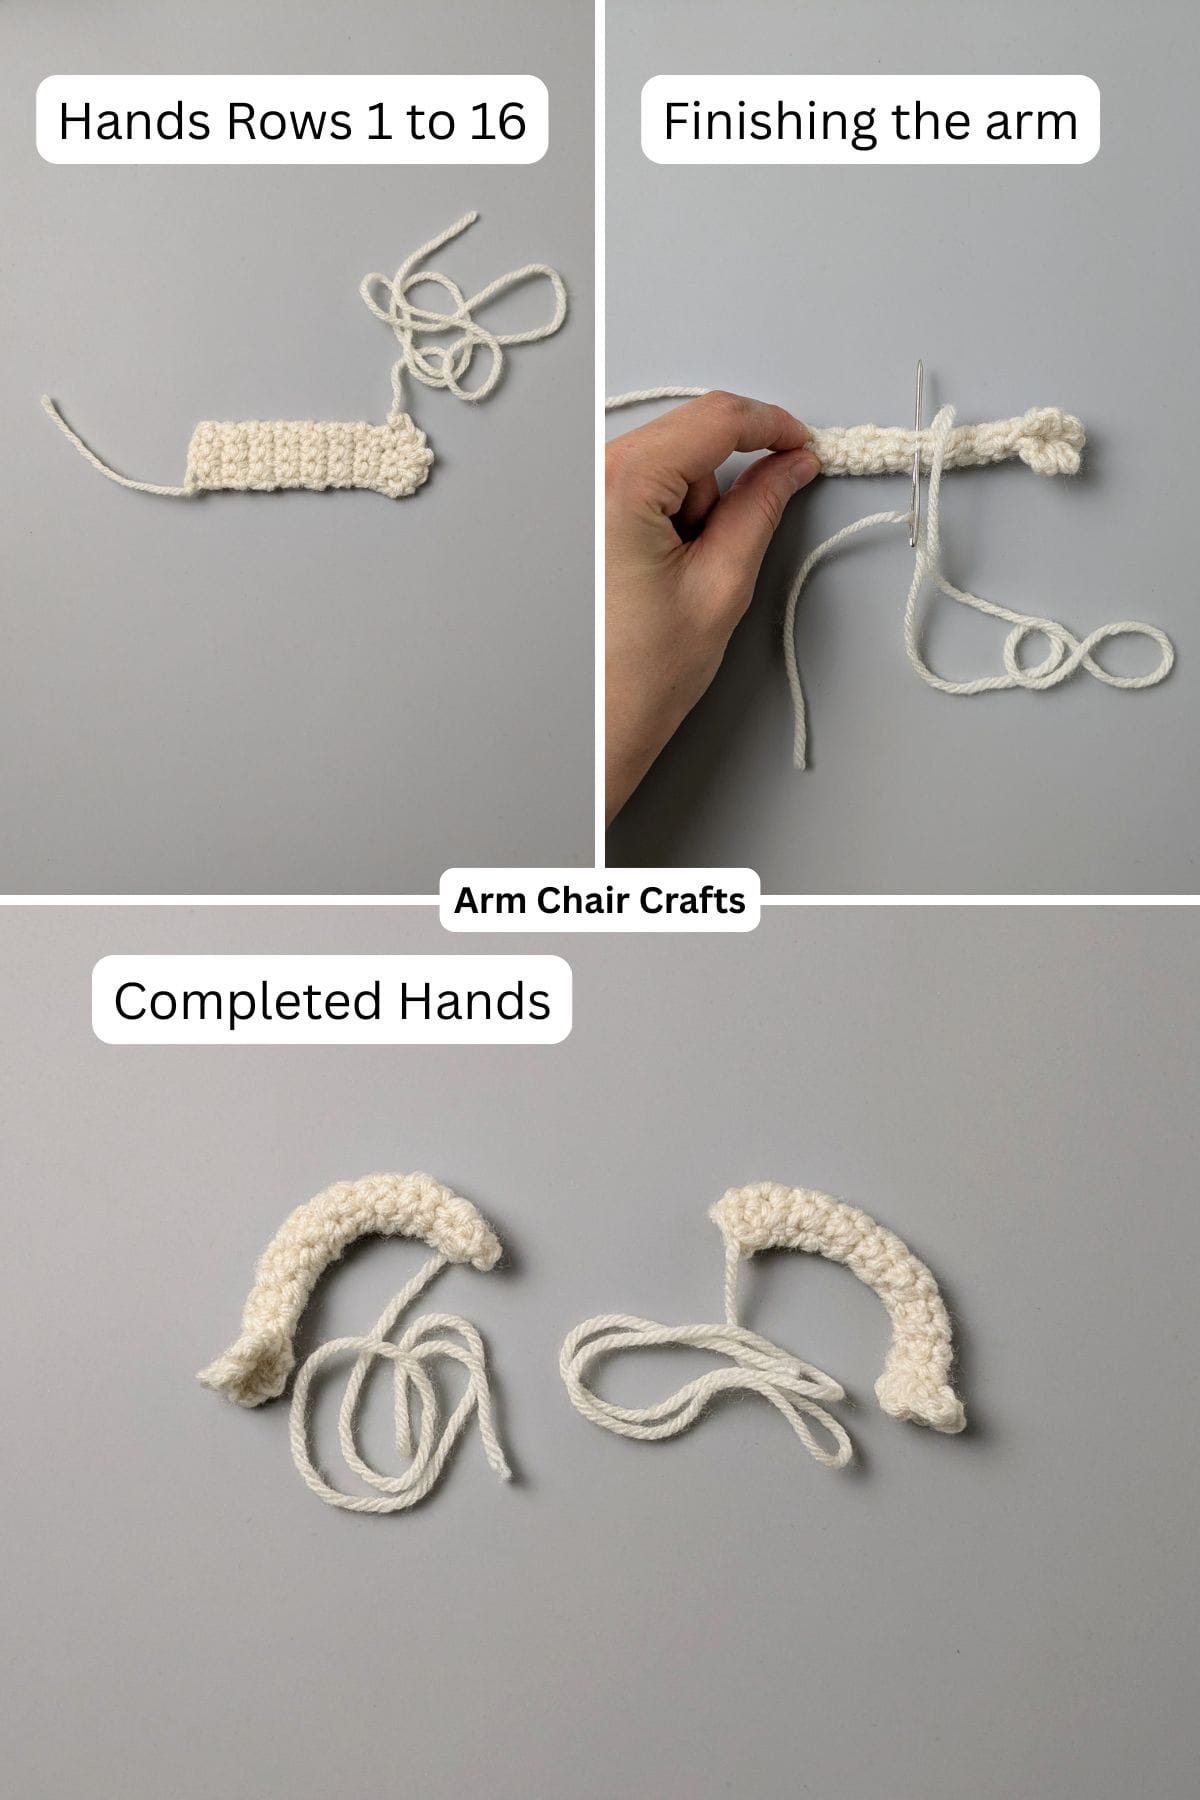
Arm and hands
Make 2.
Foundation: Using your 4 mm (G/6) hook, ch5
Row 1: 1 sc in 2nd ch from hk, 1sc in next 3-sts, turn. [4sc]
Rows 2 - 15: 1sc in each st, turn. [4 sc in each st].
Row 16: Sl st in next st, (ch2, sl st, ch3, sl st, ch4) in next st, (sl st, ch3, sl st, ch2) in next st, sl st in last st, ch1, cut yarn, leave an extra long tail for sewing and fasten off. The reason why you want an extra long tail is so that you can use part of the tail to finish the arm (see below) and then to sew the arm onto the body later.
Finish arm: Thread the long yarn tail onto a needle and fold the long rectangle in half lengthwise and sew the sides together. Once sewn together, don't cut off the extra yarn tail. Leave that on so that you can sew your arm onto the body later.
Make another. You should have 2 in total.
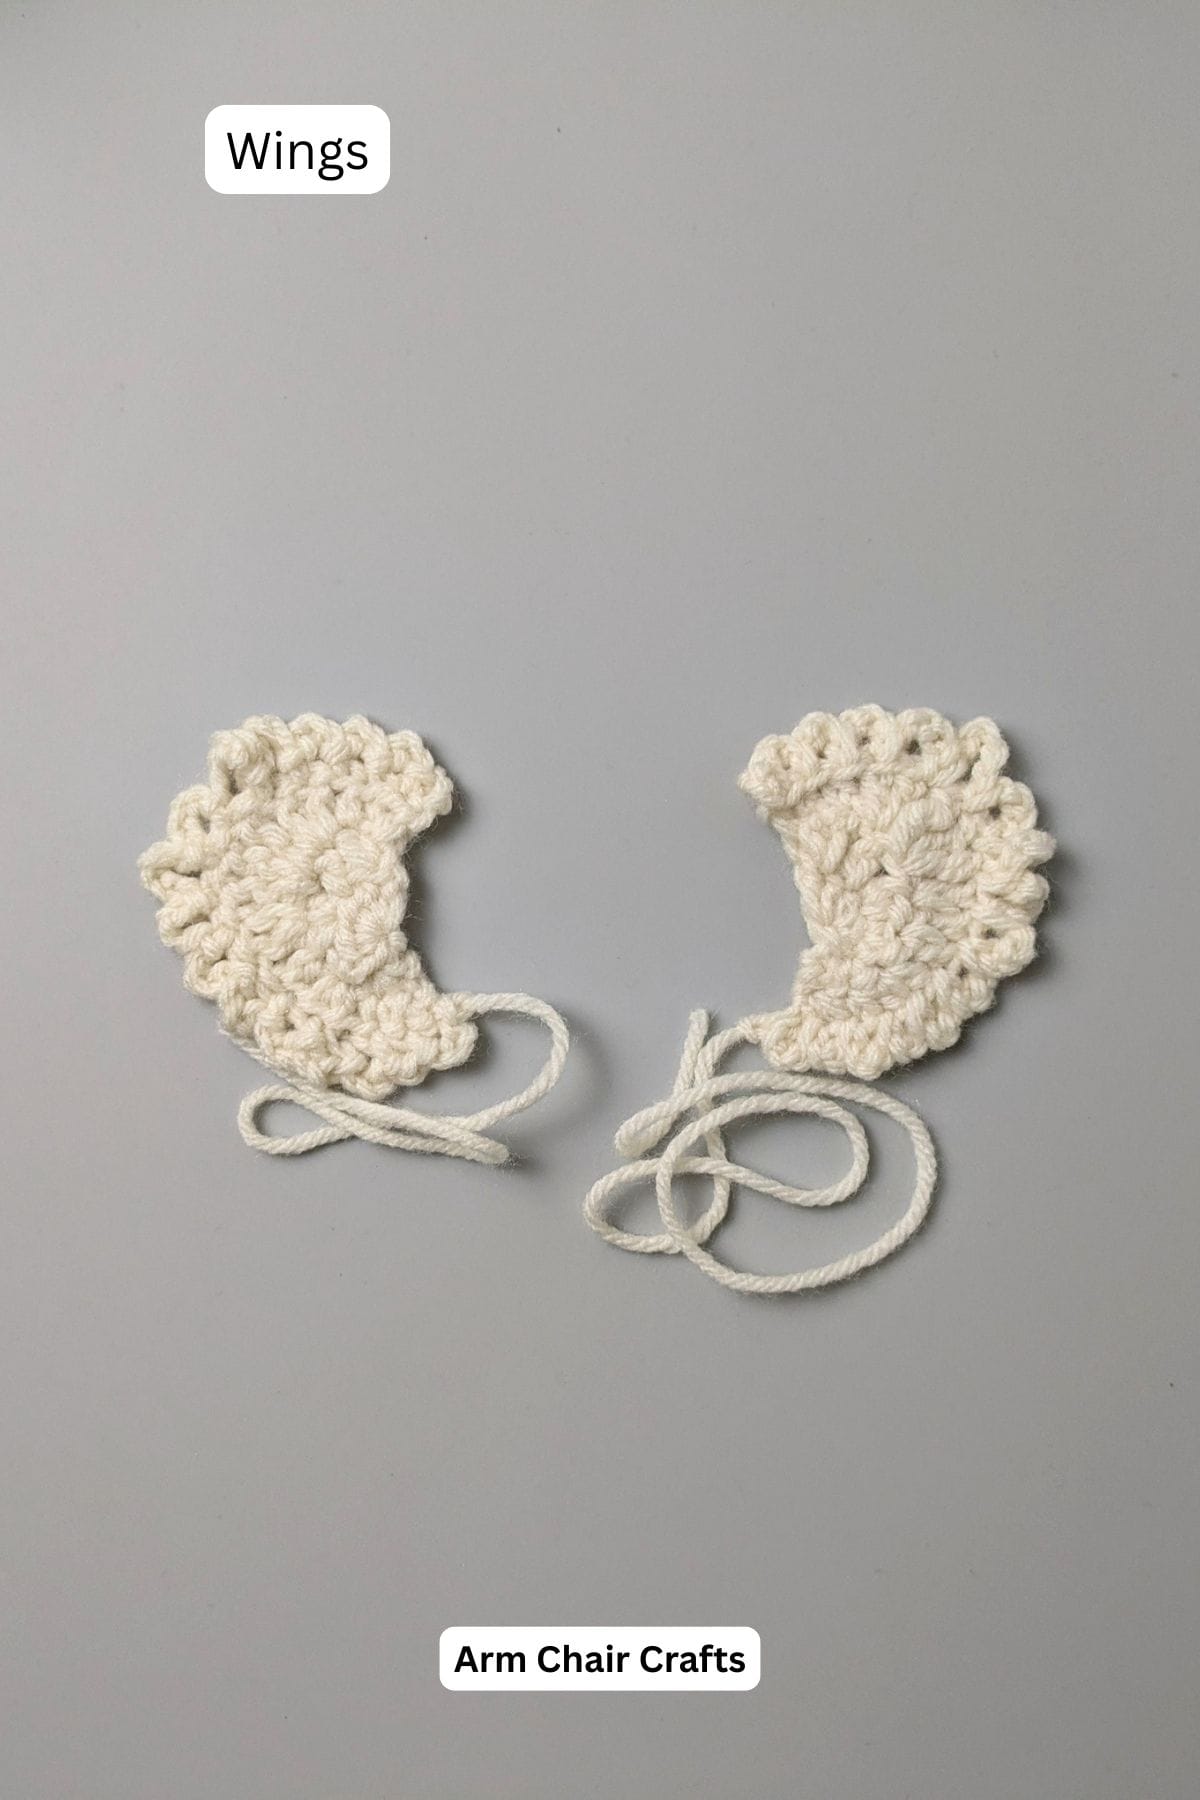
Making The Wings
Make 2.
Round 1: Using your 3.5 mm (E/4) hook, make a magic ring, 2sc, 2hdc, 2dc into ring, pull tail tight to close ring, turn [6 sts].
Round 2: 2dc in 1st st, 1dc in next, 2hdc, in next, 1hdc in next, 2sc in next, 1sc in last st, turn [9 sts]
Round 3: 2sc in 1sts, 1sc in next, 2hdc in next st, 1dc in next, 2dc in next, 3tr in next, 2dc in next, 1hdc in next 3-sts, turn. [16 sts]
Round 4: *Ch3, sl st in next st,* repeat from * 4 times, ch4, sl st into next st, ch5, sl st into next st, ch4, sl st into next st, ch5, sl st into next st, ch4, sl st into next st, ch4, sl st into next st, ch3, sl st into next st, ch3, sl st into next st, ch2, sl st into next st, ch3, sl st into next st, ch2, sl st into next st, ch3, sl st into next st, FO, leaving a long tail for sewing. Weave in starting tail.
Make another, you need 2 wings in total.
Putting It together
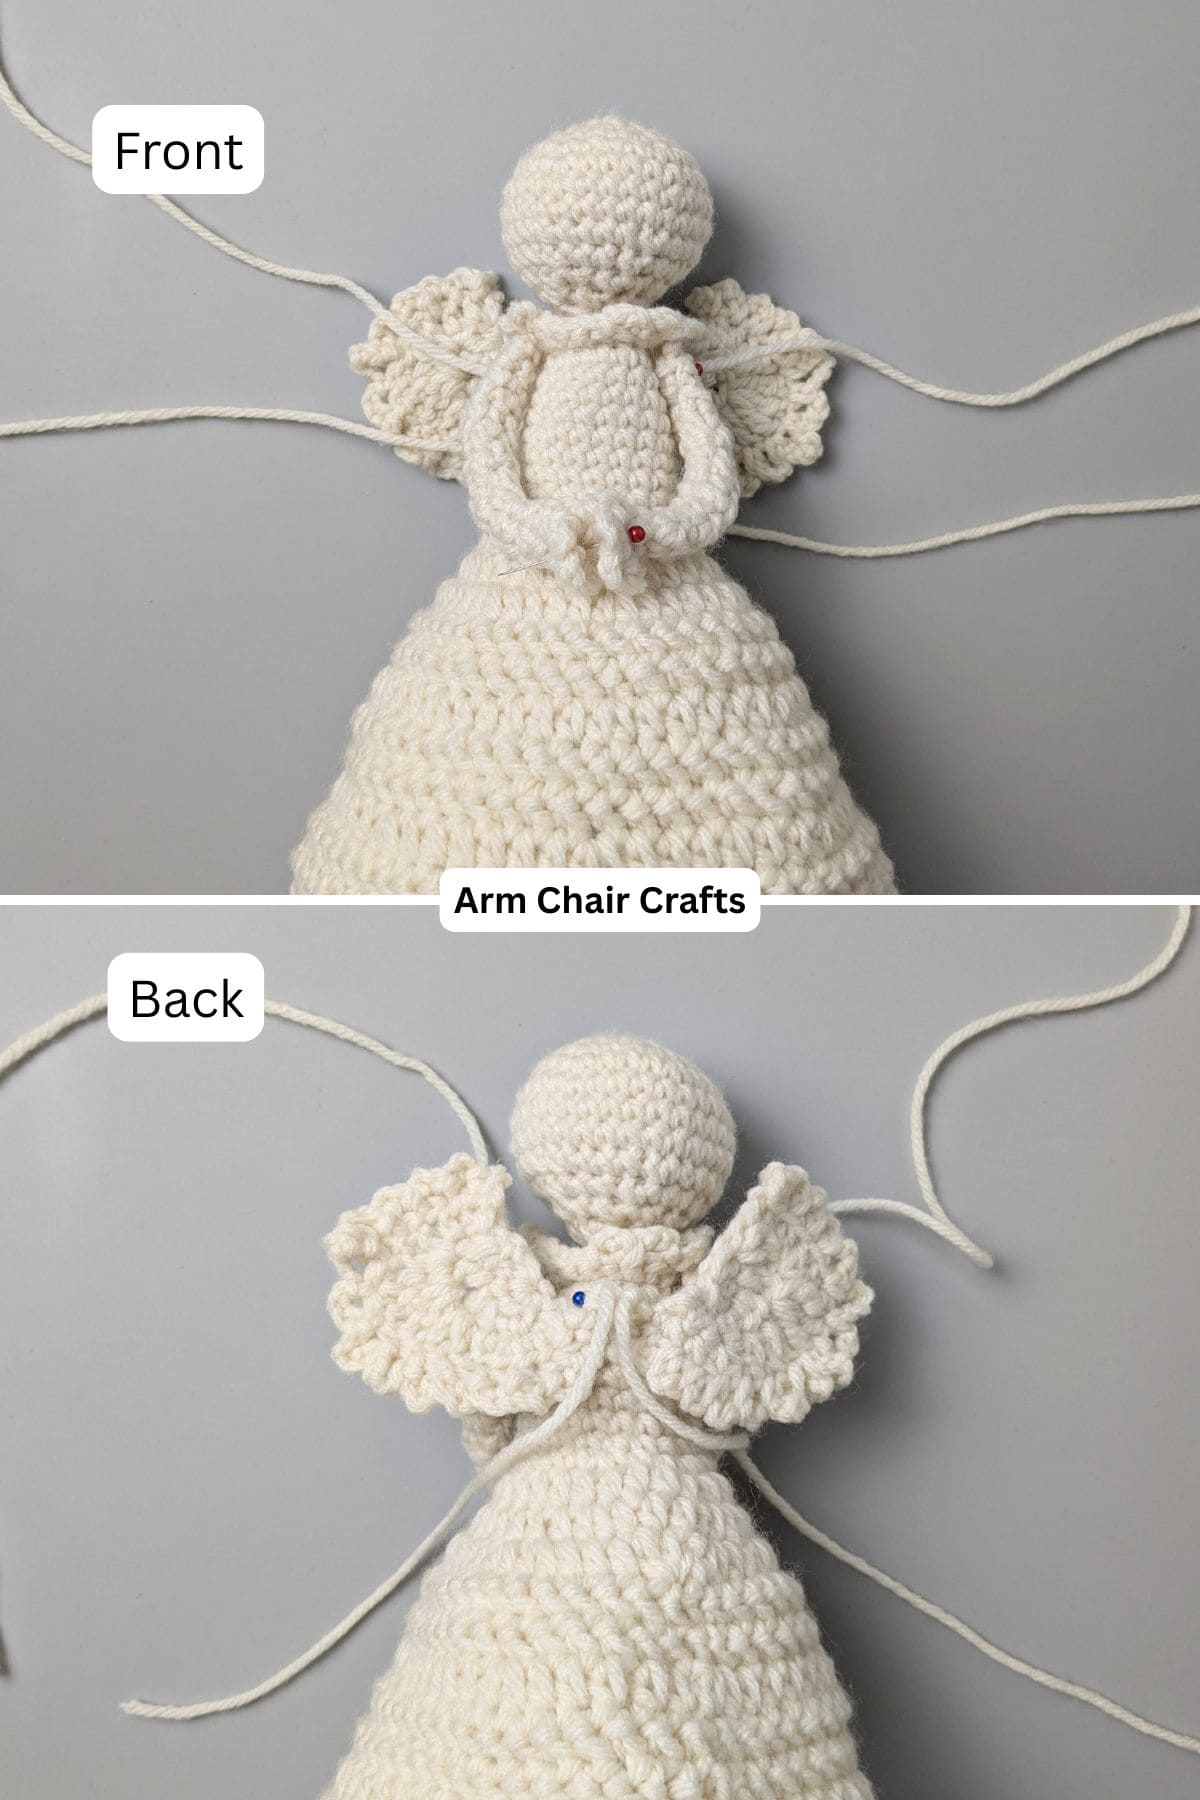
Using pearl head pins, position your arms under the collar of your angel's body on opposite sides.
After this, turn your angel over so that the back is facing up. Using pearl head pins, pin the wings onto the angel into a position you like. Make sure that the short edges of the wings touch (so there is no gap between the wings). This will make your angel look neater.
When you are happy with the position of the wings, and arms, sew them in place using the long tails you left on each piece.
Optional: you can sew the angels hands together so it looks like she is praying.
Finally, weave in any ends.
Looking for your next crochet project?
Explore the Recline and Unwind Club for exclusive ad-free crochet patterns, tips, and shop.
Crochet Tips, Yarn Choices, and Color Inspiration
- Use stitch markers to track rounds and maintain shape.
- Keep yarn tension consistent for smooth stitches and neat shaping.
- Personalize yarn colors, embellishments, or small details for a unique Eve.
- Classic white and gold for traditional Christmas décor
- Soft pastels for nursery or home decorations
- Embroidered details for facial features or decorative trim
Perfect Occasions to Use This Craft
- Makes a beautiful Christmas ornament or tabletop decoration.
- Ideal as a handmade holiday gift for family or friends.
- Great for nativity scenes or angel-themed collections.
- Suitable for baby showers or baptism gifts.
- Adds charm to holiday décor or festive displays.
How To Use This Craft
- Display on shelves, mantels, or tabletops during holidays.
- Give as a meaningful handmade gift for special occasions.
- Create a collection of crochet angels for festive décor.
- Pair with handmade ornaments or crafts for a cohesive theme.
- Use as a decorative accent for gift wrapping or holiday tables.
FAQ
Yes! You can use traditional holiday colors or any palette that suits your style.

More Crafts You Might Like To Try
More Easy Patterns For You To Try
Looking for more patterns like this? Why not try one of these:

Stay Connected
Made this pattern? Let us know how it went in the comments below!
Pin this post - Pin now to take your paper crafting skills to the next level.
Share on Instagram or Facebook - Capture the beauty of your finished project and share it on Instagram or Facebook! Tag us @armchaircrafts so we can see your work!