Looking for a fun, creative accessory that you can make yourself?
Learn how to make a paper heart necklace using simple materials like paper and a necklace chain.
This beginner-friendly project is quick, enjoyable, and allows you to customize your necklace with colors, patterns, or designs you love.
Whether you want a cute handmade gift for someone special or a stylish personal accessory, this paper heart necklace is both practical and playful-a charming way to wear your creativity.
Jump to:
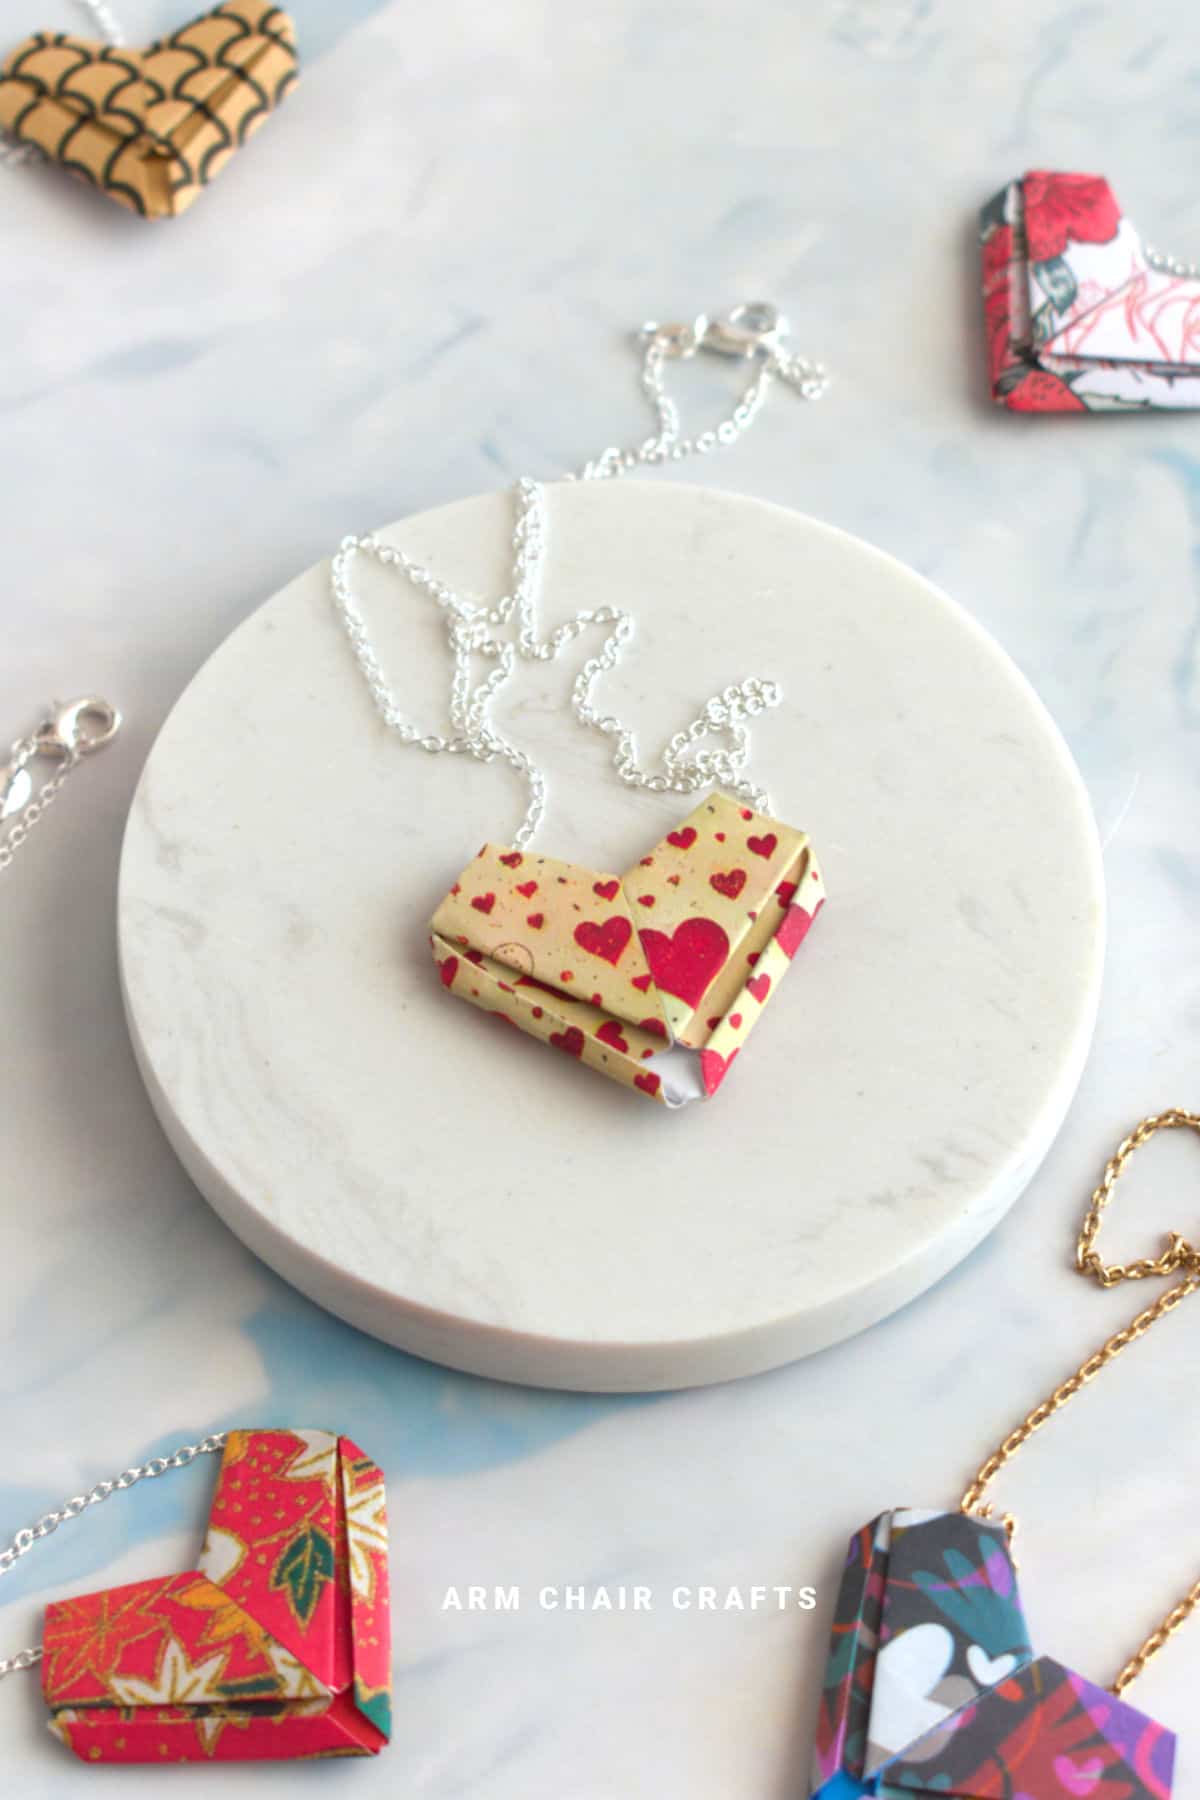
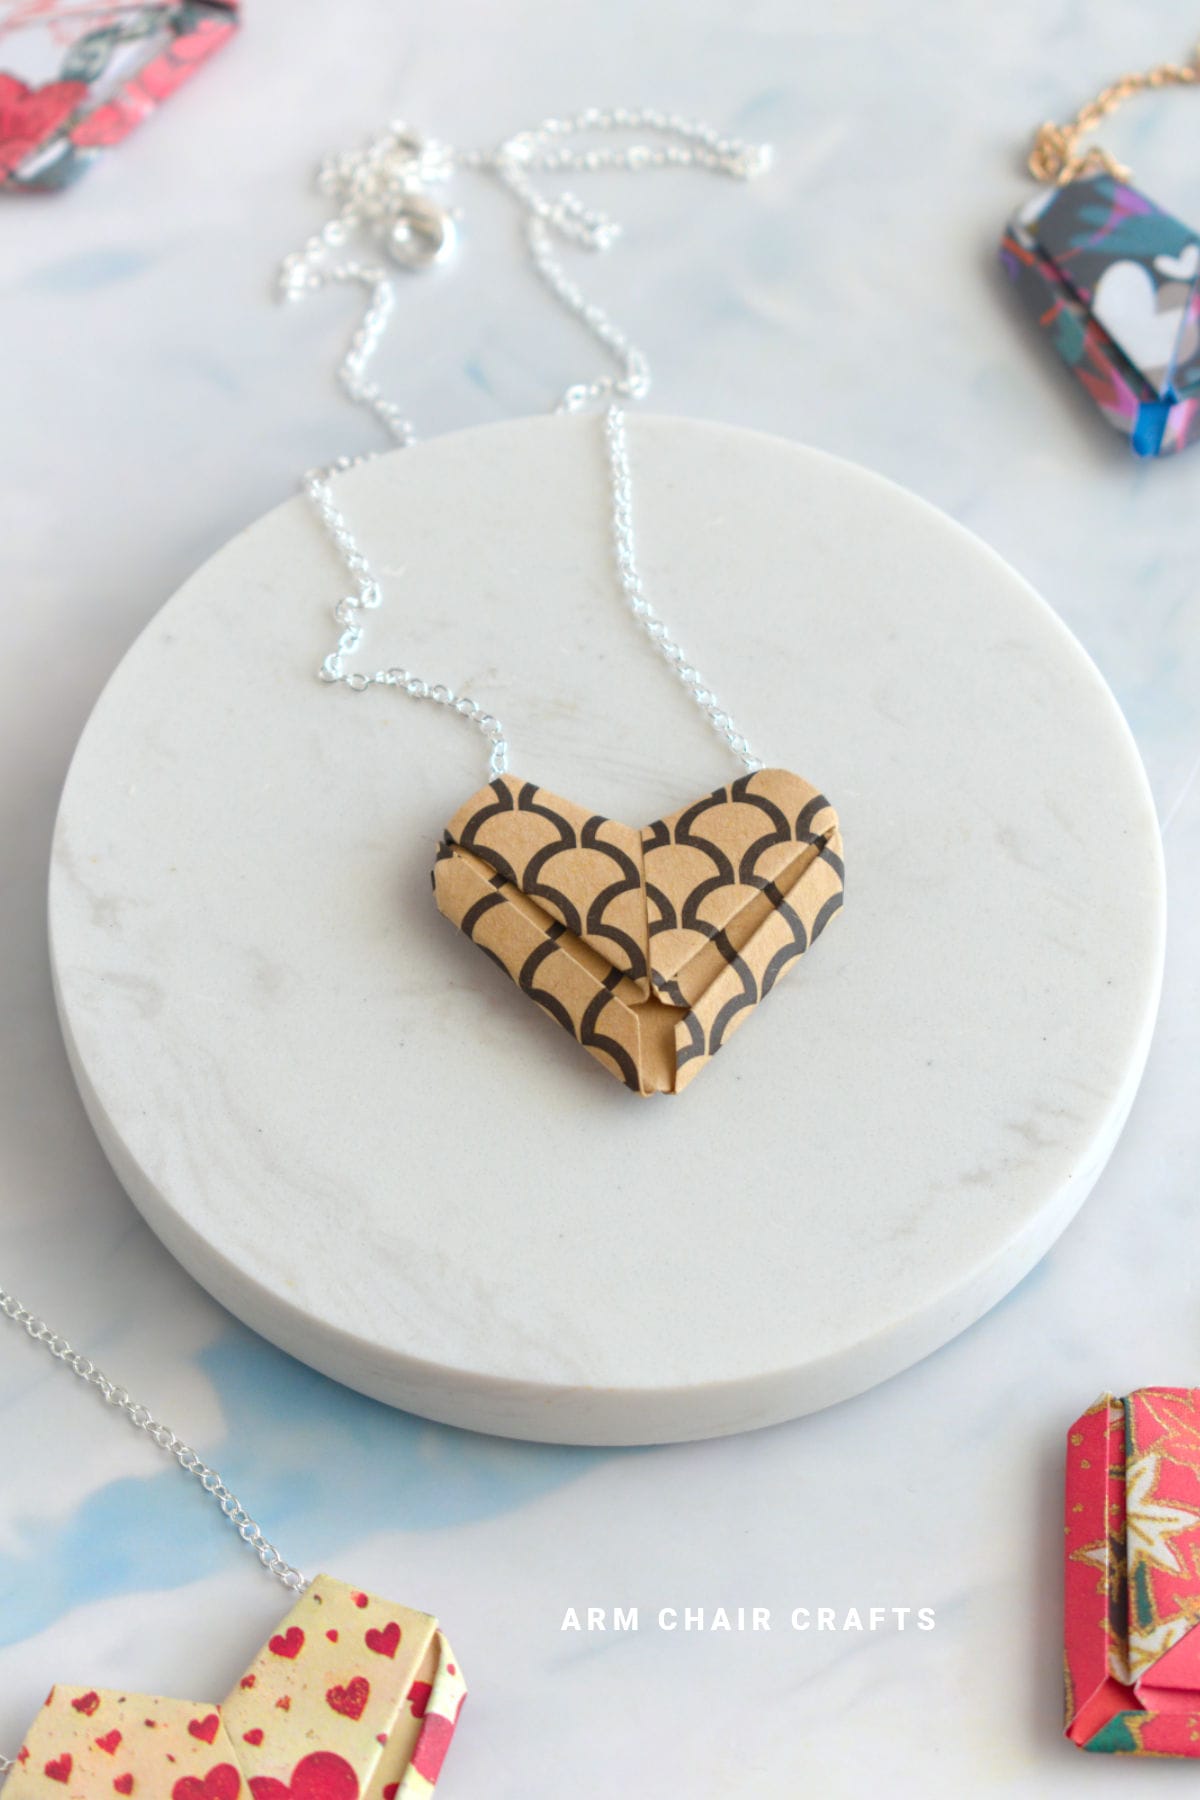
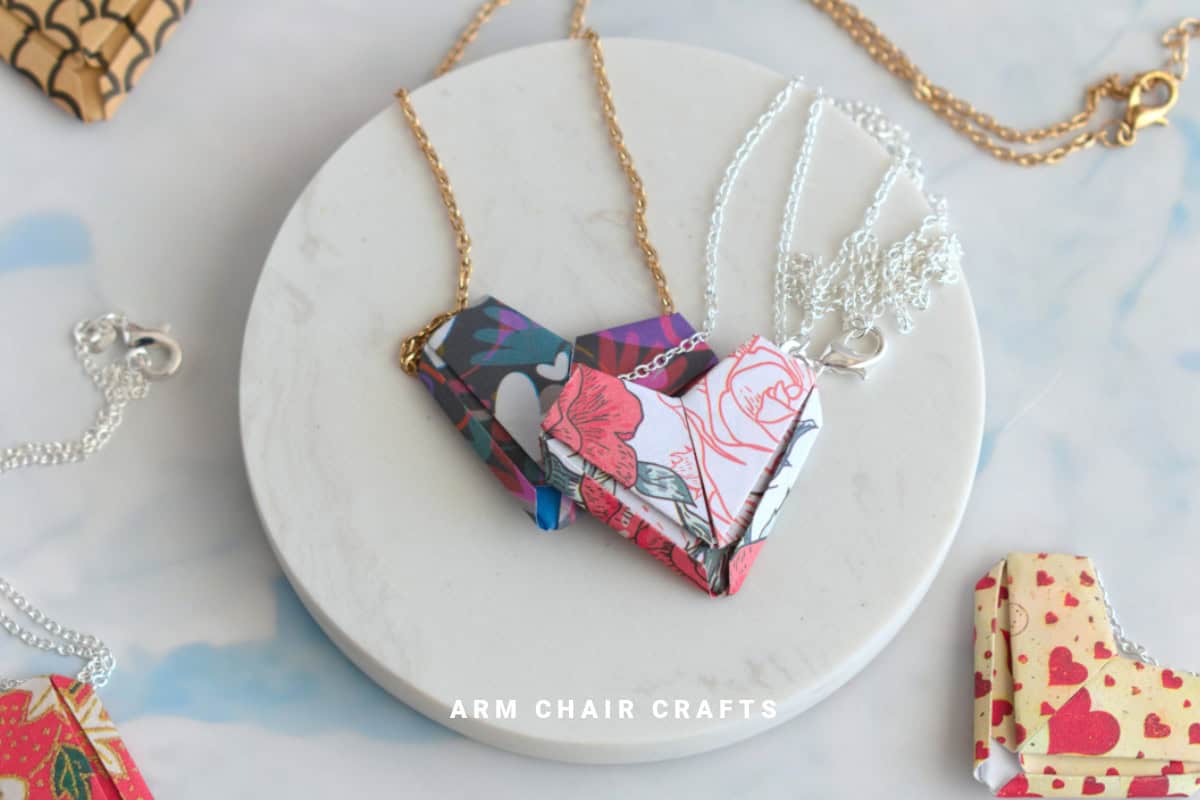
A paper heart necklace is a simple and adorable accessory that you can make at home.
Using just paper and a necklace chain (or string), you can create a unique piece of jewelry that's lightweight, colorful, and fully customizable.
This project is beginner-friendly and perfect for anyone learning how to fold paper hearts into wearable designs.
Even if you've never made paper jewelry before, the step-by-step process is approachable, fun, and a little addictive.
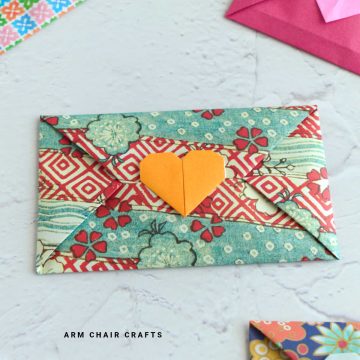
You can decorate your heart with colors, patterns, or small embellishments to match your style, making it a charming accessory or a thoughtful handmade gift.
Why You'll Love This Pattern
- Quick and easy DIY tutorial for making wearable paper jewelry
- Perfect for beginners learning paper folding and basic assembly
- Creates a cute origami accessory that's lightweight and stylish
- Fully customizable with colors, patterns, or decorations
- Ideal for handmade gifts or personal accessories
- Offers a fun, hands-on craft that doubles as wearable art
Skill Level
★☆☆☆☆ - Beginner-friendly
Materials Needed
- 1 x sheet of rectangle paper (size: 3.70 inches x 2.7 inches [9.5 cm x 7 cm])
- Necklace chain, or you could use string.
- Optional: Tape (if you want to make your necklace more secure)
Final necklace pendant size is about 1.5 inches (4 cm) wide.
Instructions
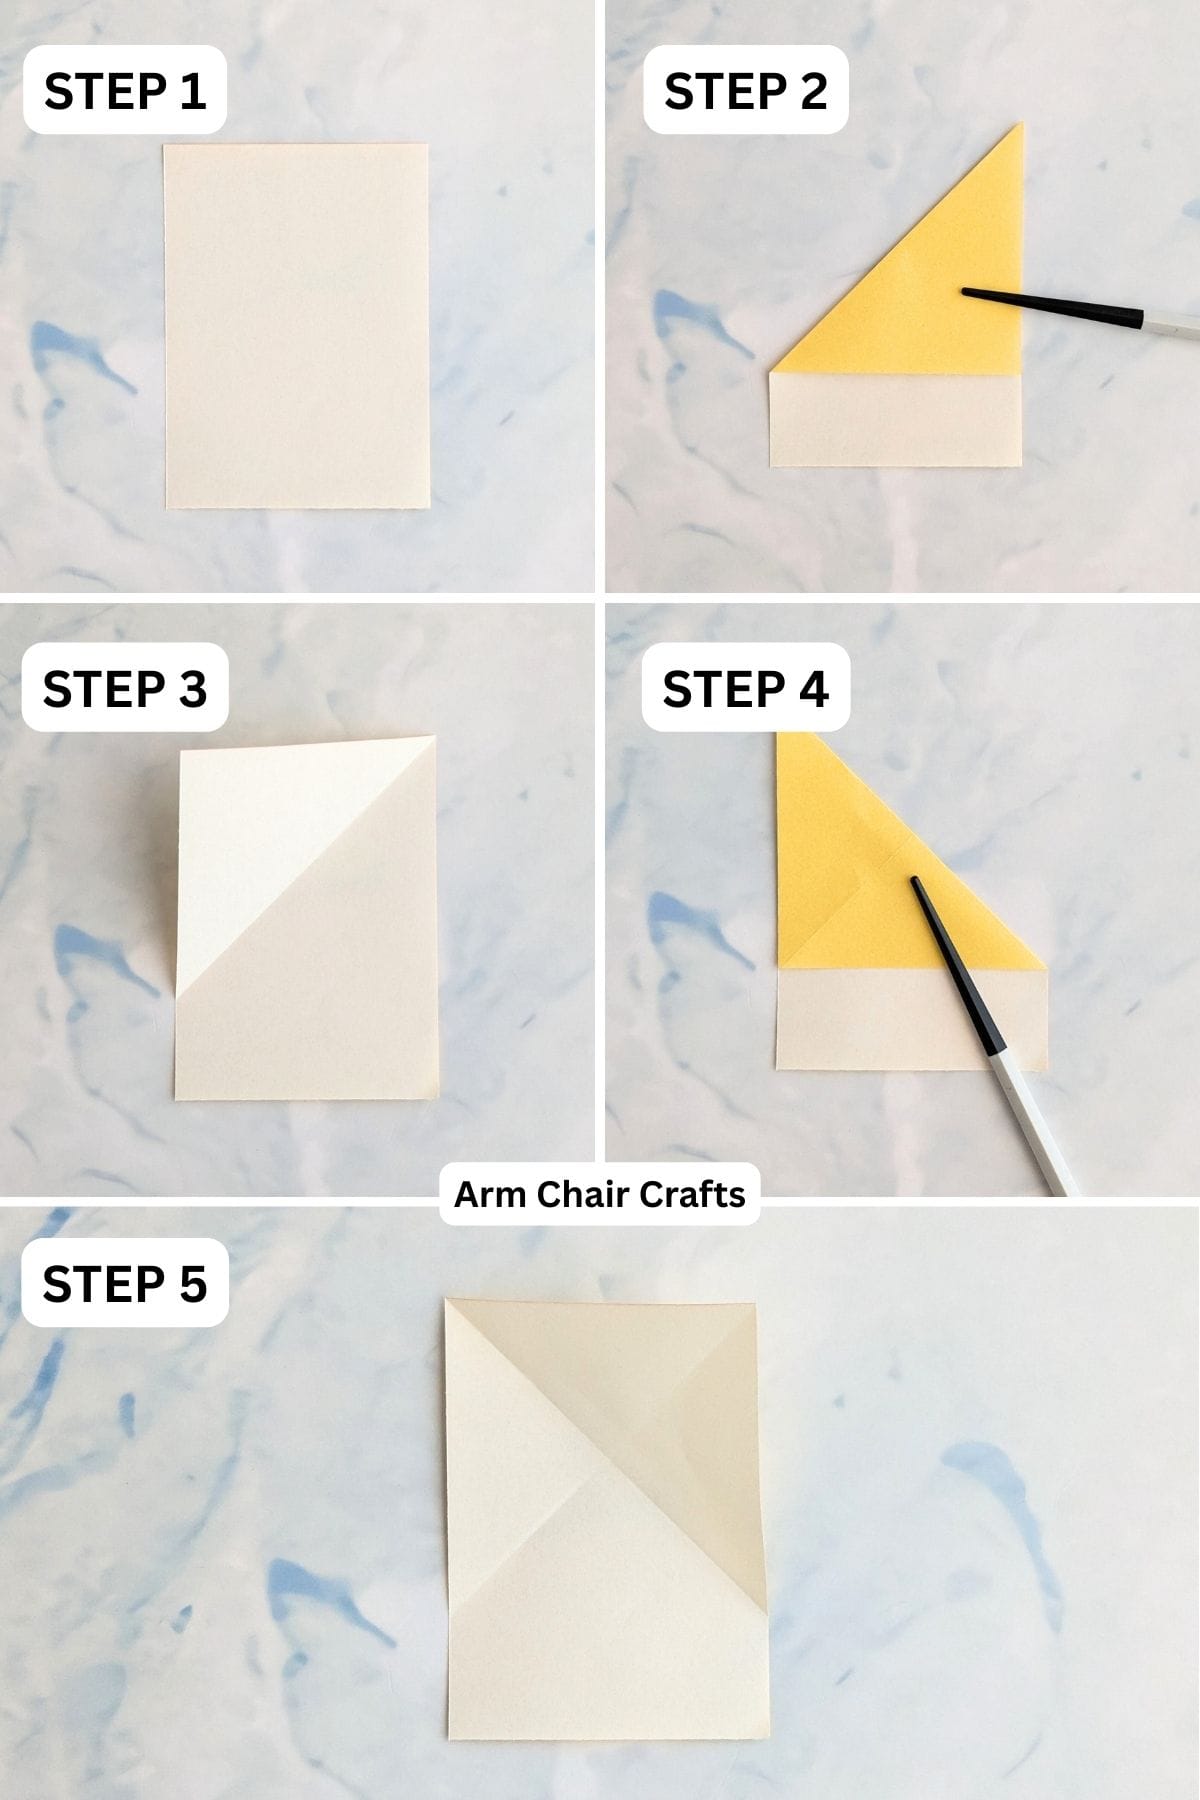
Step 1: Begin with the color that you want your heart to be facing down. Arrange your paper to sit as shown.
Step 2: Fold the top left corner down to meet the right edge.
Step 3: Unfold previous step.
Step 4: Fold the top right corner down to meet the left edge.
Step 5: Unfold previous step.
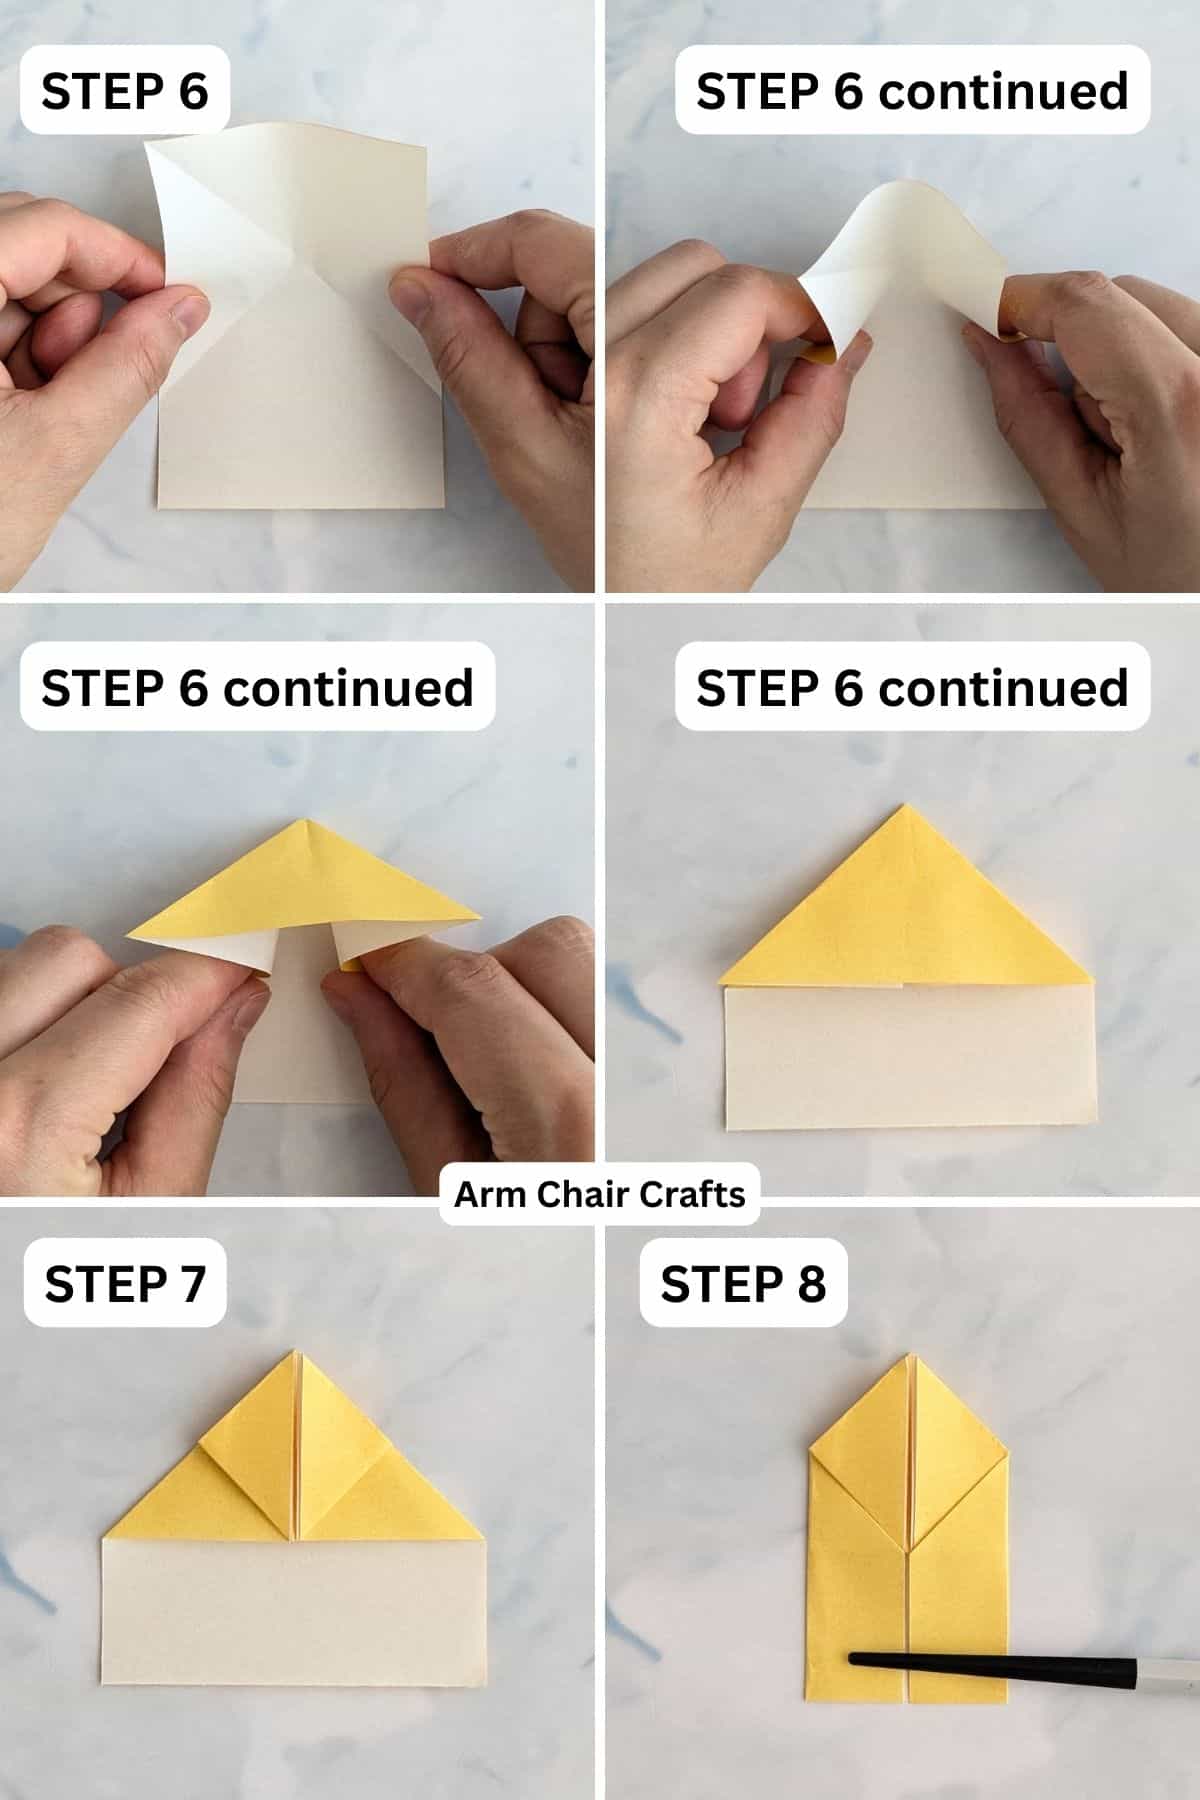
Step 6: Holding both the upper left and upper right sides of the paper, collapse the paper onto itself using the existing creases. It should form a triangle. Crease this well after.
Step 7: Fold both the bottom left and right corners (top layer only) of the triangle up to meet the top point.
Step 8: Next, fold both the left and right sides of the paper in to meet the middle.
You're almost there!
To unlock the final steps and complete your pattern, create a free account with Grow.me. below.
Make sure you tick the box to subscribe to our newsletter and stay up to date with the latest patterns, tips, and more!
Once you're signed up, you'll get instant access to finish your project and enjoy exclusive content in the future.
Already signed up? Hit the button below and select 'Switch to Log In' to pick up where you left off and finish your project!
Step 9: Flip your paper over from left to right.
Step 10: Fold the bottom edge up to meet the top left and right corners as shown.
Step 11: Fold the top point down (only the top layer) as shown.
Step 12: Fold both the bottom left and bottom right corners up to meet the center.
Step 13: Tuck both corners you folded up in the previous step into the middle of the triangle pocket found underneath (see picture for guide).
Step 14: Fold both the top left and right corners down on a slight angle as shown.
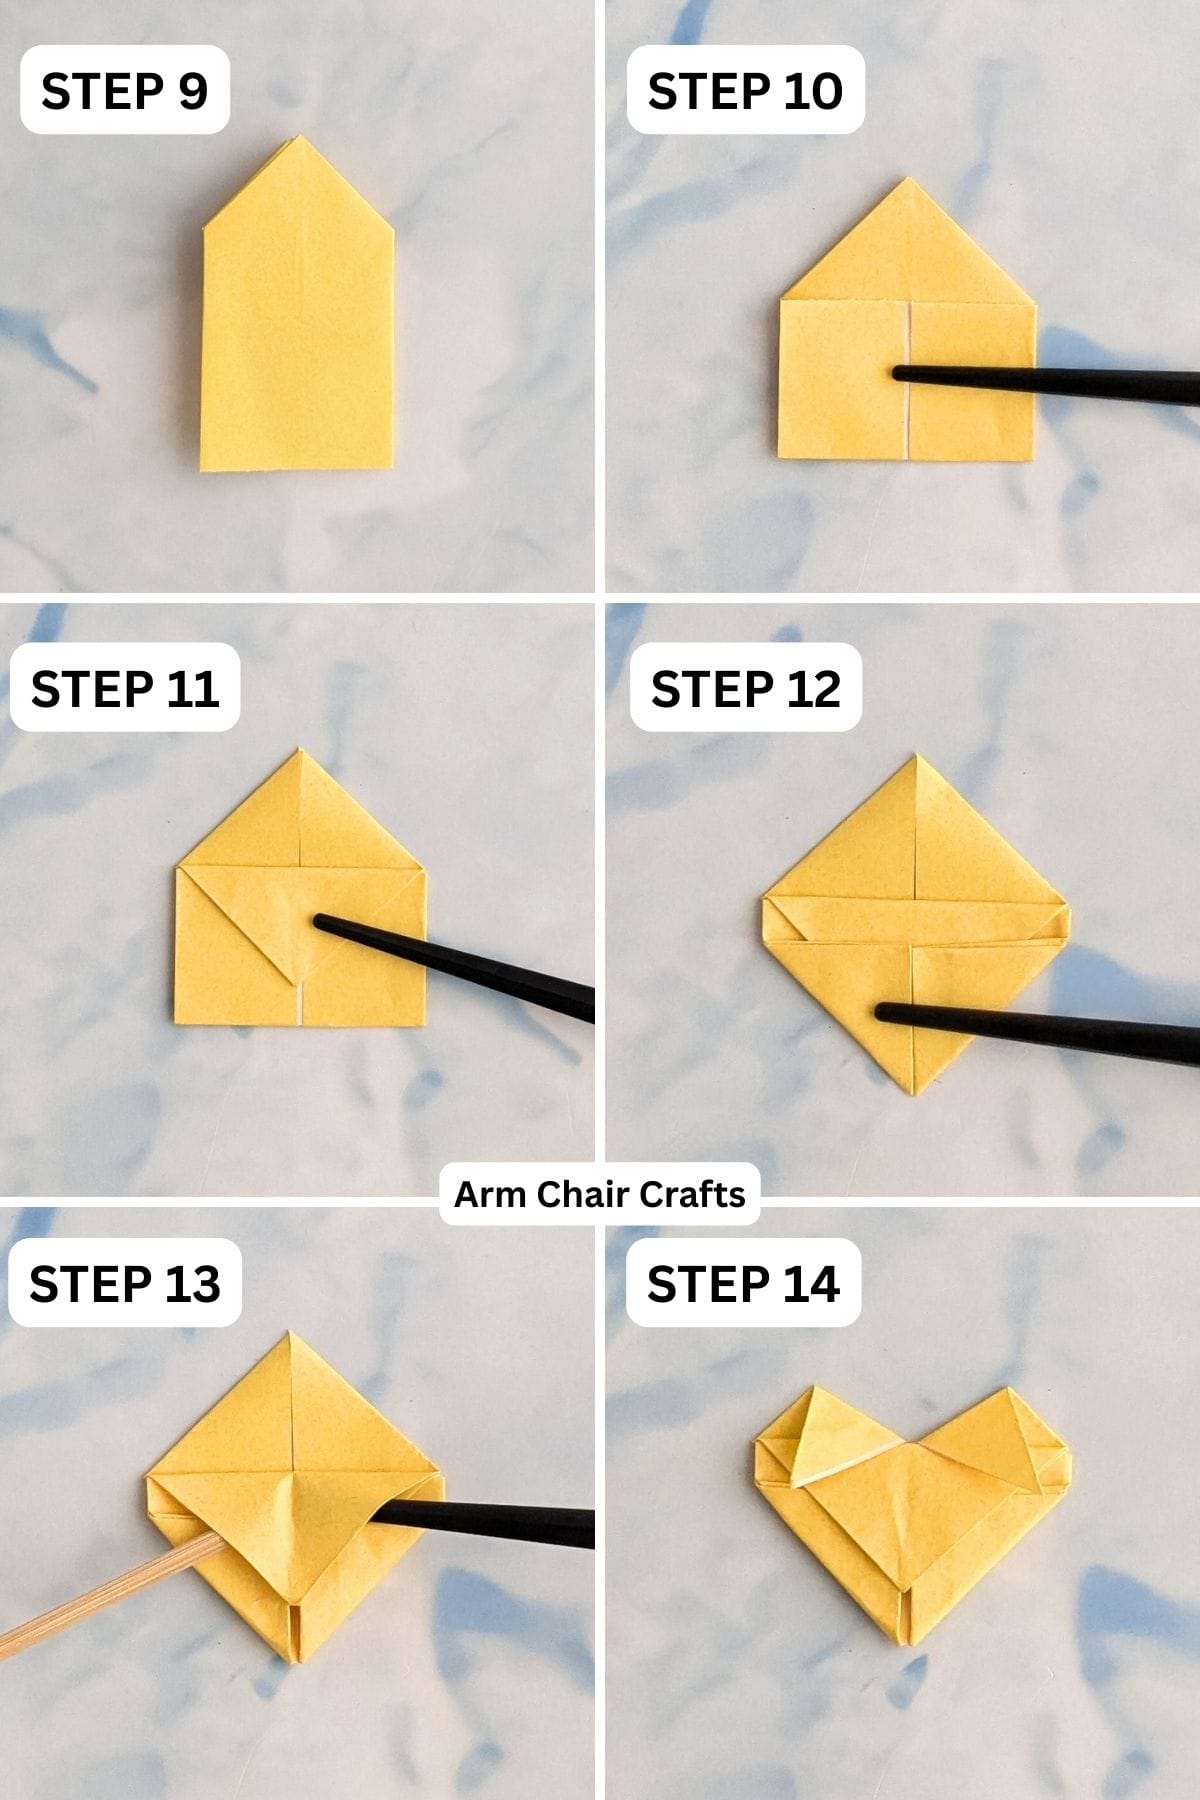
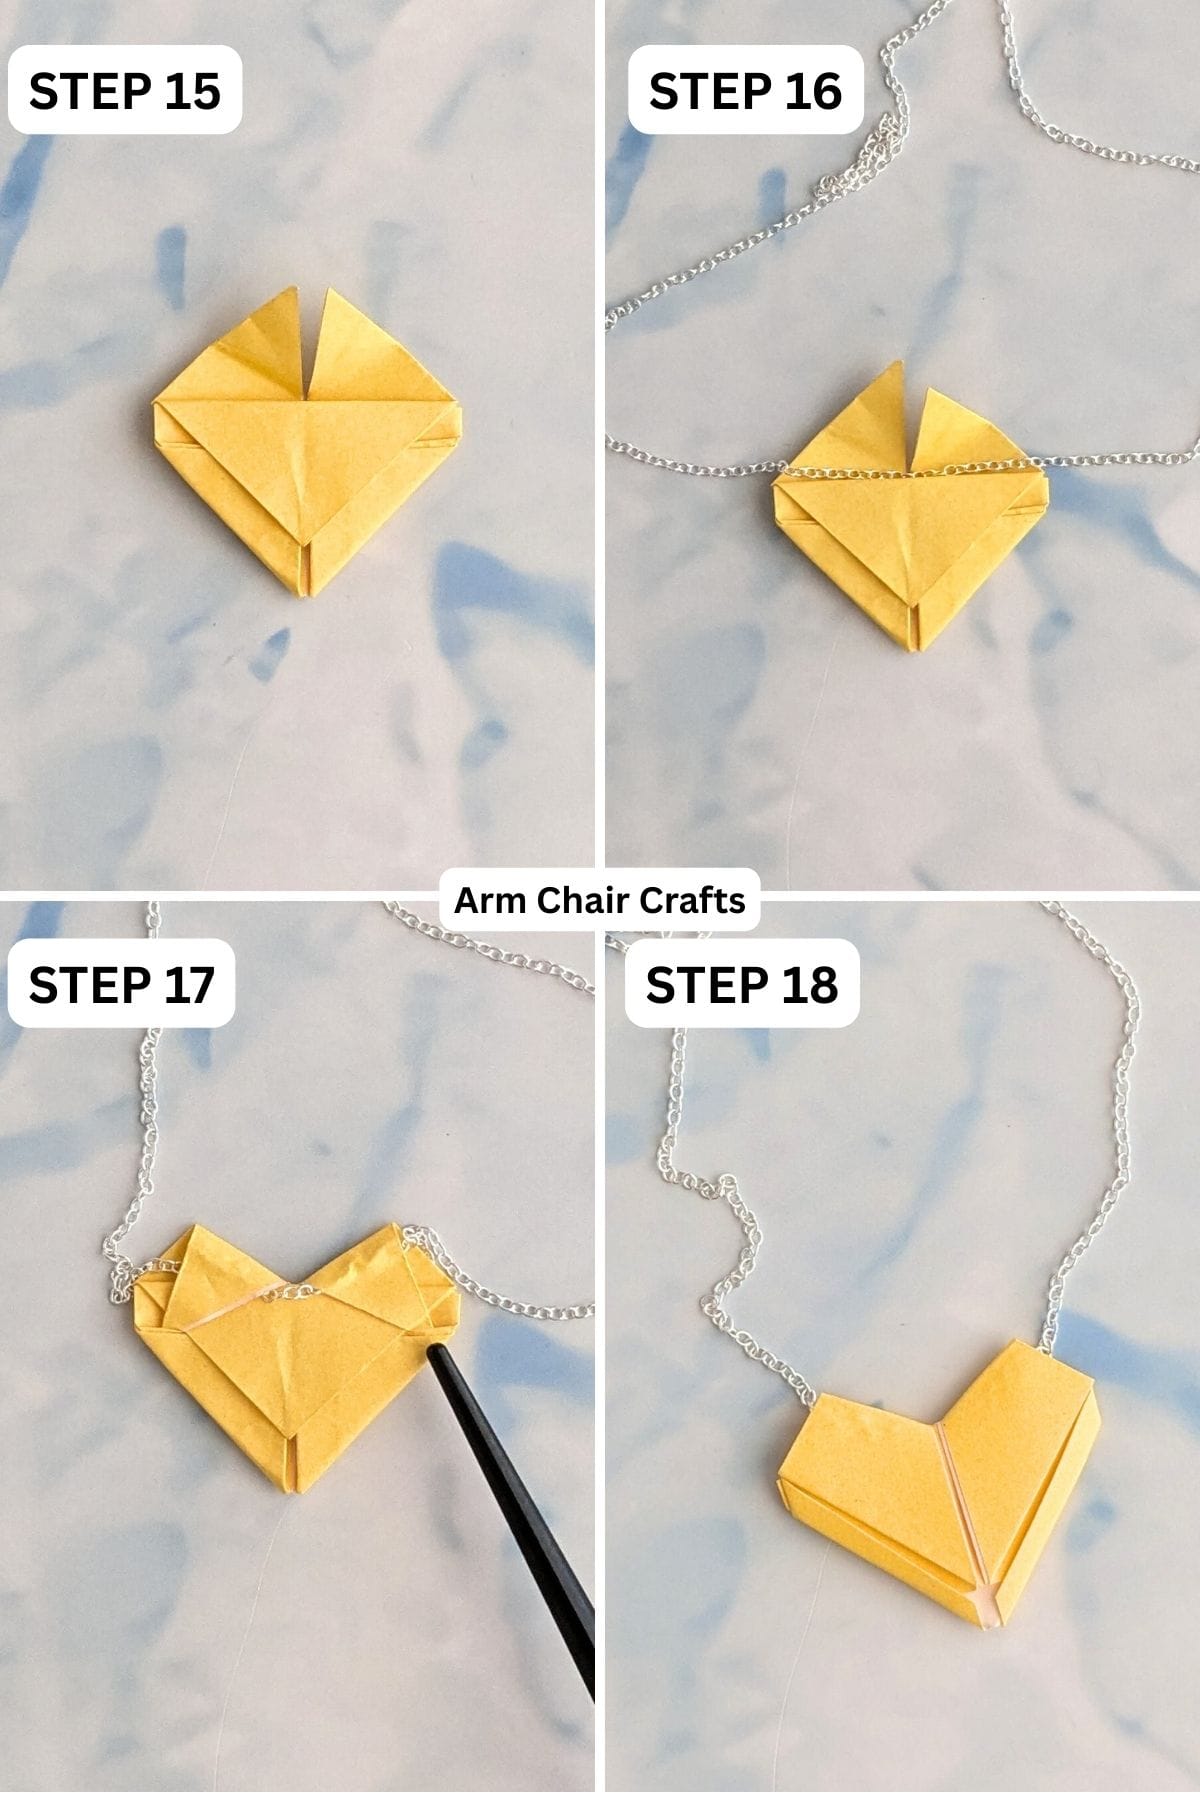
Step 15: Unfold previous step.
Step 16: Place your necklace chain on your heart as shown.
Step 17: Re fold both top corners down and then tuck them into the pocket.
Note: the necklace chain will hold if you have folded the top corners on the right angle. If you want it to be more secure, you could add some tape or glue to hold the chain in place.
Step 18: Flip your heart over, completed paper heart necklace.
Tips For Success
- Use medium-weight paper for a sturdier heart that holds its shape.
- Pre-crease folds lightly for crisp edges.
- Personalize with colors, patterns, or small drawings to match your style.
- Adjust the string or chain length to wear as a choker or longer necklace.
Color, Paper Ideas, and Variations
- Red or pink paper for Valentine's Day
- Pastels for spring or Mother's Day
- Metallic or patterned paper for a beautiful, eye-catching look
Perfect Occasions to Use This Craft
- This paper heart necklace is a charming gift for Valentine's Day, perfect for friends, classmates, or loved ones.
- It makes a thoughtful and personalized accessory for Mother's Day.
- Create festive versions for Christmas or holiday parties.
- Use it as a birthday gift or party favor for children or teens.
- Handmade jewelry like this can also be a fun addition to classroom or craft group activities.
How To Use This Craft
- Wear your handmade paper heart necklace as a personal accessory, adding a unique, colorful touch to any outfit.
- Gift it to a friend or loved one as a thoughtful, creative present.
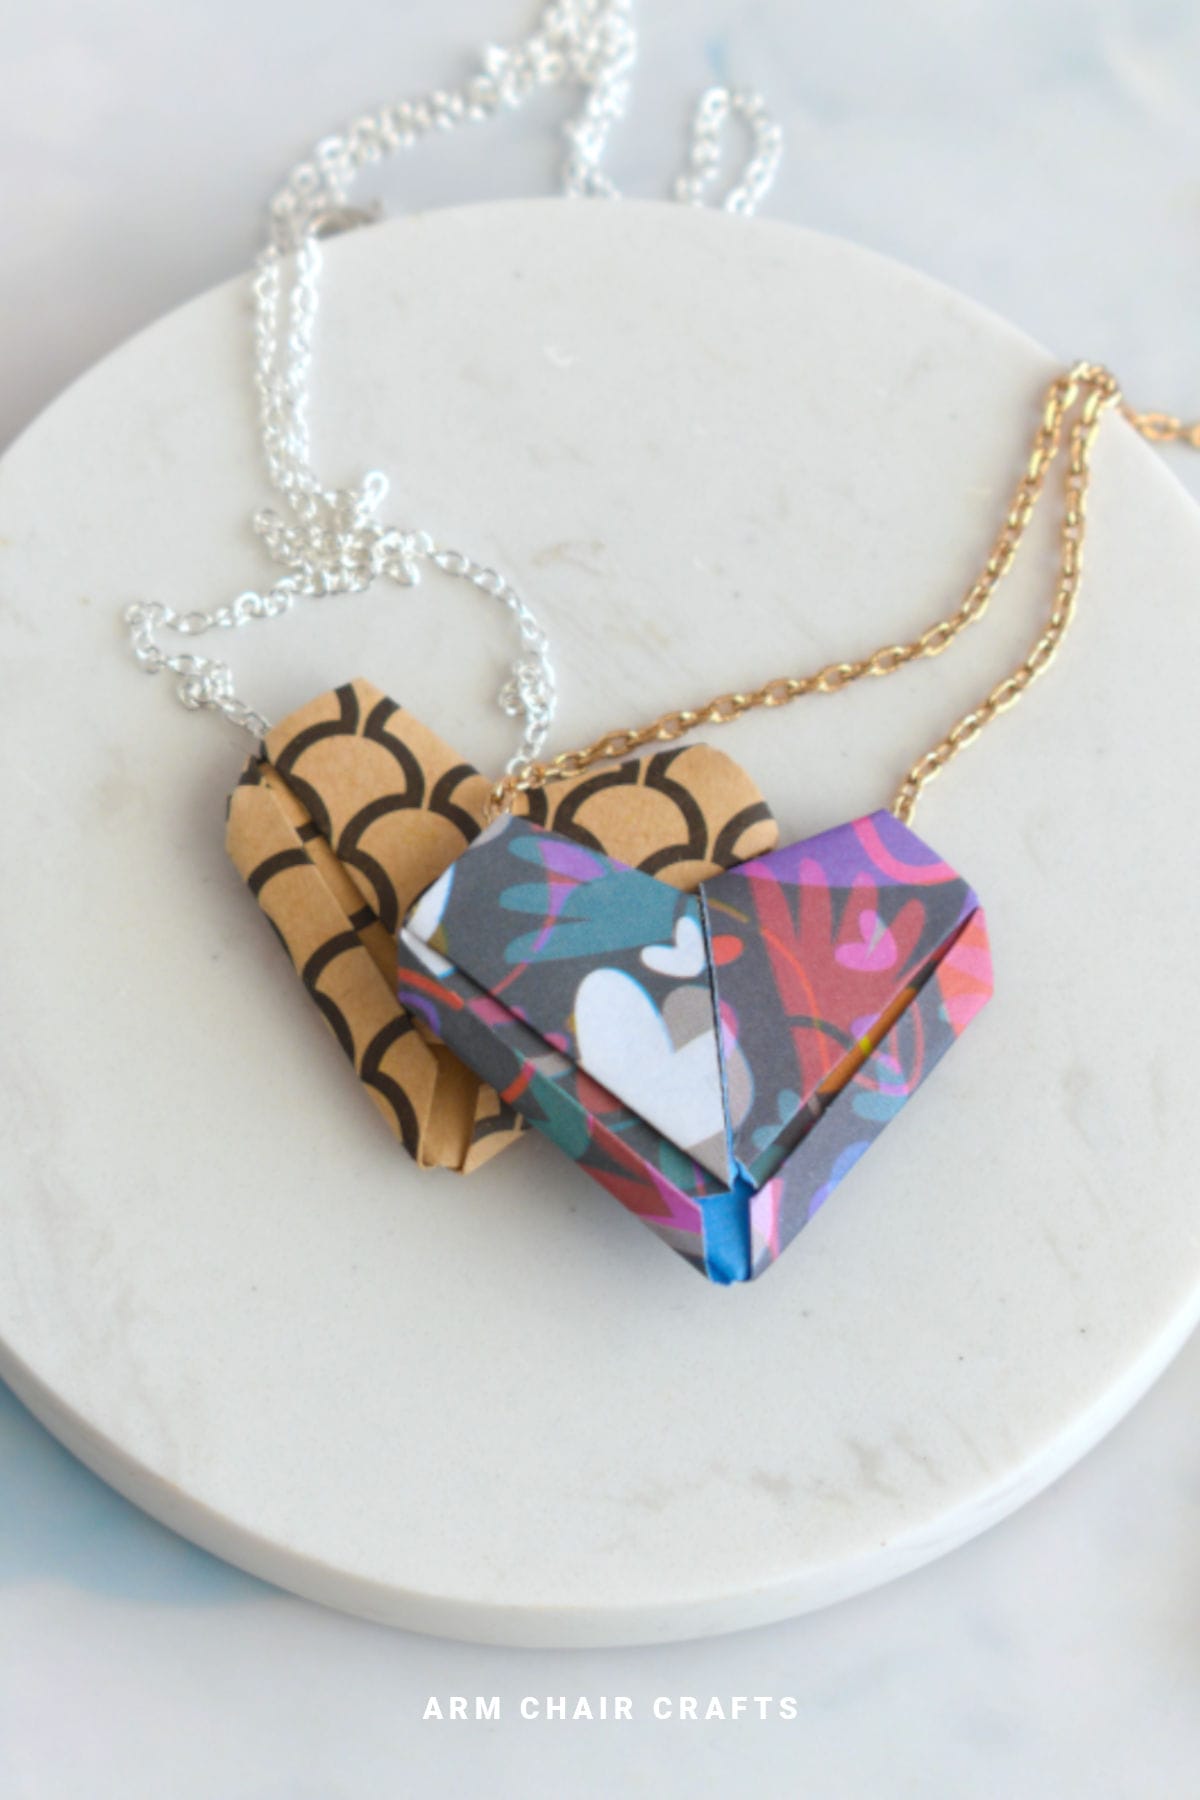
- Use multiple hearts to make layered or matching necklaces for parties, holidays, or special occasions.
- Incorporate it into classroom or craft group projects, teaching folding and jewelry assembly skills.
- Customize for themed events, like Valentine's Day, weddings, Mother's Day, or holiday celebrations, making it a versatile craft and party favor.
FAQ
Yes! This project is designed for beginners and teaches simple folding and assembly skills while creating a wearable accessory.
If you are new to origami, we recommend using a larger piece of paper (such as A4) first to get the hang of the folds.
Then, when you are ready, use the small sheet of paper to make your heart necklace charm.
Medium-weight paper or origami paper works best. Very thin paper may tear, and thick paper may be harder to fold neatly.
The necklace chain (or string) sits neatly behind the folds of the heart.
If you want your necklace to be more secure, you can add some tape or glue to secure the chain (or string) in place.
Absolutely! You can create several hearts to make layered necklaces, matching gift sets, or group craft projects.
Yes! Add colors, patterns, stickers, or small embellishments, but avoid heavy decorations that might weigh down the paper.
Other Easy Crafts You Might Like To Try:
Stay Connected
Made this pattern? Let us know how it went in the comments below!
Pin this post - Pin now to take your paper crafting skills to the next level.
Share on Instagram or Facebook - Capture the beauty of your finished paper craft project and share it on Instagram or Facebook! Tag us @armchaircrafts so we can see your work!